Prevent Notes, Calendar and Tasks from getting archived by using EWS script.
When you have a Default Policy tag (DPT) with move to archive in the policy, since by definition DPT process all the folders in the mailbox, it is going to process all the folder and archive any expired content in the mailbox. This is default behavior.
At times there could be a requirement to exclude some folder from being archived by DPT, Out of the box , there is no solution for this requirement. Most common perception to achieve this requirement is ;
- To create a disabled tag so that it will prevent content from that folder from being archived.
- To create a tag with higher retention age ,like 68 years (24855 days).
When you have a DPT with move to archive action , the above mentioned workarounds would not work.
Detailed explanation is documented in below blog ;
DPT with move to archive action takes precedence over RPT. Notes getting archived by Default Policy tag !!
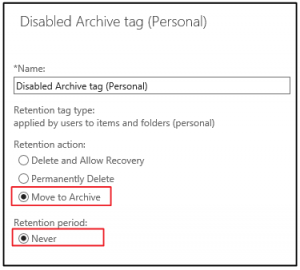
The only workaround available is to apply a disabled Personal tag with move to archive action to a folder, this tag will prevent content from being archived. This personal tag should look as below;
Once the Personal tag is created , the end user is required to apply this Personal tag to the required folder using Outlook or OWA.
For example : If I want that the emails in the Inbox folder should not archived, I need to apply this personal tag using Outlook as shown below;
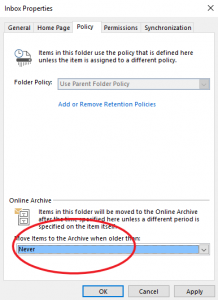
You can use OWA also to apply this personal tag to Inbox folder.
Default Notes, Calendar and Tasks folder.
For Notes folder, You can only use OWA to apply this personal tag, since on the Notes folder properties, the Policy tab is not available in Outlook
When it comes to default folders like Calendar and Tasks, we cannot use Outlook or even OWA to apply this personal tag.
In this case , the only workaround available is to use EWS script and apply the personal tag to Calendar and Tasks folder.
There are ready EWS scripts available publicly . I personally have been using below EWS script for Notes or Calendar or Tasks folder, and it does work perfectly fine.
The EWS script which can be used to apply a Personal tag to Calendar and Tasks folder is available in the below link;
Stamping Archive Policy Tag using EWS Managed API from PowerShell(Exchange 2010)
Again the above script needs modifications. Incorrectly apply any script can damage the properties on the folder, so I would strongly recommend to test any script in your lab or test mailboxes before implementing it on Production mailboxes.
This blogs is intended to guide you to configure a sample EWS script to apply a disabled Personal tag to Calendar or Tasks or Notes folder ,inorder to prevent content from these folders from being archived.
Prerequisites:
# Before we make any modification to the script, we would first we need to download and install the EWS API from the below link.
Microsoft Exchange Web Services Managed API 2.0
https://www.microsoft.com/en-in/download/details.aspx?id=35371
Note : You can download any version of EWS API. You just need to make a note of the installation directory as we need this path to be specified in the script.
# then we need create the disabled Personal tag with move to archive action as shown above. It should be noted that this personal tag created need to be added to the policy which is going to be applied to the users.
# Account used to execute the script needs to have the RBAC "Application Impersonation" right.
New-ManagementRoleAssignment "AssignmentName" -Role ApplicationImpersonation -User "username"
Note : Once the above permissions are assigned , recommend to close the powershell session and reopen a new powershell session to Office 365 for the changes to take effect.
# We need to connect the powershell to O365.
# Create a text file called "UserAccounts.txt" which has header "WindowsEmailAddress" and populated the WindowsEmailAddress of users against whom the script needs to be executed. Save this file to the same location where you would be saving the script.
WindowsEmailAddress
User1@Contoso.onmicrosoft.com
User2@Contoso.onmicrosoft.com
User3@Contoso.onmicrosoft.com
Once above prerequisites are met, we need to download the EWS script which is in the text format, make the required modifications and then save this text files as ps1 format.
Download the below TagIt.txt file and edit this file in Notepad and make the modifications shown below.
1)) Make sure the C drive on the workstation has a TEMP folder, This is where the script will create a log file, this location can be changed in the script by changing the below parameter.
[string]$LogFile = "C:\Temp\Log.txt"
2) Get the RetentionId of this Personal tag using below command.
Get-RetentionPolicyTag "TagName"| FT RetentionId
3) Search for "Import-Module" section in the script and add the installation path of EWS API.
Import-Module -Name "C:\Program Files\Microsoft\Exchange\Web Services\2.0\Microsoft.Exchange.WebServices.dll"
4) Search for "Set the Credentials" section in the script and specify the credential of user running the script who has Application Impersonation right, this is in format "Username","Password","Domain.
# Set the Credentials
$service.Credentials = new-object Microsoft.Exchange.WebServices.Data.WebCredentials("JohnDoe@Contoso.onmicrosoft.com","Password","Contoso.onmicrosoft.com")
5) Search for "$service.Url" section in the script and specify the EWS URL of Office 365. if you need to use this script for On-Premise mailbox, you need to specify your EWS URL accordingly.
# Change the URL to point to your cas server
$service.Url= new-object Uri("https://outlook.office365.com/EWS/Exchange.asmx")
6) Search for the "Change the GUID based on your policy tag" section in the script and past the RetentionId of the Personal tag .
#Change the GUID based on your policy tag
$ArchiveTagGUID = new-Object Guid("{ded867ea-bdf2-4f63-bfe1-a0e0171f181c}");
7)Search for "Change the name of the folder" section in the script and specify the folder name on which you want to apply the Personal tag.
#Change the name of the folder
$FolderName = "Notes";
$CreateFolderIfDoesNotExist = $false;
8) Once modification are saved to the txt file, rename the TagIt.txt to TagIt.ps1.
9) In the powershell,navigate to the folder where the TagIt.ps1 and UserAccounts.txt is copied and then execute the script.
.\TagIt
Its quite possible that before apply the Personal tag to required folder, the Managed folder assistant might process the mailbox, thus archiving the content, it would be better to set the mailbox on "Retention hold" until personal tag is applied to the required folder.
Note : This behavior of DPT archiving the content for all the folder is a default behavior, incase your requirement is use EWS script and tag some folders to prevent from being archived, You can write you own EWS script or use any publicly available EWS script which suits your requirement.
Note:
Script needs to be tested on test mailboxes, before applying on production mailboxes. Incorrect formatting the script would cause properties on the folder to get corrupted.
Hope this helps !!
Vikas