Azure Automation - Using JSON formatted tags to create a week schedule for virtual machine startup and shutdown with Azure Automation Runbooks
Hello Everyone,
UPDATE: this article got integrated into Azure Automation Documentation under Scenarios. It can be found here.
This blog post the the continuation or the practical usage demonstration on how to use JSON strings on tags described in this blog post here.
In order to maximize the ROI of Azure adoption and focus the budget on services/compute resources that brings value to the business it is important to rationalize compute resources usage, one way of doing that is by shutting down and deallocating virtual machines. We do have some options out of the box, like using Virtual Machine Scale Sets with Auto Scale Settings that will allow scale in or out and DevTest Labs service which have the built-in capability of scheduling startup and shutdown operations. The problem is that these options works on specific scenarios and cannot be applied to plain IaaS virtual machines.
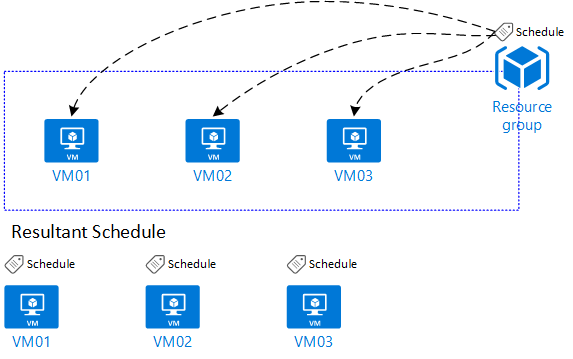
This solution presented here allows you to setup a tag called Schedule at Resource Group level or virtual machine level, this schedule is configured from Sunday to Saturday with startup time and shutdown time.
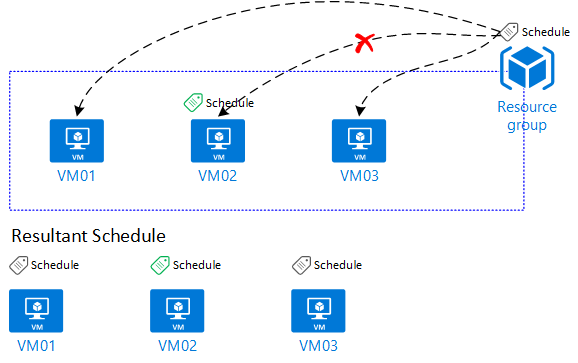
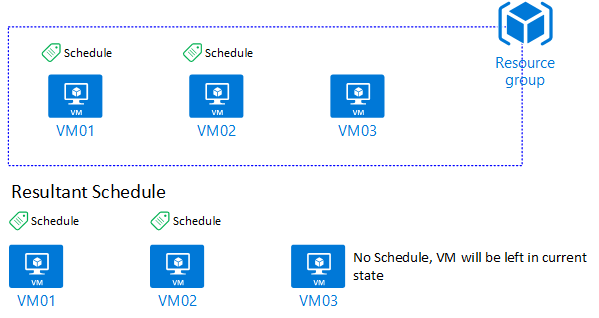
When the Schedule tag is applied to Resource Group level it will be applied to all virtual machines inside that Resource Group. If the schedule is also applied to a virtual machine directly, this last schedule will take precedence, follows the possible scenarios covered:
Schedule applied at Resource Group level
Schedule applied at Resource Group and Virtual Machine level
Schedule applied at Virtual Machine level only
This solution basically takes a JSON string with a specified format and add it as a the value for a tag called Schedule, then a Runbook lists all Resource Groups and Virtual Machines and identifies the schedules for each virtual machine based on the scenarios listed above, then it will loop over these virtual machines with schedules attached and check what action it should be taken, which can be stop, shutdown or nothing.
Schedule JSON format
 {
   "TzId": "Central Standard Time",
   "0": {
     "S": "11",
     "E": "17"
   },
   "1": {
     "S": "9",
     "E": "19"
   },
   "2": {
     "S": "9",
     "E": "19"
   },
   "3": {
     "S": "9",
     "E": "19"
   },
   "4": {
     "S": "9",
     "E": "19"
   },
   "5": {
     "S": "9",
     "E": "19"
   },
   "6": {
     "S": "11",
     "E": "17"
   }
 }
Important information about this structure
- The format of this JSON structure is optimized due to the 256 characters limitation of a single tag value in Azure
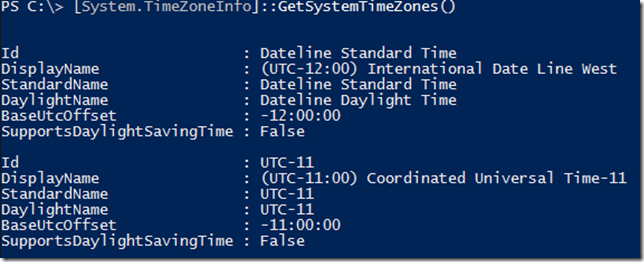
- TzId = Time Zone of the virtual machine
This ID can be obtained from the following command line executed from a PowerShell prompt
[System.TimeZoneInfo]::GetSystemTimeZones()
- Week days are represented from 0 to 6, Sunday starts at 0
- S is the attribute for the start time, notation is 24 hour format
- E is the attribute for end/shutdown time, notation is 24 hour format
- If S and E have 0 value, virtual machine will be left in the state as it is at the time of evaluation
- If you want to skip evaluation for a specific day of the week, just don’t add the section of related day of week, in the following example, only Monday will be evaluated, the other days of the week will be ignored.
 {
   "TzId": "Central Standard Time",
   "1": {
     "S": "11",
     "E": "17"
   }
 }
Before we move on with tagging Resource Groups or Virtual Machines, we need to setup an Azure Automation Account, Azure Automation is the heart of this solution that will keep monitoring the schedules and starting up or shutting down virtual machines as needed.
Setting up the solution
Download Runbooks
Download the Runbooks from this TechNet gallery link.
If you prefer, the Runboks are also published and source controlled from GitHub, which will detail all changes made to them like bug fixes.
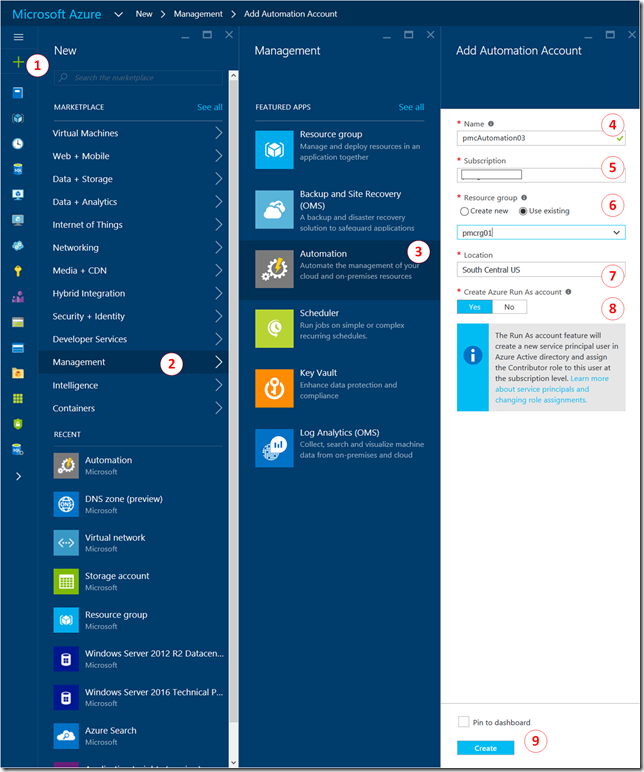
Creating Azure Automation Account
- Click New icon
- Click Management
- Click Automation
- Enter a name for your automation account
- Select subscription
- Create new or select an existing resource group for this new automation account
- Select location for it
- Make sure Create Azure Run As account is set to Yes
- Click Create
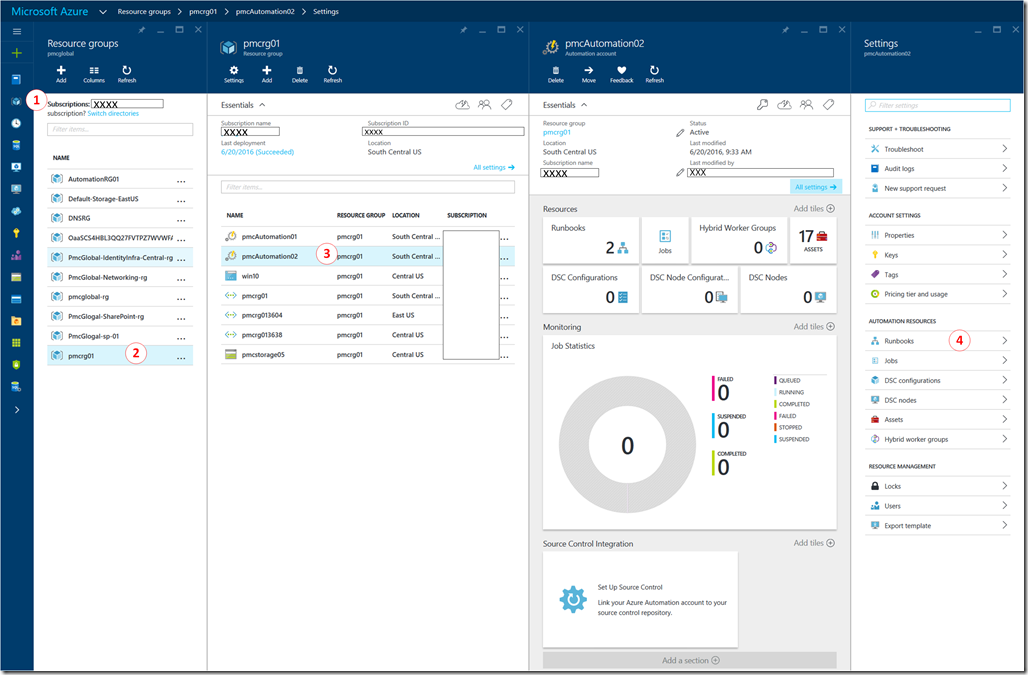
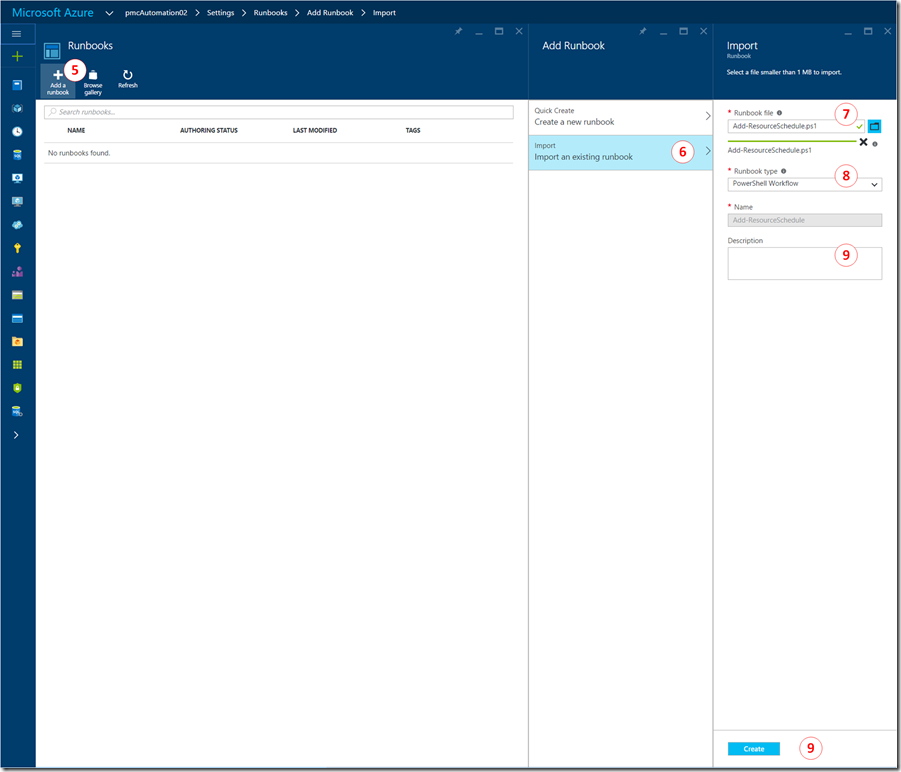
Importing necessary Runbooks
- Click Resource Groups icon
- Select the Resource Group where your automation account was created
- Select the Automation Account
- At Setting blade, click Runbooks
- Click Add
- Select Import
- Browse to the folder where you extracted the scripts.
- Optionally you can give a description
- Click Create
Repeat the above steps for all scripts, make sure you import the following:
- Add-ResourceSchedule.ps1
- Remove-ResourceSchedule.ps1
- Test-ResourceSchedule.ps1
- Update-ResourceSchedule.ps1
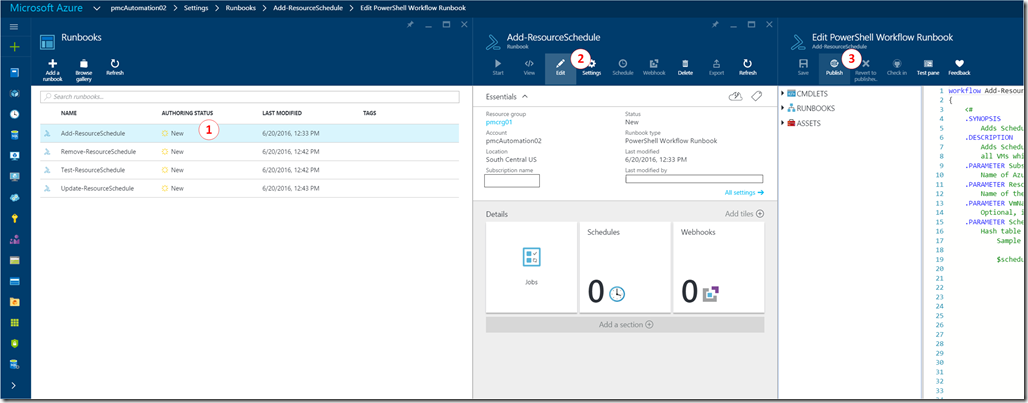
Publishing the Runbooks
When you import Runbooks to Azure Automation Account they are not ready and available yet, it is necessary to publish all of them. Below are the steps to follow in order to accomplish this task.
- Click the Runbook with New status
- Click Edit button
- Click Publish button
- Repeat steps 1 through 3 for all Runbooks
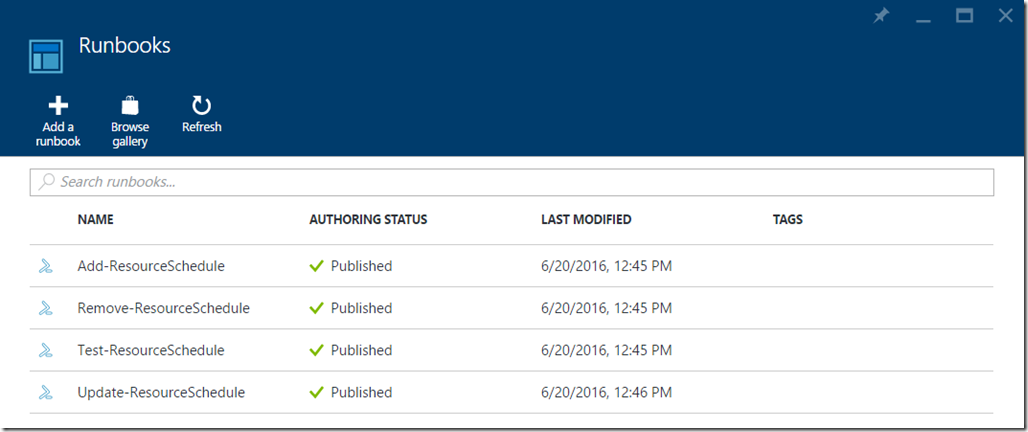
Make sure all related Runbooks gets the “Published” status
Adding a schedule to Test-ResourceSchedule
Last step on enabling the scheduled startup or shutdown routine for virtual machines or virtual machines inside a resource group is enabling the schedule to Test-ResourceSchedule runbook, as mentioned previously this is the Runbook that tests which virtual machine will be started, shutdown or leave as is.
Follow these steps in order to enable the Runbook scheduled execution:
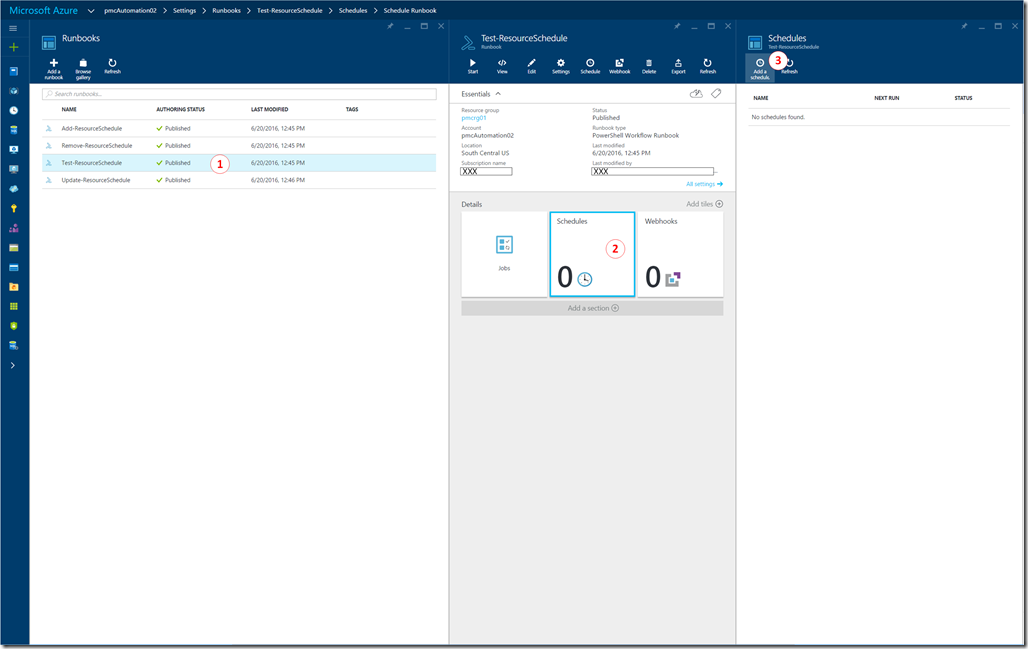
- Back to the Runbooks section of your Automation Account, click on Test-ResourceSchedule
- On Test-ResourceSchedule blade, click Schedules tile
- On Schedules blade, click Add a schedule
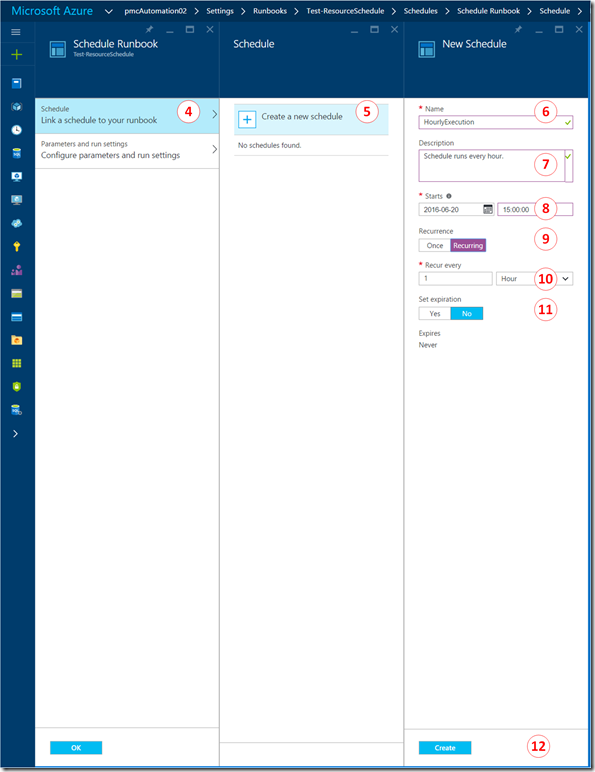
- Click on Schedule to link a new schedule
- Click Create a new schedule
- Type the name of this schedule, use a meaningful name, in this example, HourlyExecution
- Optionally, add a description.
- Set the rounded up to the hour schedule start time, startups and shutdowns will have a better fit in the schedule in this way
- Select Recurring
- At Recur every field, type 1 and select hour
- Make sure the expiration is set to No
- Click Create
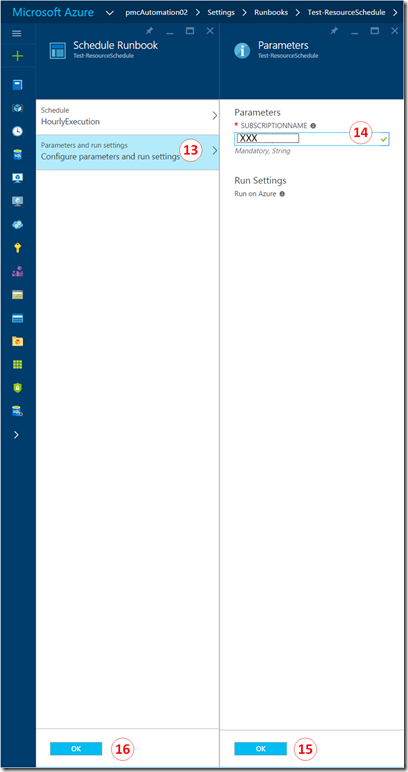
- Select Parameters and run settings at Schedule Runbook blade
- The only parameter required by this Runbook is SUBSCRIPTIONNAME, type the name of the subscription
- Click OK
- Click OK
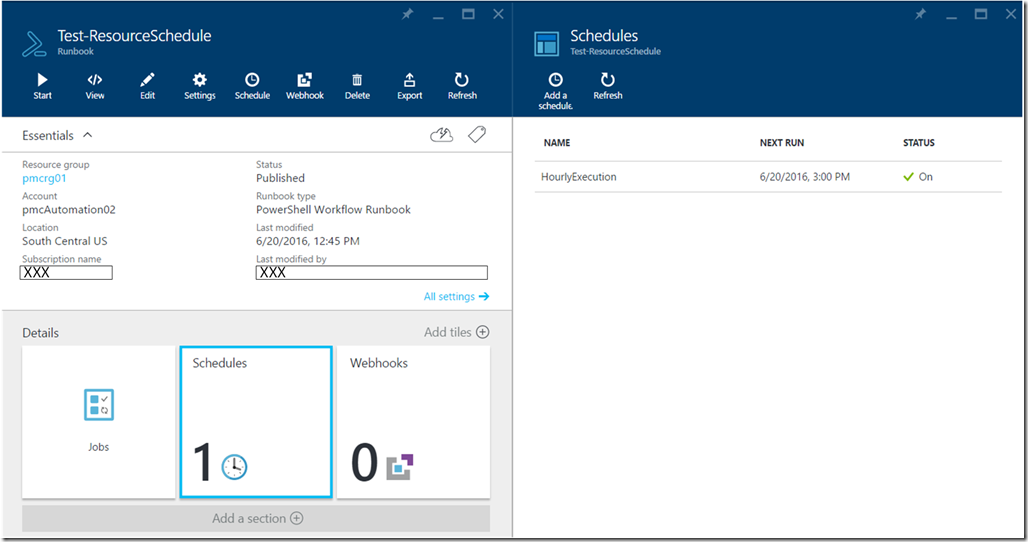
Make sure that your Runbook looks like this:
Description of each Runbook
This solution is comprised of 4 Runbooks, three of them are used to the tags (add/remove.update) and one performs the real action of shutting down and starting up virtual machines.
Schedule tag maintenance Runbooks
- Add-ResourceSchedule – Adds the Schedule tag to a Virtual Machine or Resource Group
- Update-ResourceSchedule – Modifies an existing Schedule tag by replacing it by a new one.
- Remove-ResourceSchedule – Removes Schedule tag from a Virtual Machine or Resource Group
Shutdown and Startup Runbook
- Test-ResourceSchedule – Checks each Virtual Machine’s schedule (built based on scenarios described earlier and performs shutdown or startup of Virtual Machines depending on the schedule.
Tagging Resource Groups or Virtual Machines
In order to shutdown Virtual Machines based on this schedule solution we need to tag them or the Resource Groups where they are located. Virtual Machines that does not have a Schedule tag are not evaluated therefore are not started nor shutdown. There are two ways to tag Resource Groups or Virtual Machines with this solution, directly from the portal or using the Add-ResourceSchedule Runbook.
Tagging from the Portal
Flatten the JSON string and don’t leave any spaces due to the 256 characters limitation, your JSON string should look like this
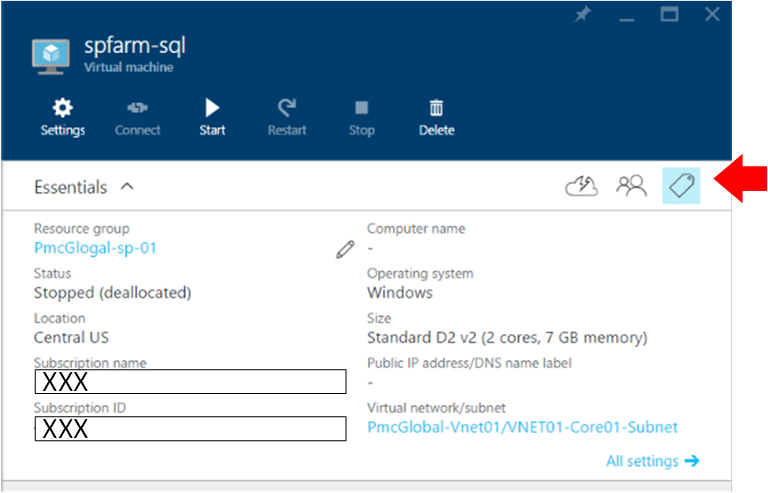
{"TzId":"Pacific Standard Time","0":{"S":"11","E":"17"},"1":{"S":"9","E":"19"},"2":{"S":"9","E":"19"},"3":{"S":"9","E":"19"},"4":{"S":"9","E":"19"},"5":{"S":"9","E":"19"},"6":{"S":"11","E":"17"}}Locate the Virtual Machine or Resource Group to apply this schedule and click on the Tag icon
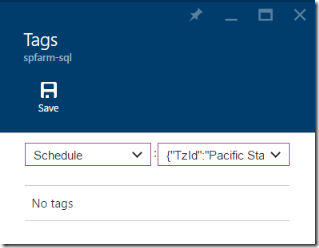
Type Schedule on Key combo box and paste the JSON string into Value combo box and click Save
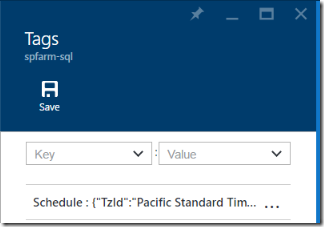
Your tag should look like this
Tagging using the imported Runbook Add-ScheduleResource or Update-ScheduleResource
All imported Runbooks contains help information at the beginning of the script, for example how to execute the Runbooks from PowerShell, the steps below are from this information.
Open a PowerShell command prompt and execute these steps to authenticate and select the subscription
 Add-AzureRmAccount
 Select-AzureRmSubscription -SubscriptionName <Your Subscription Name>
Define a schedule hash table
$schedule= @{ "TzId"="Central Standard Time"; "0"= @{"S"="11";"E"="17"};"1"= @{"S"="9";"E"="19"};"2"= @{"S"="9";"E"="19"};"3"= @{"S"="9";"E"="19"};"4"= @{"S"="9";"E"="19"};"5"= @{"S"="9";"E"="19"};"6"= @{"S"="11";"E"="17"}}Define the parameters required by the Azure Automation Runbook
$params = @{"SubscriptionName"="<Your Subscription Name>";"ResourceGroupName"="pmcrg01";"VmName"="pmcvm01";"Schedule"=$schedule}If you’re tagging a Resource Group, just remove the VMName parameter from the $params hash table as follows:
$params = @{"SubscriptionName"="<your subscription name>";"ResourceGroupName"="pmcrg01";"Schedule"=$schedule}Execute the Add-ResourceSchedule Runbook
Start-AzureRmAutomationRunbook -Name "Add-ResourceSchedule" -Parameters $params -AutomationAccountName "pmcAutomation01" -ResourceGroupName "rgAutomation"If you’re just updating a Resource Group or Virtual Machine tag you define the $params accordinggly (without VMName to apply to a Resource Group) and execute the following RunBook Instead:
Start-AzureRmAutomationRunbook -Name "Update-ResourceSchedule" -Parameters $params -AutomationAccountName "pmcAutomation01" -ResourceGroupName "rgAutomation"
Removing a tag using Remove-ResourceSchedule Runbook
Open a PowerShell command prompt and execute these steps to authenticate and select the subscription
 Add-AzureRmAccount
 Select-AzureRmSubscription -SubscriptionName <Your Subscription Name>
Define the parameters required by the Azure Automation Runbook
$params = @{"SubscriptionName"="<Your Subscription Name>";"ResourceGroupName"="pmcrg01";"VmName"="pmcvm01"}If you’re removing a tag from a Resource Group, just remove the VMName parameter from the $params hash table as follows:
$params = @{"SubscriptionName"="<your subscription name>";"ResourceGroupName"="pmcrg01"}Execute the Remove-ResourceSchedule Runbook
Start-AzureRmAutomationRunbook -Name "Remove-ResourceSchedule" -Parameters $params -AutomationAccountName "pmcAutomation01" -ResourceGroupName "rgAutomation"If you’re just updating a Resource Group or Virtual Machine tag you define the $params accordinggly (without VMName to apply to a Resource Group) and execute the following RunBook Instead:
Start-AzureRmAutomationRunbook -Name "Update-ResourceSchedule" -Parameters $params -AutomationAccountName "pmcAutomation01" -ResourceGroupName "rgAutomation"
Notice: The way that these Runbooks are managing the tags will soon be changed according to this link on GitHub. Also, it is very important to keep monitoring these runbooks (and the virtual machine state) to guarantee that your virtual machines are being shutdown and started accordingly.
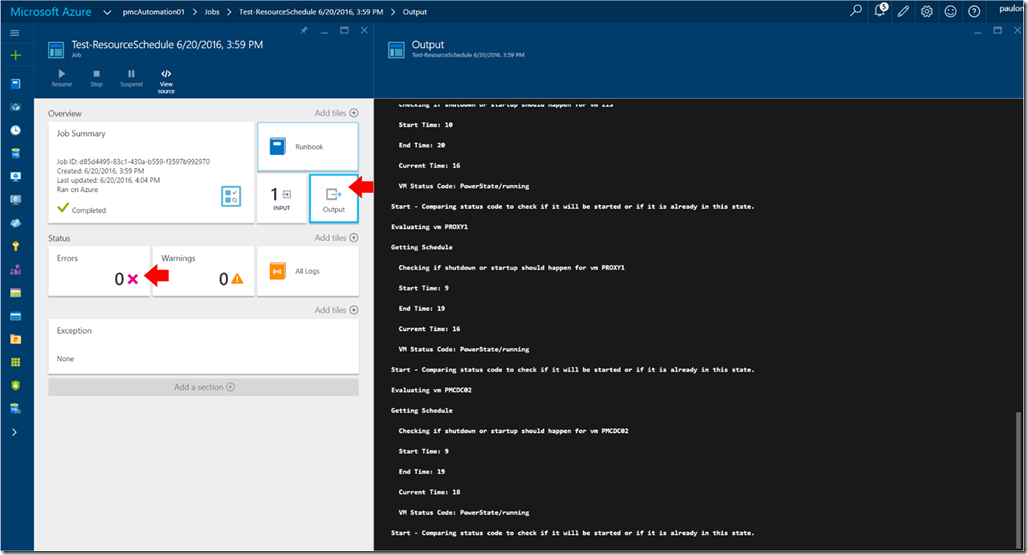
In order to check for any output error, select your Runbook and click either Output tile or Errors, the following screenshot shows the Output tile result:
Very important
Before applying this in any production environment, make sure you perform thorough testing and read and understand the Runbooks involved.
We highly recommend that you proactively monitor these runbooks (and the virtual machine states) to verify that your virtual machines are being shut down and started accordingly. Below is an example on how to get error information from runbook execution:
 $job = Get-AzureRmAutomationJob  -ResourceGroupName pmcrg01 -AutomationAccountName pmcautomation01

 Get-AzureRmAutomationJobOutput -Id $job[16].jobid -ResourceGroupName $job[16].ResourceGroupName -Stream Error -AutomationAccountName $job[16].AutomationAccountName

 ResourceGroupName     : pmcrg01
 AutomationAccountName : pmcautomation01
 JobId                 : 8e30a784-b184-40bb-9ada-275d90fa77c2
 StreamRecordId        : 8e30a784-b184-40bb-9ada-275d90fa77c2_00636021506104930169_00000000000000000082
 Time                  : 6/21/2016 5:03:30 PM -07:00
 Summary               : No certificate was found in the certificate store with thumbprint 9C17F05AB143C8...
 Type                  : Error

 ResourceGroupName     : pmcrg01
 AutomationAccountName : pmcautomation01
 JobId                 : 8e30a784-b184-40bb-9ada-275d90fa77c2
 StreamRecordId        : 8e30a784-b184-40bb-9ada-275d90fa77c2_00636021506111230423_00000000000000000085
 Time                  : 6/21/2016 5:03:31 PM -07:00
 Summary               : Run Login-AzureRmAccount to login.
 Type                  : Error

 ResourceGroupName     : pmcrg01
 AutomationAccountName : pmcautomation01
 JobId                 : 8e30a784-b184-40bb-9ada-275d90fa77c2
 StreamRecordId        : 8e30a784-b184-40bb-9ada-275d90fa77c2_00636021506203691051_00000000000000000092
 Time                  : 6/21/2016 5:03:40 PM -07:00
 Summary               : Run Login-AzureRmAccount to login.
 Type                  : Error
A big thanks to Chris Nadler for his time helping me test and build this post.
This is it for this post.
