
Manage your SharePoint Online tenant with PowerShell
Summary: Learn how to manage your SharePoint Online tenant installation by using Windows PowerShell cmdlets.
Christopher Weaver is a Microsoft Premier Field Engineer (PFE) who focuses on SharePoint and Office 365 solutions for large enterprise Premier customers. He has been doing PowerShell and SharePoint with Microsoft for nine years. In his spare time, he enjoys backpacking, hiking, kite surfing, and spending time with his kids and dog. You can follow him on his blog at https://blogs.technet.microsoft.com/christwe/.
Hello All,
Continuing with the topic of how to use PowerShell to migrate a site collection from your on-premises farm to Office 365, I’m going to write today about how to manage your tenant.
In my previous article, Get Started with PowerShell and SharePoint Online, I walked you through how to connect to SharePoint Online. Now that you have imported the correct module and connected to your service, we can start to really have fun.
When I talk about managing your tenant, I mean specifically your SharePoint tenant, which holds your site collections and other SharePoint objects. You will be managing organizational settings at this level. To manage the tenant, you need to be a Global Administrator. There are several cmdlets that we will look at today:
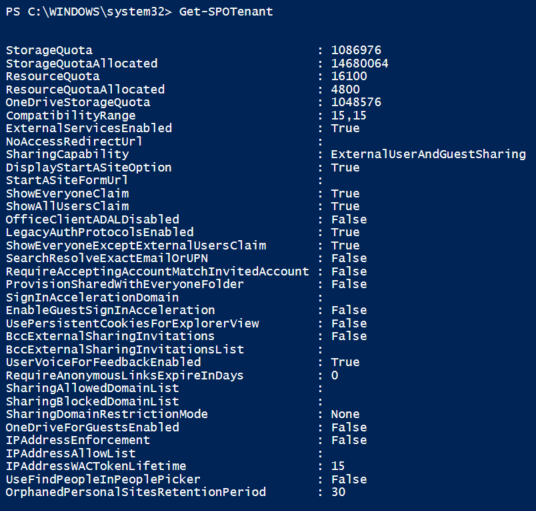
Get-SPOTenant: Returns many organizational properties like quota, and SiteCreationMode. You could say it’s a way to get to know your tenant. Incidentally, all properties are read only when you use this cmdlet.
Set-SPOTenant: Sets different organizational settings like external sharing settings and max/min site compatibility level. This cmdlet has no required parameters, all parameters are named, and the cmdlet does not accept bind for any parameters.
![]()
Get-SPOTenantLogEntry: Retrieves unified logging system (ULS) style logs for all actions by external systems. You can filter on date, Correlation ID, or max number of rows.
Get-SPOTenantLogLastAvailableTimeInUtc: Provides date of last log in UTC. The name says it all. This cmdlet exists to help you use Get-SPOTenantLogEntry.

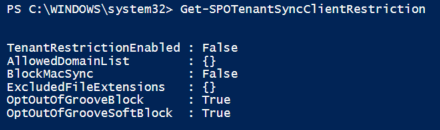
Get-SPOTenantSyncClientRestriction: Enumerates the options for synching between OneDrive for Business client and the app.
Set-SPOTenantSyncClientRestriction: Sets how OneDrive for Business client syncs. You can set a safe list based on domain, block Mac from synching, and block old sync client versions from connecting
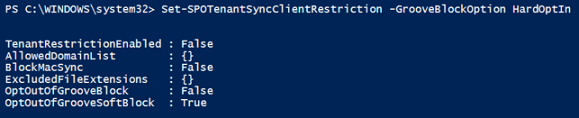
Note: Changes will take anywhere from one hour to 24 hours to be reflected in your tenant.
Remove-SPOTenantSyncClientRestriction: Sets restrictions back to false. However, it does not clear the value for AllowedDomainList.
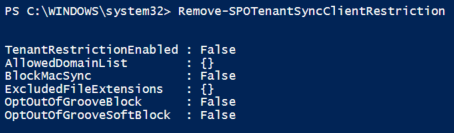
Note: Change will take up to 24 hours to be reflected in your tenant.
The Set-SPOTenant cmdlet is the one that most people will use because you can use it to set a ton of interesting settings like BccExternalSharingInvitations/BccExternalSharingInvitationsList, ExternalServicesEnabled, or SharingCapability to name only a few.
Because the purpose of this blog post is to prepare us to migrate our on-premises site collections to the cloud, we should focus on those properties that will affect a migration. And, for our purposes, we will look at site creation properties.
MaxCompatibilityLevel/MinCompatibilityLevel: These properties set the upper and lower compatibility levels for new sites. When you set this, you will have to wait up to 24 hours to see the change on your sites.
![]()
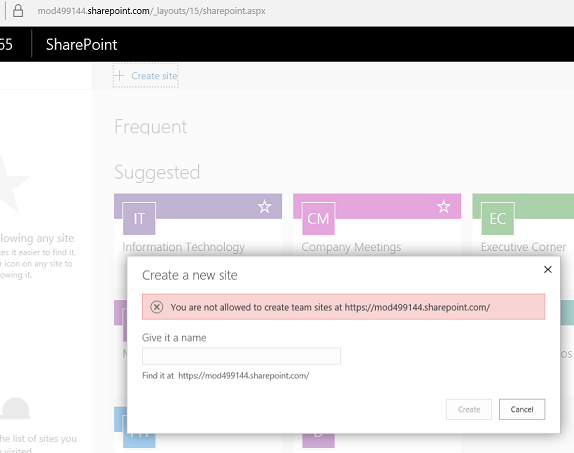
DisplayStartASiteOption/StartASiteFormUrl: These properties control whether users can create new sites for themselves and the form that they use to create those sites. This can be a great time saver but you have to monitor the sprawl of sites. Users might create sites, determine that they are not happy with them, and abandon them to create another. By default, we do not enable the StartASite option.
ShowAllUsersClaim/ShowEveryoneClaim/ShowEveryoneExceptExternalUsersClaim: You set these properties to True or False This will determine whether you can find the corresponding claim in the People Picker. If you want to hide everyone in a group in People Picker, run the following command:
Set-SPOTenant -ShowEveryoneClaim $False
UsePersistentCookiesForExplorerView: To be able to use Explorer view to manage files and folders in a library, the client has to be using a persistent cookie. If you set this property, a user who uses Explorer view to connect to a machine that’s private will be prompted and then will download the appropriate cookie.
In the next article, we will look at the cmdlets that you use in the SPO module to create, delete, and configure site collections as we prepare for our migration.
I invite you to follow me on Twitter and Facebook. If you have any questions, send email to me at scripter@microsoft.com, or post your questions on the Official Scripting Guys Forum. Also check out my Microsoft Operations Management Suite Blog. See you tomorrow. Until then, peace.
Ed Wilson, Microsoft Scripting Guy
 Light
Light Dark
Dark
0 comments