Step by Step - Configuring the Host Guardian Service in Windows Server 2016
For the most up-to-date installation instructions, check out our official documentation at https://aka.ms/ShieldedVMs
[This post is authored by Amitabh Tamhane, Senior Program Manager and Ryan Puffer, Program Manager for the Windows Server Product Team]
The “Host Guardian Service” (HGS) is a new server role introduced in Windows Server 2016. HGS provides Attestation and Key Protection services that enable Hyper-V to run Shielded virtual machines. A Hyper-V host is known as a “guarded host” once the Attestation service affirmatively validates its identity & configuration. Once affirmatively attested, the Key Protection service provides the transport key (TK) needed to unlock & run Shielded VMs.
Shielded VMs protect VM data and state by supporting a virtual TPM (vTPM) device which allows BitLocker encryption of the VM’s disks. This vTPM device is encrypted with a transport key. HGS is a security critical component that protects the TK. In addition, there are significant security enhancements made across multiple components (including Hyper-V) that raise the security assurance levels for Shielded VMs. For more details on terms like Shielded VMs, guarded fabric, guarded hosts, etc. click here.
The purpose of this blog is to walk-through the default configuration steps for the Host Guardian Service role and the corresponding Hyper-V support components. For advanced scenarios and more information on the guarded fabric topology, consult the guarded fabric deployment guide.
1. Installing Host Guardian Service (HGS) Role
On a machine running Windows Server 2016, install the Host Guardian Service role using Server Manager or Windows PowerShell. As a security best practice, it is recommended that you use a dedicated physical machine running the Server Core installation option for HGS.
Using Server Manager: 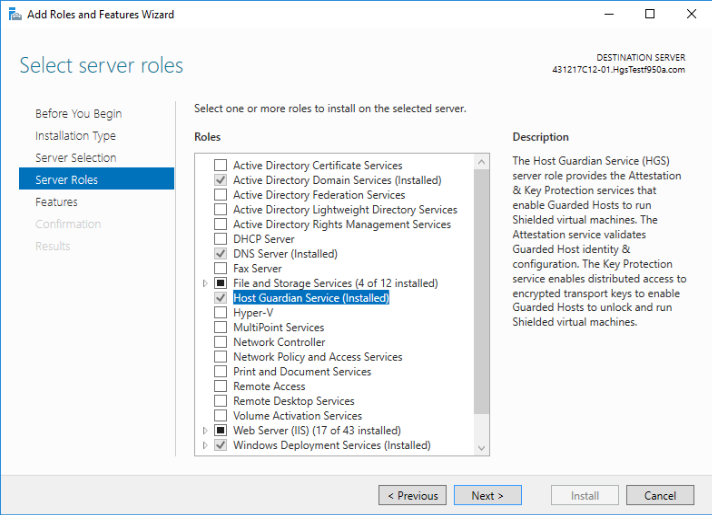
Using PowerShell: 
2. Configuring HGS Server
After installing the HGS role, you still need to configure the role to make it a fully functional HGS server. All management of HGS is done through Windows PowerShell.
Note: This blog assumes the default installation mode for HGS where a new Active Directory forest will be created specifically for the Host Guardian Service. If you wish to instead join HGS to an existing, highly trusted Active Directory domain, please consult the guarded fabric deployment guide for the extra configuration steps you must take.
2.1. Install-HgsServer
The first step is set up the dedicated Active Directory forest for the HGS servers. Each node in the HGS cluster is a domain controller for this private domain. Ensure the HGS server is not already joined to a domain before running this command.

After the machine restarts, it will be the primary domain controller for the newly created domain. Log into the server with your administrator account to continue the HGS setup process.
2.2. Initialize-HgsServer
With the domain set up, it is now time to configure the HGS cluster and web services for Key Protection and Attestation. You will need 2 certificates (1 for signing, 1 for encryption) in order to complete this step. 
“HgsServiceName” will be used to register the cluster service name with the local DNS server. In the above example, the service name is “HGS”, so the FQDN of the service will be “HGS.DomainName.com” (refer to the domain name specified in the Install-HgsServer).
The “TrustTpm” parameter specifies the Attestation service operation mode. For TPM-trusted fabrics, use “-TrustTpm”. If your host machines do not meet the hardware requirements for TPM attestation, you can configure HGS to use AD attestation with the “-TrustActiveDirectory” parameter.
The last 4 parameters are for specifying the signing and encryption certificates, where the certificates are provided as references to password-protected PFX files that contain the public and private keys of each certificate. These certificates are used by the Key Protection Service in HGS to decrypt keys of shielded VMs. Owners of shielded VMs use the public keys to authorize a fabric to run their VMs.
If you are setting up HGS in your test lab, you can use self-signed certificates to get started quickly. To generate self-signed certificates and export them to PFX files, use the New-SelfSignedCertificate and Export-PfxCertificate cmdlets.
When using HSM backed certificates or non-exportable certificates from your PKI, you will specify the thumbprint of the certificate instead of a PFX file and password when running Initialize-HgsServer. The guarded fabric deployment guide explains the extra steps you need to take when using PKI-issued or HSM-backed certificates.
2.3. Validate your configuration
Once the primary HGS Server is configured, you can run the HGS diagnostics to ensure everything is set up correctly. In PowerShell, run the following command to check if there are any additional steps you need to take. 
3. Authorizing guarded hosts
Before a Hyper-V host can run shielded VMs, HGS must be configured with attestation policies which are used to determine if the host is “healthy” and allowed to request keys for shielded VMs.
3.1. TPM-trusted attestation
For TPM-trusted attestation, a guarded host’s TPM 2.0’s Endorsement Key (EK) needs to be retrieved and added to the list of authorized hosts in HGS.
On each host, use the Get-PlatformIdentifier cmdlet to generate an XML file containing the EKpub and EKcert. 
Copy this file to your HGS server and use the Add-HgsAttestationTpmHost cmdlet to authorize the guarded host with the attestation service: 
3.2 AD-trusted attestation
For Admin-trusted attestation, the guarded host is expected to be part of an Active Directory security group. Use the Add-HgsAttestationHostGroup to authorize the Active Directory group’s SID with the Attestation service: 
Note: For AD-trusted attestation, you also need to establish one-way trust between the fabric Active Directory domain and the HGS domain. Consult the deployment guide for instructions on how to set up this trust.
4. Configuring Policies (TPM-trusted attestation only)
For TPM-trusted attestation, the guarded host’s software integrity is also verified. You need to configure baseline policies with the attestation service to establish one or more authorized (known good) host configurations.
Note: For AD-trusted attestation, the guarded host’s configuration is not verified. Hence, the steps below are not required for AD-trusted attestation.
4.1. Add-HgsAttestationCIPolicy
On a reference host (sometimes called a golden image) that is completely configured with all software agents and features installed, run the New-CIPolicy cmdlet to generate a code integrity policy. This policy will be applied to every machine with the same configuration, and is used to prevent unauthorized software from running on the host. You will need to create a CI policy once for each unique hardware/software configuration in your datacenter. Consult the deployment guide for detailed instructions on the CI policy cmdlets.
Once generated, you’ll have a code integrity policy stored in a binary file with a .p7b extension. Copy this file to your HGS server and add it to the attestation service: 
4.2. Get-HgsAttestationBaselinePolicy
Next, for each unique hardware configuration in your datacenter you need to collect a TPM baseline policy. This file will contain information about the UEFI boot sequence up to the point where control of the system is handed off to the Windows boot loader. It is validated by HGS to ensure the system did not try to load unauthorized code such as a rootkit before Windows was loaded.
To capture a TPM baseline policy, run the following command on a reference host: 
Copy the file to your HGS server and register it with the attestation service:

5. Configure HGS Client
The final step is to configure each guarded host to attest with and request keys from your HGS servers. You can find the two URLs to use here by running Get-HgsServer on the HGS server. Run the following command on each guarded host: 
This command will trigger an attestation attempt with the server and show you its result. If “IsHostGuarded” is not true, check the attestation status and substatus for indications as to why your host did not pass attestation with HGS.
6. Conclusion
Now that the HGS attestation service has been configured with information about the trusted hosts and their trusted configurations in your datacenter, you are ready to create your first shielded VM. Check out this blog post or the deployment guide for information about creating a shielded VM.