Migrating an on-premise database from SQL Server to SQL Azure using SSIS
In this blog I will demonstrate moving an on-premise SQL Server database to SQL Azure using SSIS.
I will perform the tasks mentioned below:
- Provision the Destination SQL Azure Database
- Generate a DDL Script of the SQL Server Source Database
- Execute the DDL Script against SQL Azure Destination Database
- Use SSIS to export the on-premise SQL database data to SQL Azure database
It is recommended to disable Foreign Key Constraints in the destination SQL Azure database as it is easier to load data by removing the need to do it in a specific order to avoid violating foreign key constraints.
You may also want to disable any Non-clustered Indexes in the destination SQL Azure database as it improves performance of loading data by avoiding incremental index rebuilds during the loading process.
Since I am using a simple table for demonstrating on how to migrate data using SSIS, I do not have any Foreign Key Constraints and Non-clustered indexes.
You must make sure that your on-premise SQL database has a clustered index which is required by SQL Azure and does not have any XML Schema Collection which is not supported by SQL Azure.
Task 1: Provision the Destination SQL Azure Database
We Logon to the Windows Azure Management Portal by going to the site https://windows.azure.com/ . We click on the Database link on the left pane as shown in the figure below. Then we click on the Subscription and then select the SQL Server instance as shown in the figure below.

From the ribbon menu we click on Create as shown in the figure below.
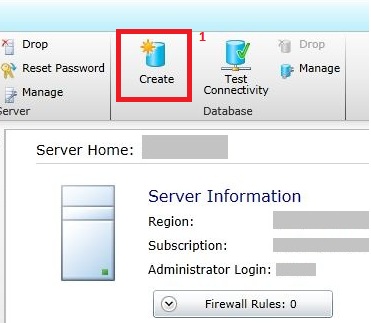
You will be asked to enter information about your new SQL Azure database. In my case I entered the information shown in the Figure below and clicked on OK.

We click on the Firewall Rules button. We check the “Allow other Windows Azure services to access this server” option. This will allow other services running in the Azure Services environment to interoperate with your SQL
Azure server. See Figure below.

Now we click on the Add button to add a Firewall rule to grant access to the IP addresses we will use to connect to SQL Azure. In my case I will allow all IP addresses for simplicity. You should grant access only to the IP
addresses you actually need to avoid unauthorized usage. Please see the Figure below.

Thus Task 1 of provisioning a SQL Azure database is complete.
Task 2: Generate a Data Definition Language (DDL) Script
In this task we will generate a DDL Script to recreate all the objects in my source database.
We open SQL Server Management Studio, connect to the SQL Server Instance where we have installed the source database (in my case it is Products). I then select the Products database, right click on it, click on Tasks
and then click on Generate Scripts. Please see the Figure below.

On Generate and Publish Scripts dialog box, when the Introduction section appears click next as shown below.

In the Choose Objects section, we choose “Select specific database objects”. Check the Tables option, select the tables and click the Next button shown below.

In the Set Scripting Options dialog, we click the Advanced button as shown below.

In the General section, we set the "Script for the database engine type” option to “SQL Azure Database” and in the Table/View Options section set the “Script Indexes” option to True. We then Click on OK. See the Figure below.

In the Set Scripting Options section, we select the Output Type to “Save scripts to a specific location” , and select the “Save to new query window” option, then we click the Next button as shown below.

In the Summary section we review the information and click next as shown below.

On the Save or Publish Scripts section we review the information and then click Finish as shown below.

After we click the finish button the DDL script is generated in the SQL Server Management Studio.
We review the script. Now we are ready to execute the DDL Script against the SQL Azure destination database.
Task 3: Execute the DDL Script against SQL Azure Destination database.
We go to the DDL Script generated in the SQL Server Management Studio. We right click on the query window, select Connection and then click on Change Connection as shown in the Figure below.

Now we will see the Connect to Database Engine Dialog Box as shown below. We enter our credentials and click on Connect button to connect to the SQL Azure Server Instance. To connect to a SQL Azure instance we use SQL Server Authentication mode See the Figure below.
 io
io
Also, we use the Object Explorer to Connect to your SQL Azure database instance. We will be prompted to enter your credentials again as shown the figure above.
I will now change the active database to Products so the script is executed correctly against the Products database. Please see the figure below.

Now execute the script by clicking on the Execute button or Pressing F5.
Now I will expand the Products database node and then the Tables node. I will then check the CricketBats table to see if it has all the columns that are available in the on-premise SQL Server instance as shown below.

Now that we have our table object ready I will create a SSIS package to transfer data between the CricketBats table from the on-premise SQL Server database to the CricketBats tablein the SQL Azure database.
Task 4: Create SSIS package to export data to SQL Azure database
On our machine we go to Start-> All Programs-> SQL Server 2008 R2 and then open the Business Intelligence Development Studio as shown in the Figure below.

Once we have the Business Intelligence Development Studio open, we click on File -> New -> Project as shown in the Figure below.

We will now see the New Project dialog box. I will select Business Intelligence Projects from Project types. Then I will select the Integration Services Project template as shown in the Figure below and name it ExportDataToSQLAzure. I will also select the Create directory for the solution option. The project will be saved in the default Documents\Visual Studio 2008\projects folder.

Once we click OK button the Package.dtsx file will be opened and the Control Flow tab will be selected as shown in the Figure below.

We click on the Toolbox to expand it and under Control Flow Items select the Data Flow Task and drag in onto the designer surface as shown in the next two Figures below.


We Right click the Data Flow Task and select Edit as shown below.
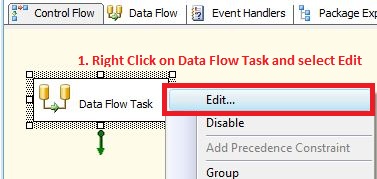
When we click Edit as shown above we will be presented with the Data Flow tab as shown below.

To connect to the on-premise local SQL Server Database we will use an OLE DB Source from the Data Flow Sources section in the Toolbox. We click on Toolbox to expand it, under Data Flow Sources select OLE DB Source and drag it onto the designer surface.

When the OLE DB Source is displayed on the designer surface, right click on it and click Edit as shown below.

Now we will create a new connection using the OLE DB Source. When we click on Edit as shown above, we are presented with the OLE DB Source Editor dialog box. The Connection Manager section is selected by default.
In order to create a new source connection we click the New button as shown below.

We are then presented with the Configure OLE DB Connection Manager Dialog box as shown below. Click on the New button as shown in the Figure below.

We are then presented with the Connection Manager dialog box. We click on the Refresh button, select the Server Name from the drop down list, use Windows Authentication in my case, select the database name from the drop down list, test the connection to make sure it is successful and then click OK. Please see the figure below.

We are presented the Configure OLE DB Connection Manager Dialog box which has the connection we just created displayed. Click on OK as shown in the Figure below.

We are now taken back to the OLE DB Source Editor dialog box. We select Table or View from the Data Access Mode drop down list. We select the CricketBats table from the Name of the table or the view drop down list. Now we click the OK button.

We now have our OLE DB connection source setup.
To connect to the SQL Azure destination database we will use an ADO NET Destination from Data Flow Destinations in the Toolbox. Click on Toolbox to expand it, under Data Flow Destinations select ADO NET Destination and drag it onto the designer surface as shown in the next two Figures below.


To create a connection between source and destination we drag the green output of OLE DB Source and connect it to the ADO NET Destination as shown in the Figure below.

Now we will create a connection to the SQL Azure database. We Right Click the ADO NET Destination and click on Edit as shown below.

We are presented with the ADO.NET Destination Editor dialog box as shown in the Figure below. The Connection Manager section is selected by default. In order to create a new source connection we click the New button as shown below.

We are then presented with the Configure ADO.NET Connection Manager Dialog box as shown below. Click on the New button as shown in the Figure below.

We are now presented with the Connection Manager dialog box. We enter the SQL Azure server instance in the Server Name drop down field. Under Log on to the server section, we select Use SQL Server Authentication; enter the User name and Password.
In the Connect to a database name section, we enter Products as the database name under the Select or enter database name drop down list. We test the connection to make sure it is successful and then click OK. Please see the figure below.

We are presented the Configure ADO.NET Connection Manager Dialog box which has the connection we just created displayed. Click on OK as shown in the Figure below.

We are now presented with the ADO.NET Destination Editor dialog box. In the Connection Manager section under the Use a table or View drop down list we select dbo.CricketBats table as the destination table.

In the ADO.NET Destination Editor dialog box select Mappings to check the column mappings. No changes are required here. Click on OK as shown in the Figure below.

Now we are presented to the Data Flow designer surface again. Click the Error List tab at the bottom left hand corner to check for any errors. See Figure below.

Click on Start Debugging button on the Standard Toolbar to run the SSIS Package as shown in the Figure below.

As you can see from the Figure below the SSIS package ran successfully.

Now we go to the SQL Server Management Studio. We select the Products table under the SQL Azure Server instance and retrieve the data from the dbo.CricketBats table as shown in the Figure below.

We have successfully migrated data from the on-premise SQL Server database to a SQL Azure database.
Refrences: https://msdn.microsoft.com/en-us/gg282151