Configuring IAG Network Connector for Full SSL VPN Access – Part 1 of 2
1. Introduction
Without a doubt one of the most powerful features that IAG 2007 has is the capability to allow full VPN access using a pure SSL connection. This feature is not available on ISA Server and the only other product that Microsoft has to enable this technology is the SSL VPN that comes with Windows Server 2008. If you want to learn more about the implementation of SSL VPN on Windows Server 2008, read the following article that my friend Tom Shinder recently published on ISAServer.org. The article is called Publishing a Windows Server 2008 SSL VPN Server Using ISA 2006 Firewalls.
The part 1 of my post will show how to configure IAG Network Connector on the server side. The part 2 will show how to establish the connection from outside and some troubleshooting tips.
2. Configuring Network Connector Server
The follow steps assume that you already have a trunk created to be used as your Portal entry point. The whole idea is to create a link on the Portal so the client can use to fully access the internal network.
1. Open the IAG Console, highlight the Portal , click in Admin and then click in Network Connector Server.
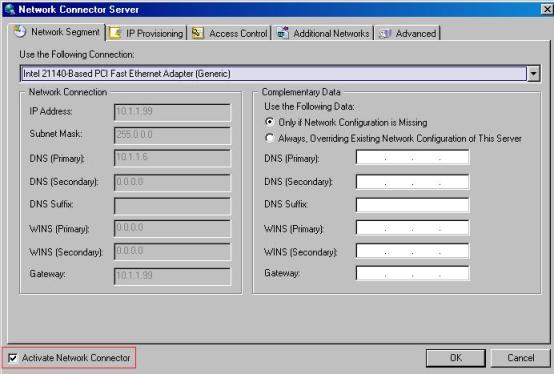
Figure 1 – Network Connector Server
Note: for the purpose of this demonstration, the external IP address of the IAG Server is a non-valid Internet IP Address (192.168.0.70).
2. After select this checkbox, the options on this window will be available. Click in the option Use the Following Connection and select the internal network adapter. If you leave the option Only if Network Configuration is Missing then the client that connects from outside will use the same DNS configuration as used on the internal NIC of the IAG Server. If you want to use a different DNS, WINS or Default Gateway, make sure to select the option Always, Overriding Existing Network Configuration of this Server.
3. Click in the IP Provisioning and select the pool type. Here is the definition for each one of the available options:
Option |
Description |
Corporate IP Address |
Select this option to use the same IP range is the internal network of the IAG Server. Make sure to exclude the range from your internal DHCP Server. If the question is: Can I use my current DHCP Server to assign IP address to the remote clients, like RRAS and ISA Server do? The answer is: you can’t. This version of the IAG doesn’t support that. |
Private IP Address |
Use this option if you want to use another range (such as 10.20.20.0/24) for the remote clients. |
4. For the purpose of this demo, we will use the option Corporate IP Address. Click in the Add button and add the range below:

Figure 2 – Adding the Corporate IP address.
Note: IAG will use the first IP address from this pool to the Whale Network Connector adapter.
5. Click OK and click in the IP Provisioning Tab. Here is the definition for each one of the available options:
Option |
Description |
Split Tunneling |
Use this option if you want to allow the VPN user to access the Internet and the corporate LAN at the same time. The corporate access goes through the IAG and the Internet access goes through the user’s Internet access (user’s ISP). This is a good option on the performance standpoint, because the user will not use the company’s link to access the internet. |
Non-Split Tunneling |
Use this if you want to control the Internet access on the remote client workstation. This option will allow you to restrict the remote user to access Internet, but will add an extra load on the company’s Internet link since all Internet traffic will pass through it. Optionally you can select the checkbox Disable Local Area Network Access to disallow the client to access the local company’s LAN. |
No Internet Access |
This option will disallow the remote client to access Internet. |
IP Spoofing Policy |
When enabled, this option will analyze the IP address to verify if this is a spoofed IP. |
Protocol Blockers |
Allow an extra control on the TCP, UDP and ICMP packages. Be careful because this option is not granular, which means that if you select TCP then you will be blocking all TCP traffic through the VPN connection. |
6. For the purpose of this demo, we will use the default options.
7. Click in Additional Networks tab and you will have the option to add other networks that the remote client can use it. Usually this option will be used when the company’s network has more the one IP subnet and you want to grant access to some or all subnets located within your internal network. In this case we will not enable this option.
8. Click in Advanced and the following options will be available:
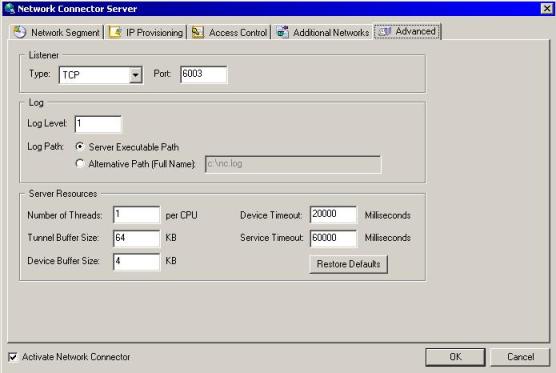
Figure 3 – Network Connector advanced options.
9. By default the Network Connector’s Listener uses the TCP port 6003, but here you can change it. You also can change the log level from 1 to 5 (where 5 is the most detailed one). You also can change the log location and tune the server’s performance using the Server Resource options. Click in OK to finish the configuration.
10. Press CTRL + G to activate the configuration.
3. Adding the Network Connector to the Portal
Now that we have the feature already enabled, the last step on the server side is to add the Network Connector link into the IAG Portal. Follow the steps below to add that:
1. On the Application option click in Add.
2. Select the Network Connector option as show below:
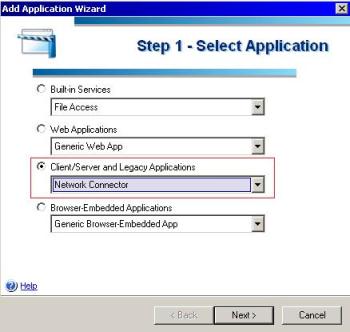
Figure 4 – Adding the Network Connector link.
3. Click in Next.
4. Type the application’s name and leave the other default options selected. Click in Next to continue.
5. Leave the Server and Port options with the default option selected. Click in Next to continue.
6. Add a name for the application; this name is the one that will appear on the Portal’s web site. Click in Finish.
Now that the full network connector configuration is done, the window will show that IAG is trying to start the service:

Figure 5 –Network Connector service.
If you type ipconfig on the command prompt you will notice that the Whale Network Connector is now using the first IP from the pool that we configured earlier:

Figure 6 –Automatic IP.
4. Conclusion
On this post we saw how to configure the Network Connector Server and how to add the Network Connector entry on the IAG Portal. Next session will cover what needs to be done on the client side and also some troubleshooting tips.