Post Product Catalog data on Facebook using workflows
This is the third Blog post in the BLOG describing how to use workflows in conjunction with a product catalog.
Using social media to distribute product news is an effective way of marketing your product. All people LIKE’ing a facebook page automatically get news updates from it. Having an automated way of fetching data from a product catalog and placing notes on a facebook wall, could be a neat thing to do. Let’s assume we have this scenario: A company, ContosoElectronicsSuperstore, has a product catalog in SharePoint, with a public facing web site to display their products. In addition to this, the company has a facebook page called ContosoSocial. This FB page is LIKE’d by thousands of fans. When the business manager of ContosoElectronicsSuperstore is changing the price on an item to be lower than its regular price, a note is automatically placed on the ContosoSocial facebook page, traversing out to all that LIKE’s this FB page. This will effectively bring product information out to a large number of potential customers. The FB note contains the following information; Title, Item description, price, company logo and a link back to the public facing web site where the customers can view all the products.
In this blog I will show you how to use workflows to fetch data from a product catalog and paste it on the wall on a facebook page. I will show you how to make this workflow trigger automatically every time an item is edited, and how to post a note on facebook every time the price is lower than the regular price.
I will go through the following in this blog:
- Creating and running the workflow
- How to obtain an access_token for facebook.
Prerequisites:
- A product catalog is set up in a SharePoint installation
For this example I have created a product catalog called UncategorizedList_000. Sorry about the long and meaningless catalog name. It contains many list columns, but those of interest are: RetPrice, RetAdjustPprice, Title and Retdescription.
- SharePoint Designer (SPD) installed and coupled to the Site Collection containing the product catalog.
- A facebook page has to be created.
In this example the page is called ContosoSocial
- A facebook app has to be created and added to the FB page in point 3.
You create this to get an access_token.
Creating the workflow
We need to create a workflow that:
- Is started automatically when an item is edited, and the price is changed to a lower value
- Fetch item information from the product catalog using lookups
- Place an automatically created message onto facebook.
- The note has to be unique for every item.
- The message shall contain info like title, price, description, image and link back to the ContosoElectronicsSuperstore web site.
And this is how I created the workflow in SharePoint Designer:
I have named this workflow Facebook Publishing Demo. It is of type Reusable workflow.
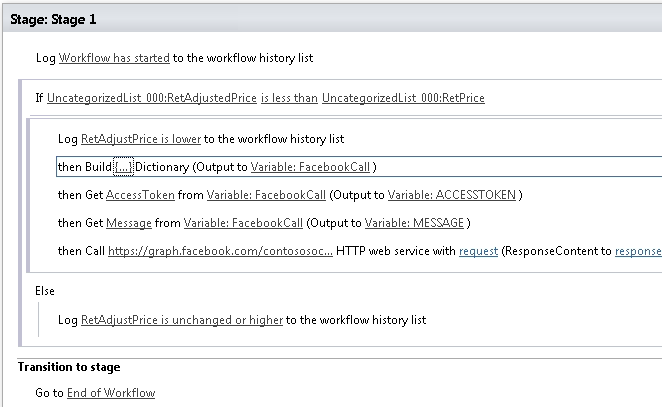
Let me walk you through the workflow steps.
- It is always nice to start the workflow with a log message. Makes it easier to troubleshoot later.
- The IF statement shall detect whether the new price (RetAdjustprice) is lower than the regular price (RetPrice).
The IF statement is picked from the Condition tab in SPD. It’s called: IF any value equals any value. Other options than Equals are available, just click on Equals and a drop down menu will appear.

Setting the Value: RetAdjustPrice is the displayed price, while RetPrice is the regular price of an item. When selecting Data Source I choose the product catalog name itself (UncategorizedList_000), instead of Current Item. By doing this you are sure to get access to the list columns for the product catalog. When looking up the catalog directly this way, you will have to specify the Find list Item, by setting the Field=GUID and Value=Current Item:GUID, in order to fetch the right item data from the product catalog . This will enable the workflow to retrieve data from the same item in the product catalog that triggered this workflow. I do the item lookup like this:

- I’ve added a log message for each of the IF outcomes, to easily troubleshoot the workflow later.
- Then I’ve chosen to build up a dictionary, containing the access_token needed to communicate with facebook, and the message to be sent to facebook. Creating the dictionary may be overkill, as we extract the info into local workflow variables later.
This is how we set up the dictionary:

The AccessToken is just a long string of characters. I will come back to how to create this later in this blog.
The Message is created using the String Builder:

I do several item lookups here, using the same method as described earlier in this blog.
- Then I create 2 local workflow variables; ACCESSTOKEN and MESSAGE, with input from the dictionary. These variables will be fed into the http POST call action later.
The reason for this is that I’m not allowed to do dictionary lookups directly inside the http POST call action coming up next.
- The http POST call.
This is the heart of this workflow. The action (in SPD) to use is called Call http web service. You only need to specify the “This” part. You do not need to specify anything for request, response or responseheaders.
The http method is to be set to HTTP POST.

Use the String Builder to build up the URL:

Let me guide you through the details:
The https address is the address to the facebook API for the contososocial page.
Access_token: This is the authentication key you need, to get access to the FB page.
Message: Specifies what you want to display on FB.
Caption: Text to the picture
Picture: Link to a company logo that I would like to follow the message on FB.
- Then another log message is added if the ELSE statement is used instead.
When done, click Publish to save the workflow and deploy it to SharePoint.
We are now done with the creation part of the workflow.
Since the SPD designer is coupled to the Site Collection containing the product catalog, the workflow is deployed correctly into the right Site Collection. And since I’ve been using a reusable workflow I will have to add it manually to the product catalog.
In the correct Site Collection navigate to the product catalog, activate the LIST ribbon, click on Workflow settings => Add workflow. Select the workflow just created, give it a proper name, select start option: Changing an item will start this workflow, and click NEXT.
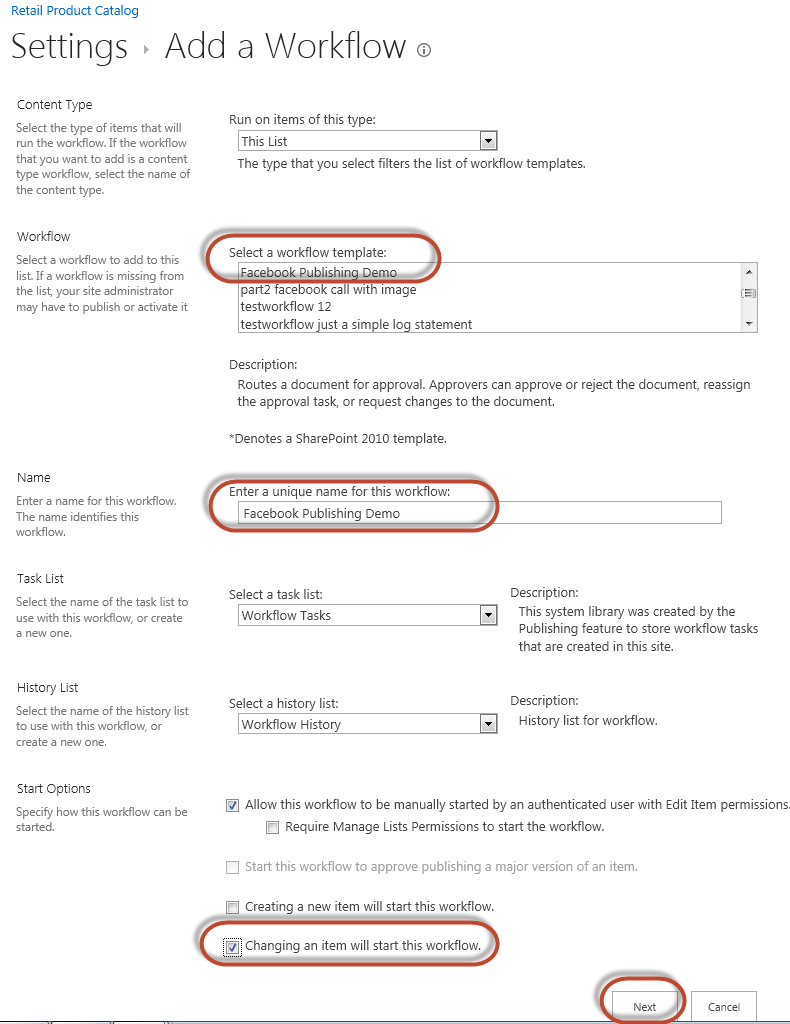
The workflow is now activated for the product catalog, and ready to run.
To run it; navigate to the product catalog, select an item, activate the ITEMS ribbon, and click on Edit. Change the RetAdjustprice to a lower value than RetPrice and click Save.

Editing the item will kickstart the workflow. The workflow will compare the RetAdjustPrice against RetPrice: In this case the former is lower than the latter, and the http call will be sent to facebook.
I can then navigate to the facebook page contososocial to observe the end result.

Note: All item details, company name, facebook page, and web address in this example are fake and only for illustration purposes.
How to obtain an access_token from facebook
In order to place a note on a facebook page, you need to authenticate the message being sent to facebook. I will show you how to obtain an access_token which are valid for 2 months. The idea is to create an App that is associated with/added to a FB page. In that process the owner of the page will accept the permissions required by that App. If permissions are set to publish_stream the App will have access to put notes on the wall for that FB page. Using the App credentials, you can create a user access_token which will be used by the workflow to put the note on FB. Details around how to create FB pages, Apps, authentication, etc can be found at: https://developers.facebook.com/docs/guides/canvas/
- In facebook.com create a page for your company. In my example I’ve used ContosoSocial.
- Create a Facebook app at https://developers.facebook.com/apps
The app is created just to get a user access_token.
Be sure to add publish_stream as an extended permission.

- Add the app to the page you want the workflow to post notes to (in my example contososocial). Navigating to “https://www.facebook.com/add.php?api_key={add your app’s api_key here}&pages” will allow you to choose your page to add the app to.
- Using the app’s identity, look up user access token for the App you just created. This can be done using Facebook Graph API Explorer tool. Note:This access_token will only be valid for a couple of hours.
- Extend the user access token by using this URL:
This URL will return a long lived access_token. It will be valid for 2 months.
For verifying the access_token use this debugger: https://developers.facebook.com/tools/debug
Use the long lived access_token in your workflow.