Azure Batch Explorer Sample Walkthrough
Azure Batch Explorer Sample Walkthrough
What is the Batch Explorer?
Batch Explorer is a GUI sample application that allows browsing and updating of all major elements within an Azure Batch account. For example, it shows jobs and tasks, pools and pool VM's, lists and downloads files that are on a pool VM, generates an RDP file to enable login to a pool VM, allows pools to be created and resized, and many other features. It is therefore extremely useful and will prove invaluable to the vast majority of Batch users, especially if you are new to Batch, trying to troubleshoot issues, or want to monitor activity.
We released Batch Explorer as a sample so that you have access to the source code. You can see how Batch Explorer functionality is implemented using the Batch .NET API and you can extend the functionality to meet your own needs. This blog post looks at some of the main Batch Explorer features and shows the API code used to implement the functionality.
Please note that as a sample Batch Explorer is not a supported tool. We do encourage feedback and bug reports using the Batch forums (https://social.msdn.microsoft.com/forums/azure/en-US/home?forum=azurebatch) and intend to release periodic updates with fixes and new functionality.
How to get Batch Explorer?
Batch Explorer is hosted, along with other Batch samples, on MSDN - https://github.com/Azure/azure-batch-samples/tree/master/CSharp/BatchExplorer.
How to use the Batch Explorer
First you must set up an account in the Batch Explorer. You do this via the accounts tab.
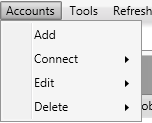
Add allows you to add a new Batch Account. Connect allows you to connect to any Batch Account which has already been added.
When connect for an account is called, the Batch Explorer queries the Batch Service for the selected account using the REST APIs and pulls down a list of resources under that account.
The resources gathered from the Batch Service consist of a collection of Work Items and a collection of Pools, retrieved by the following methods:
public IList<WorkItemModel> GetWorkItemCollection()
{
IEnumerable<ICloudWorkItem> workItems = this.Service.ListWorkItems();
IList<WorkItemModel> workItemModels = workItems.Select(workItem => new WorkItemModel(workItem)).ToList();
return workItemModels;
}
public IList<PoolModel> GetPoolCollection()
{
IEnumerable<ICloudPool> pools = this.Service.ListPools();
IList<PoolModel> poolModels = pools.Select(pool => new PoolModel(pool)).ToList();
return poolModels;
}
The above methods return a collection of WorkItemModel and PoolModel objects respectively. The Batch Explorer uses the common MVVM pattern. See: https://msdn.microsoft.com/en-us/magazine/dd419663.aspx for more information about MVVM.
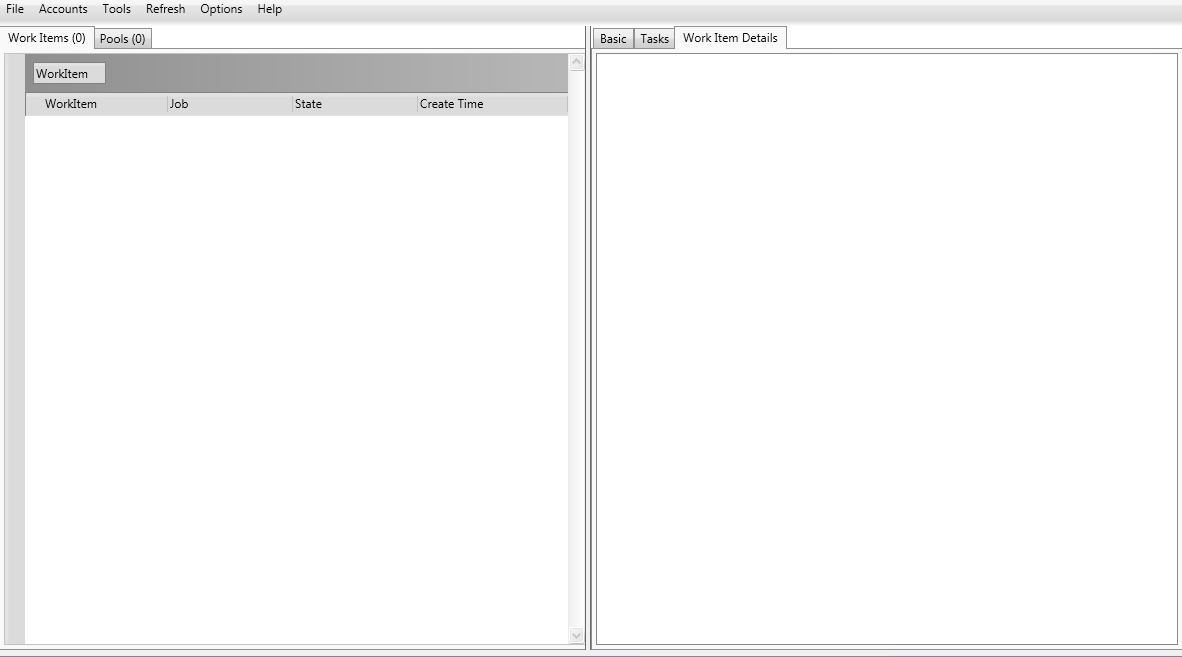
Once connected to an account the following view is seen for an empty Batch Account:
Creating resources with the Azure Batch Explorer
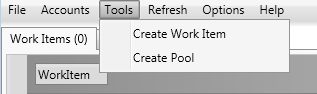
Although the Batch Explorer sample supports most read functionality of the Batch Service, it also supports some create operations as well. The Explorer supports creating a work item as well as creating a pool.
Creating a work item
Creating a work item on the Azure Batch service can be done through the Batch Explorer UI. When you choose the Tools > Create Work Item option you’ll see a popup like below:
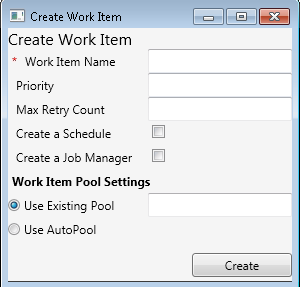
Populating these fields and clicking create issues a REST request to the Batch Service. Below is the code snippet which translates these UI fields into the correct work item options and issues the request to the Azure Batch service.
using (IWorkItemManager workItemManager = this.Client.OpenWorkItemManager())
{
ICloudWorkItem unboundWorkItem = workItemManager.CreateWorkItem(options.WorkItemName);
IJobExecutionEnvironment jobExecutionEnvironment = new JobExecutionEnvironment();
if (options.UseAutoPool.HasValue && options.UseAutoPool.Value)
{
IAutoPoolSpecification autoPoolSpecification = new AutoPoolSpecification()
{
AutoPoolNamePrefix = options.AutoPoolPrefix,
KeepAlive = options.KeepAlive,
PoolLifeTimeOption = options.LifeTimeOption.Equals("Job", StringComparison.OrdinalIgnoreCase) ? PoolLifeTimeOption.Job : PoolLifeTimeOption.WorkItem
};
jobExecutionEnvironment.AutoPoolSpecification = autoPoolSpecification;
}
else
{
jobExecutionEnvironment.PoolName = options.PoolName;
}
unboundWorkItem.JobExecutionEnvironment = jobExecutionEnvironment;
...
await unboundWorkItem.CommitAsync();
}
Creating a pool
Creating a pool can also be done via the Batch Explorer UI. When you choose the Tools > Create Pool option you’ll see a popup like below:
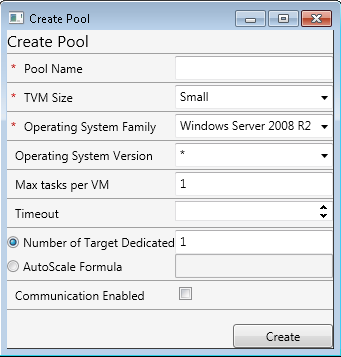
Populating these fields and clicking create issues a REST request to the Batch Service. Below is the code snippet which translates these UI fields into the correct pool options and issues the request to the Azure Batch service.
public async Task CreatePool(
string poolName,
string vmSize,
int? targetDedicated,
string autoScaleFormula,
bool communicationEnabled,
string osFamily,
string osVersion,
int maxTasksPerVM,
TimeSpan? timeout)
{
using (IPoolManager poolManager = this.Client.OpenPoolManager())
{
ICloudPool unboundPool = poolManager.CreatePool(
poolName,
osFamily: osFamily,
vmSize: vmSize,
targetDedicated: targetDedicated);
unboundPool.TargetOSVersion = osVersion;
unboundPool.Communication = communicationEnabled;
unboundPool.ResizeTimeout = timeout;
unboundPool.MaxTasksPerVM = maxTasksPerVM;
if (!string.IsNullOrEmpty(autoScaleFormula))
{
unboundPool.AutoScaleEnabled = true;
unboundPool.AutoScaleFormula = autoScaleFormula;
}
await unboundPool.CommitAsync();
}
}
Operations on existing resources with the Azure Batch Explorer
While not all operations are supported for creating new resources (for example the Batch Explorer is lacking a create task option) it has rich support for displaying existing resources. It can be a useful tool for debugging issues, especially when you are unfamiliar with the Batch Service.
Some useful things which you might want to do with the Azure Batch Explorer are:
Check start task, task, or job manager exit codes.
Download start task, task, or job manager output files.
Create a user on a VM.
Download an RDP file to remote desktop to a particular VM.
Check pool resize errors.
Check work item options (schedule, job execution environment, etc).
Enable, disable, terminate, or delete a WorkItem or Job.
Resize or delete a Pool.
In the Batch Explorer, in order to save network bandwidth and tolerate Batch Accounts with large numbers of Work Items, Jobs, Pools, and Tasks, the Batch Explorer sample only loads resources on demand. It accomplishes this by loading the tasks for a particular job only when the user selects that job. Similarly it loads the VMs for the Pool only when the user selects a particular pool.
For example for the Pool case, the Batch Explorer performs a context sensitive refresh. If the Pool VMs already have been loaded the Explorer doesn’t load them again. If the Pool VMs have not been loaded, then they are loaded.
Selecting a pool for the first time you will see the following view:

Here you can see exactly how the Explorer checks to ensure it only loads a pools VMs once (if it has not already loaded them):
//Load the TVMs in this pool just in time if they haven't been loaded yet
if (!this.selectedPool.HasLoadedChildren)
{
this.selectedPool.RefreshAsync(ModelRefreshType.Children).ContinueWith(
(t) =>
{
FirePropertyChangedEvent("SelectedPool");
FirePropertyChangedEvent("VMsTabTitle");
},
TaskContinuationOptions.NotOnFaulted);
}
public override async System.Threading.Tasks.Task RefreshAsync(ModelRefreshType refreshType)
{
if (refreshType.HasFlag(ModelRefreshType.Basic))
{
try
{
Messenger.Default.Send(new UpdateWaitSpinnerMessage(WaitSpinnerPanel.Left, true));
System.Threading.Tasks.Task asyncTask = this.Pool.RefreshAsync();
AsyncOperationTracker.Instance.AddTrackedOperation(new AsyncOperationModel(
asyncTask,
new PoolOperation(PoolOperation.Refresh, this.Pool.Name)));
await asyncTask;
this.LastUpdatedTime = DateTime.UtcNow;
//
// Fire property change events for this models properties
//
this.FireChangesOnRefresh(ModelRefreshType.Basic);
}
catch (Exception e)
{
this.HandleException(e);
}
finally
{
Messenger.Default.Send(new UpdateWaitSpinnerMessage(WaitSpinnerPanel.Left, false));
}
}
... //Handle children updates here
}
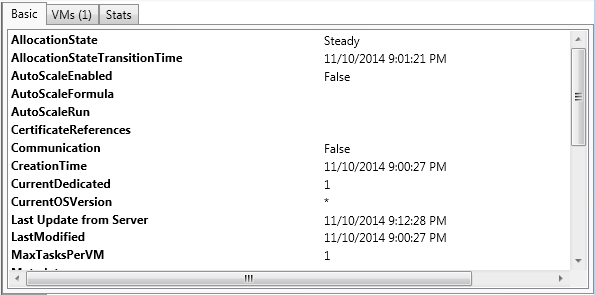
For the selected item, you can drill into properties set on the object using the “Basic” tab:
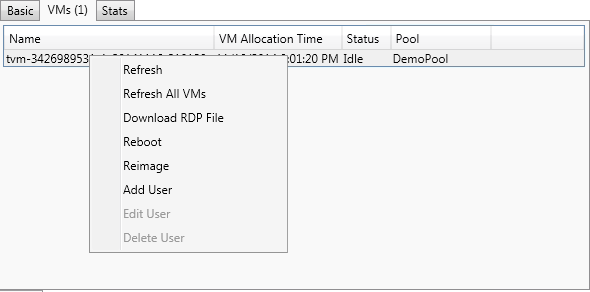
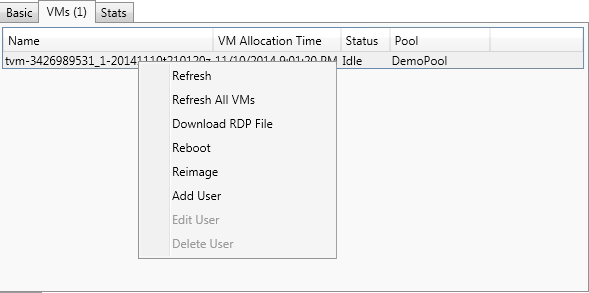
And issue context sensitive commands by right clicking on a particular resource:
If at any point you want to get the latest copy of the object from the Batch Service, you must select “Refresh” for that object. For example, “Refresh” on the pool will query the Batch Service via the REST API to get the most up to date information about the selected pool.
Debugging scenarios
Download VM RDP File and log in
Click on the pool and select the VM which you want to remote into.
Choose the Add User option in order to create a user on the VM. Without a user created on the VM, you will not have credentials to log into the VM. Fill out the corresponding “Create VM User” dialog box.
Then choose “Download RDP File” from the VM context menu, and save it to a particular place.
Follow the RDP popups at that point.
When you choose “Download RDP file” the Explorer issues a request to the Batch Service to retrieve the RDP file for the specified VM. The C# code below performs that request:
public async System.Threading.Tasks.Task DownloadRDPAsync(Stream destinationStream)
{
try
{
System.Threading.Tasks.Task asyncTask = this.VM.GetRDPFileAsync(destinationStream);
...
await asyncTask;
}
catch (Exception e)
{
Messenger.Default.Send(new GenericDialogMessage(e.ToString()));
}
}
Get a tasks output files
Click on the work item which contains the job you are interested in.
Click on the job you are interested in.
Click on the task you are interested in.
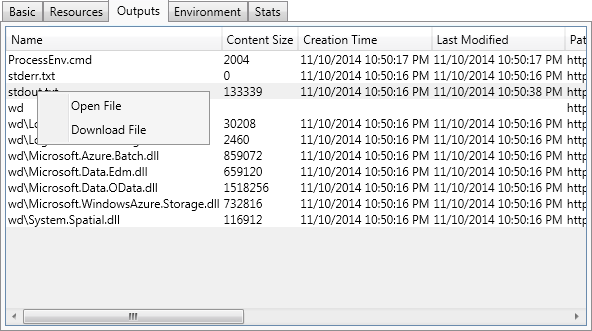
Click on “Outputs” and select the file you are interested in.
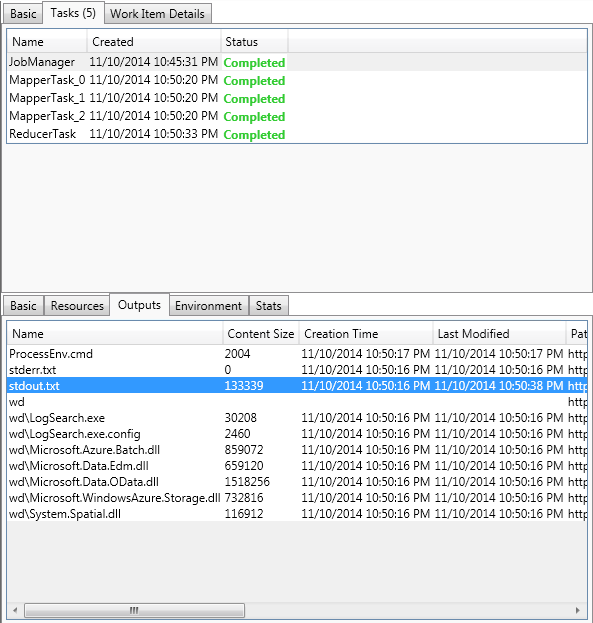
Right click the file and select either “open file” or “download file”
Below is the code snippet which actually downloads the specified file:
private async System.Threading.Tasks.Task DownloadTaskFile(string filePath, Stream destinationStream)
{
ITaskFile file = await this.Task.GetTaskFileAsync(filePath);
await file.CopyToStreamAsync(destinationStream);
}
The Asynchronous Operation Tracker
To facilitate learning the Batch Service, the Batch Explorer supports a bottom section which shows what actual operations have been performed on the Batch Service. This list contains the REST API calls which were made to the service.

A user can right click on any one of these operations and drill into it – if the operation was unsuccessful it will also contain details about what exception was hit, as well as useful escalation information in the form of request IDs.
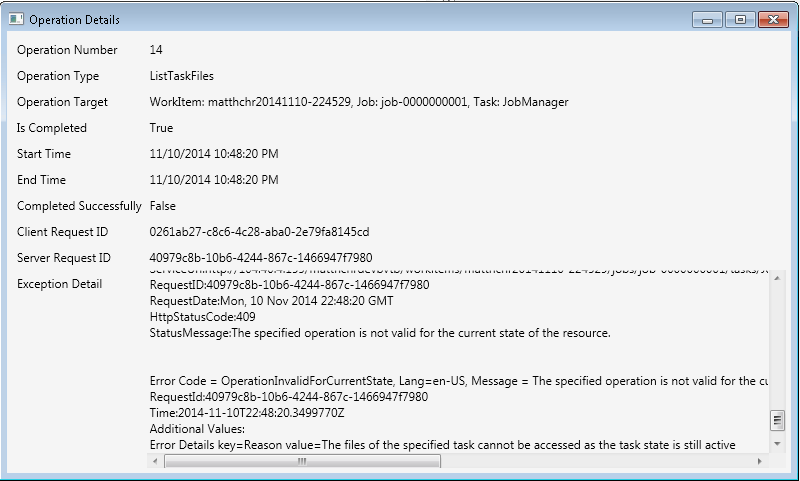
To retrieve the data you see in the UI control above (such as the service and client request ID), the exception received by the Batch Service must be processed. Because the Batch Client Library uses asnyc/await and TPL, most exceptions are wrapped in an outer AggregateException. To dump the user friendly exception text that you see above all that is required is to ToString() the aggregate exception, but to extract any exception details (such as the client and server request IDs) the following code is required:
if (this.FaultException is AggregateException)
{
//If there is only 1 batch exception we hit
AggregateException agg = this.FaultException as AggregateException;
agg = agg.Flatten();
BatchException batchE = agg.InnerExceptions.Where(e => e is BatchException).Cast<BatchException>().First();
this.FaultClientRequestId = batchE.RequestInformation.ClientRequestID;
this.FaultServerRequestId = batchE.RequestInformation.ServiceRequestID;
}
Matt Christopher - Software Engineer, Azure Big Compute
Pablo Selem - Software Engineer 2, Azure Big Compute