Folder Sharing between Windows 7 and VM
Virtual PC 2007® SP1 allowed users to share a particular folder with the Virtual Machine (VM). In Windows® Virtual PC, users can enable sharing at drive level only.
Sharing a Folder on Windows 7 Desktop with a VM
To share a particular folder with the VM, follow steps as below
- Shutdown or Hibernate the VM (assuming you have Integration features enabled)
- Open command prompt on Windows7 host. Let’s say you want to share folder C:\MySharedFolder with the VM.
- subst S: C:\MySharedFolder. This subst command will create a virtual drive “S:” which is mapped to C:\MySharedFolder. Make sure the drive letter is free for use.
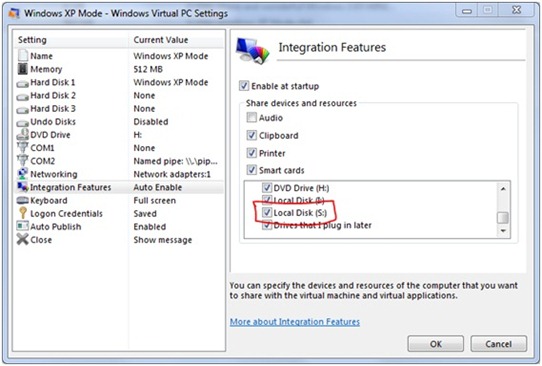
- Open settings for the VM and make sure “S:” is ticked in the drive selection as shown below:
Fig. 1. Sharing a folder on Windows 7 host with a VM using the Setting User Interface
This is all you need to do to share a particular folder between host and VM. To remove the virtual drive use subst S: /d command.
Sending a File from a VM to a Windows 7 Folder
Let’s add little more fun by making it easier to send files to Windows7 host from a VM.
- Open Windows Explorer in the VM
- For XP VM open folder %userprofile%\SendTo. For a Vista or Windows7 VM, in the Explorer bar type shell:SendTo
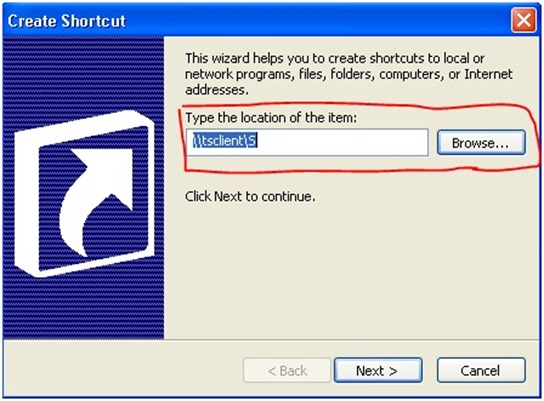
- In this folder create a shortcut “Windows7 Host,” pointing to “S:” drive as shown below:
Fig. 2. Creating a shortcut to send files from a VM to the Windows 7 host
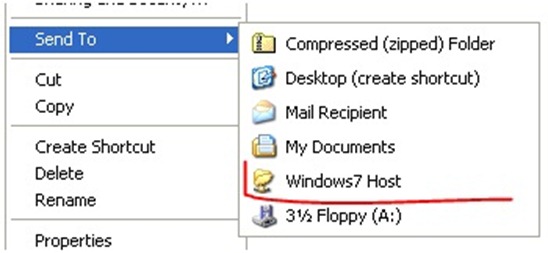
It is that simple and now by using right click menu for any file or folder you can use “Send To” menu to easily copy files to the Windows 7 desktop (Figure 3).
Fig. 3. Using the right click menu to select the ‘Send To’ folder receiving the copied file from the VM
Technorati Tags: Windows Virtual PC,Windows XP Mode,Tips n Tricks
Vinod Atal
SDE
Microsoft Virtualization Team


