Document Quarantine with Windows Server 2012 Dynamic Access Control
Hi there! In this blog post we highlight some of the early work on Dynamic Access Control during our Windows Server 2012 engineering validation program. Long before we reach RTM dedicated customers deploy in production, test and identify issues during the development phase to help us achieve a high quality release. Robert Deluca a Senior Program Manager in the Customer Engineering team focused on Identity will take you thru the details of document quarantine using Dynamic Access Control.
Natalia Mackevicius
Group Program Manager, Partner and Customer Ecosystem Team
Document Quarantine with Windows Server 2012 Dynamic Access Control
Hi there, my name is Robert De Luca and I’m part of the Windows Server Partner and Customer Ecosystem team. One PaCE responsibility is running the Technology Adoption Program for Windows, so I’ve been working with customers on Windows Server 2012 testing for well over a year now. One of our TAP customers was very interested in implementing “document quarantine” with Windows Server 2012, and in this post I’ll show you how we did it using the new Dynamic Access Control capabilities in Windows Server 2012.
What is document quarantine?
Document quarantine refers to a scenario where you want to identify, protect, and take further action on data that matches certain conditions. In my case, this meant preventing certain types of sensitive files from being stored on files shares where they would be accessible to large numbers of employees.
For the sake of this example, let’s assume the sensitive files are those that contain personally identifiable information (PII). After discussing the pros and cons of various approaches and the expected outcome of each, we came up with the following desired behaviors for the customer’s quarantine solution:
- PII is automatically identified and classified.
- PII is protected regardless of the file share or folder it is stored in.
- If PII is stored on certain file shares – those with relatively open permissions – the file owner is notified of the policy violation so they can take action.
- If no action is taken, files in violation of corporate policy are moved to a secure location accessible only to administrators.
This can be easily implemented using some of the new Dynamic Access Control capabilities in Windows Server 2012. I’ll be posting a full walkthrough on how to configure the quarantine solution end-to-end, but today I’m just going to go into detail on the less-common things we did. The rest of this post covers the following areas, roughly corresponding to the desired behaviors above:
Part 1: Classifying Files
Part 2: Protecting Files
Part 3: Notifying Users
Part 4: Moving Files
Part 1: Classifying Files
I won’t go into great depth on the Windows File Classification Infrastructure, but if you want to learn more there are many documents available online. One of the key enhancements to FCI in Server 2012 is the ability to classify files a few seconds after files are added or modified. In this example we looked for credit card data, but you can use FCI to ferret out all kinds of information based on simple or sophisticated patterns – and then classify it accordingly.
For the document quarantine solution we:
- Enabled the built-in resource property Personally Identifiable Information (PII_MS).
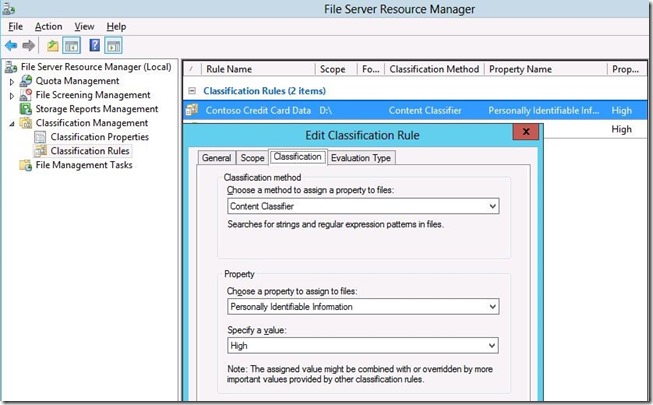
- Created a classification rule to monitor files on D:\, marking them as PII=High if a credit card number pattern is found.
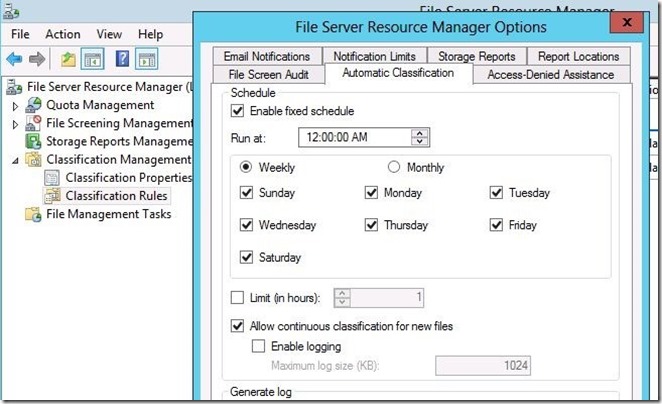
- Set the classification schedule for continuous classification in addition to a standard fixed schedule.
Here is my classification rule:
And here are the classification parameters:
For this example I used a simple regular expression that matches any sequence of 13 to 16 digits with or without separators, but this can be much more tightly controlled.
Tip: Click Refresh on the Classification Properties screen after enabling the PII_MS resource property. This pulls down the latest version of the classification definitions from Active Directory, ensuring PII_MS is available in FSRM.
And here is the classification schedule:
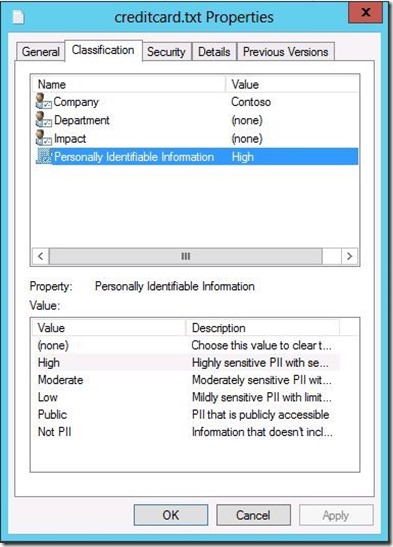
At this point, any files that you put on the D:\ drive that contain credit card numbers should automatically be classified as PII=High.
PowerShell Equivalent:
Set-ADResourceProperty PII_MS -Enabled $true
New-FsrmClassificationRule -Name 'Contoso Credit Card Data' -Namespace 'D:\' -ClassificationMechanism 'Content Classifier' -Property PII_MS -PropertyValue 5000 -ContentRegularExpression '\b(?:\d[ -]*?){13,16}\b' -ReevaluateProperty Overwrite
$schedule = New-FsrmScheduledTask -Time '00:00' –Weekly @('Sunday','Monday','Tuesday','Wednesday','Thursday','Friday','Saturday')
Set-FsrmClassification -Schedule $schedule -Continuous
Part 2 – Protect Your Data
PII is being classified automatically by the file server, but now we need the file server to enforce rules to ensure the PII isn’t inadvertently shared with the wrong people. The desired behavior for quarantine is to immediately lock down the file if it’s put in the wrong place, regardless of existing permissions. For my customer, “lock down” meant restricting permissions to the file owner and administrators. The way to do this is through a Central Access Rule.
Implementing a Central Access Rule requires the following steps:
- Create a Central Access Rule
- Create a Central Access Policy to contain the Central Access Rule
- Distribute the Central Access Policy using Group Policy
- Apply the Central Access Policy to folders on the file server
Create a Central Access Rule
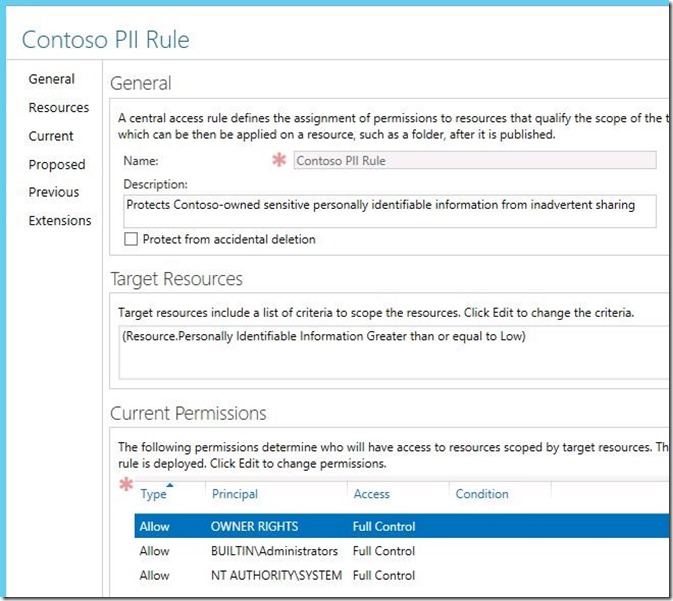
We created a new Central Access Rule – shown as Contoso PII Rule below – using AD Administrative Center. In the Target Resources section of the rule, we targeted files with a PII classification greater than or equal to “Low”. In the Current Permissions section, we left the permissions as the default – which restricts permissions on the targeted files to the file owner, members of the local Administrators group, and the file server itself (System). This acts as a safety net policy, enforcing the permissions listed in the policy even if the NTFS permissions provide broader access.
PowerShell Equivalent:
$condition = '(@RESOURCE.PII_MS >= 3000)'
$acl = 'O:SYG:SYD:(A;;FA;;;OW)(A;;FA;;;BA)(A;;FA;;;SY)'
New-ADCentralAccessRule -Name 'Contoso PII Rule' -ResourceCondition $condition -CurrentAcl $acl
Create a Central Access Policy containing the Central Access Rule
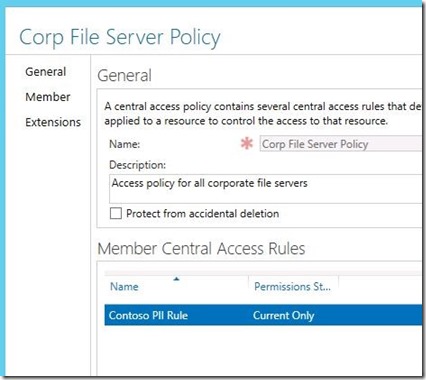
With the Central Access Rule created, we created a Central Access Policy – shown as Corp File Server Policy below – and added the rule to the policy. Central Access Policies are containers used to group multiple Central Access Rules together for easier distribution and application.
PowerShell Equivalent:
New-ADCentralAccessPolicy -Name 'Corp File Server Policy'
Add-ADCentralAccessPolicyMember -Identity 'Corp File Server Policy' -Members 'Contoso PII Rule'
Distribute Central Access Policy using Group Policy
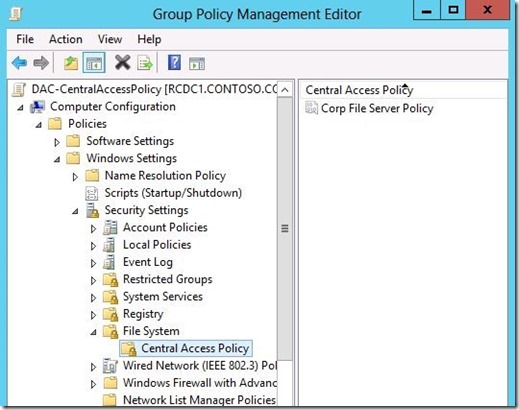
Group Policy is the policy distribution mechanism for Dynamic Access Control. Central Access Policies are configured under Computer Configuration\Policies\Windows Settings\Security Settings\File Systems\Central Access Policy. For this example I created a Group Policy Object called DAC-CentralAccessPolicy and included the Corp File Server Policy in the list of available Central Access Policies:
You must of course ensure the GPO applies to your file servers. In my test environment the file server is in a specific OU, but feel free to use any Group Policy targeting technique to apply your own policy to the appropriate file servers.
Apply CAP to folders on the file server
Note: Before proceeding, run gpupdate /force on the file server to ensure the new GPO is applied and the new Central Access Policy is available.
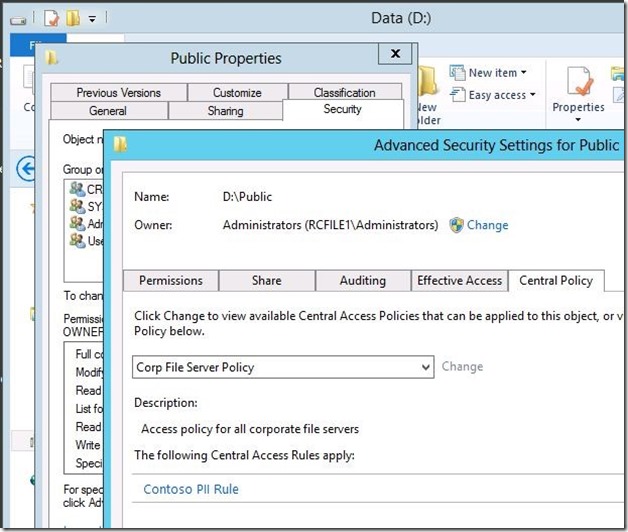
Applying a Central Access Policy to a folder hierarchy is done though the Properties page of the folder, under Security\Advanced. If a GPO containing a CAP applies to the file server, you should see a Central Policy tab:
Clicking the Change link allows you to select a new Central Access Policy. The Central Access Rules included in the active CAP are shown as well.
I used a single CAP in my example, but you may end up using multiple CAPs to hold your quarantine rules depending on the behaviors you’re trying to implement. The two general approaches are to:
1. Create one CAP and use it on all shares
2. Create a CAP for a specific set of shares – e.g. public shares
If you’re deploying CAPs to multiple shares or multiple servers, be sure to look at the deployment tools available in the Microsoft Data Classification Toolkit to make things easier.
Part 3 – Notifying Users
PII is now being classified and protected without user or administrator interaction. Unfortunately, this may cause problems for end-users if they’re unaware of the company PII policy or unaware that their shared file contains PII. User notification will enable self-remediation of the policy violation without involving IT administrators.
File management tasks allow us to take actions when files on a file server match a certain set of conditions. Actions can be triggered in continuous mode and through scheduled scans of the file system. For the document quarantine scenario we used a continuous file management task to generate email notifications shortly after PII was stored in certain folders.
File management tasks are configured in the File Server Resource Manager. I’ll walk through the configuration pages of the task we created for user notification.
On the General tab, use something meaningful for the task name – the quarantine scenario requires two separate tasks for notification and the follow-up actions.
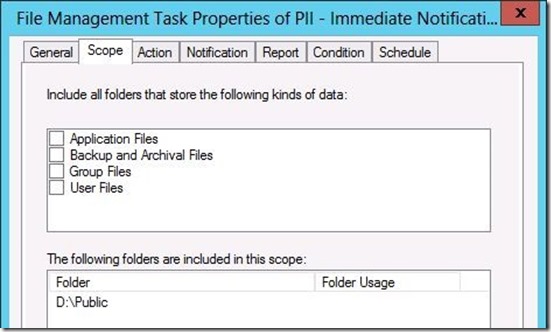
The Scope tab identifies the folders to monitor. In this case we’re only monitoring the public share at D:\Public, but you can include multiple locations if the resulting action is the same.
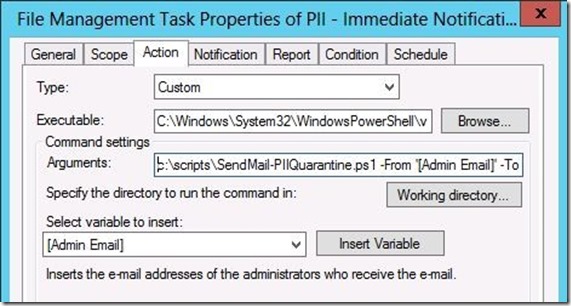
The Action tab is where we specify the action to perform when a matching file is detected. The built-in FCI email notification capabilities (on the Notification tab) are designed to consolidate notifications and send them on a scheduled basis – nightly, weekly, or monthly. We’ll use this capability later, but for this step we need something that operates more quickly. We need to send notifications with minimal delay when PII is detected. We’ll use a custom action to send email using a PowerShell script.
Executable:
C:\Windows\System32\WindowsPowerShell\v1.0\powershell.exe
Arguments:
C:\Scripts\SendMail-PIIQuarantine.ps1 –From ‘[Admin Email]’ –To ‘[Source File Owner Email]’ –Filename ‘[Source File Remote Paths]’
Variables like [Admin Email] are replaced with proper values when actual transactions take place. To use email notifications you’ll need user email addresses to be populated in Active Directory.
The PowerShell script SendMail-PIIQuarantine.ps1 is very simple. I’ve added some instructions and parameters for easy future customization and re-use, but all it does it use the built-in PowerShell Send-MailMessage command to send an email.
# SendMail-PIIQuarantine.ps1 - Sends email notifying user of file quarantine due
# to PII restrictions
#
# To use in FSRM:
# Executable:
# C:\Windows\System32\WindowsPowerShell\v1.0\powershell.exe
# Arguments:
# c:\scripts\SendMail-PIIquarantine.ps1
# -From '[Admin Email]'
# -To '[Source File Owner Email]'
# -Filename '[Source File Remote Paths]'
param(
[string]$From,
[string]$To,
[string]$Filename,
[string]$SmtpServer = 'localhost',
[string]$Subject = 'Warning: File Quarantined Due To PII Restrictions',
[string]$Body = @"
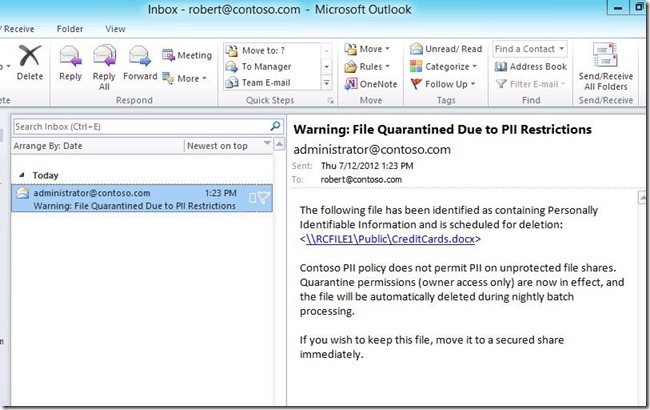
The following file has been identified as containing Personally Identifiable Information and is scheduled for deletion:
$Filename
Contoso PII policy does not permit PII on unprotected file shares. Quarantine permissions (owner access only) are now in effect, and the file will be automatically deleted during nightly batch processing.
If you wish to keep this file, move it to a secured share immediately.
"@
)
Send-MailMessage -SmtpServer $SmtpServer -From $From -To $To -Subject $Subject -Body $Body -dno OnFailure
In my example the mail server is running locally, but you can override the default SMTP server by passing the –SmtpServer parameter or by editing the script directly.
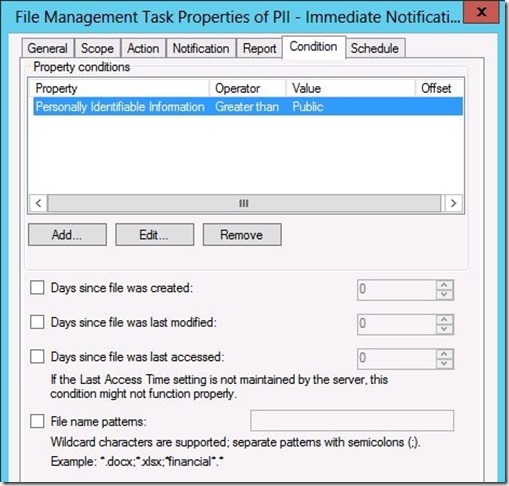
On the Condition tab, we specified the Personally Identifiable Information property to be Greater than the value of Public. This will cover any file marked as PII=Low, Moderate, or High.
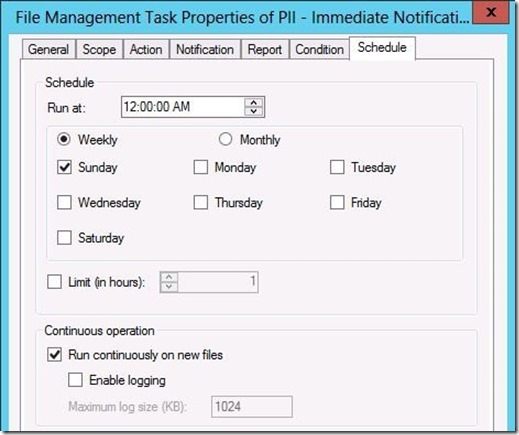
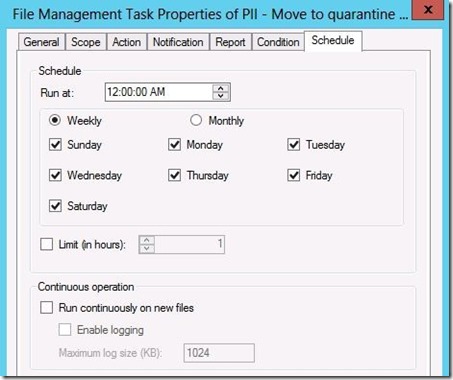
And finally on the Schedule tab, the Run continuously on new files box is checked. This will also catch any modified files, not just newly created files. Note that you must configure a schedule, even though the continuous operation option will handle ongoing changes. Any schedule will do – I just set it up for once a week.
That completes the notification configuration. Users will be notified immediately after PII files are found in the D:\Public folder or in any sub-folders.
PowerShell Equivalent:
$command = 'c:\Windows\System32\WindowsPowerShell\v1.0\powershell.exe'
$params = "c:\scripts\SendMail-PIIQuarantine.ps1 -From '[Admin Email]' -To '[Source File Owner Email]' -Filename '[Source File Remote Paths]'"
$action = New-FsrmFmjAction -Type Custom -SecurityLevel LocalService -Command $command -CommandParameters $params
$condition = New-FsrmFmjCondition -Property 'PII_MS' -Condition 'GreaterThan' -Value 2000
$schedule = New-FsrmScheduledTask -Time '00:00' -Weekly 'Sunday'
New-FsrmFileManagementJob -Name 'PII - Immediate Notification' -Namespace 'D:\Public' -Action $action -Condition $condition -Schedule $schedule -Continuous
Part 4 – Moving Files
The last step is to take action periodically to clean up the D:\Public folder and remove any files violating the company PII policy. As with user notification, this is done with a file management task. I’ll walk through the configuration pages of the task we created for file cleanup.
The General and Scope tabs are similar to the notification task – give the new task a name and scope it to the D:\Public folder.
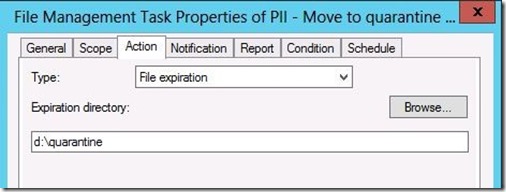
On the Action tab, we used the built-in File expiration capability as the action and specified the location we want to move files to. This will move all files matching the conditions specified on the Conditions tab to the folder you provide. It’s important to specify a separate folder for expiration that isn’t under the original scope, otherwise unexpected results like infinite loops may occur.
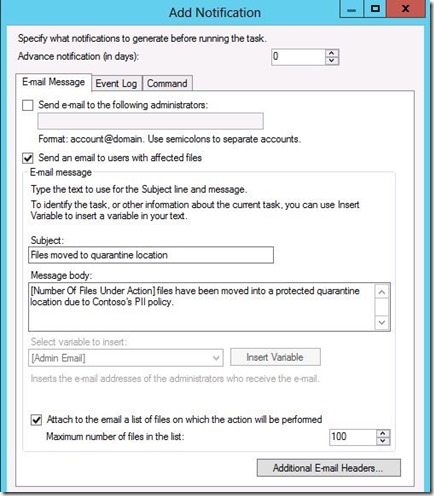
On the Notification tab, we used the built-in email notification feature to notify the end-user when a file move takes place.
Advance notification of 0 days means that an email will be sent when the action is starting. One nice thing about the built-in email task is that it groups together notifications on a per-user basis rather than sending multiple messages. No configuration is required on the Event Log or Command tabs of the new notification.
On the Condition tab, we once again select a Personally Identifiable Information classification of greater than Public.
On the Schedule tab, we’re not using the continuous operation option, but instead scheduling a nightly operation to move all PII into the quarantine location.
PowerShell Equivalent:
$action = New-FsrmFmjAction -Type Expiration -ExpirationFolder 'D:\Quarantine'
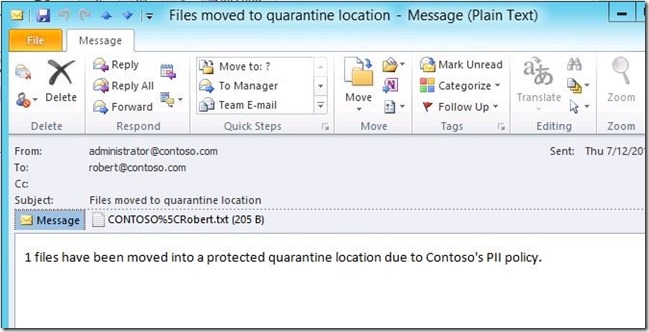
$notificationAction = New-FsrmFmjNotificationAction -Type Email -MailTo '[Source File Owner Email]' -Subject 'Files moved to quarantine location' -Body '[Number Of Files Under Action] files have been moved into a protected quarantine location due to Contoso PII policy.' -AttachmentFileListSize 100
$notification = New-FsrmFmjNotification -Days 0 -Action $notificationAction
$condition = New-FsrmFmjCondition -Property 'PII_MS' -Condition 'GreaterThan' -Value 2000
$schedule = New-FsrmScheduledTask -Time '00:00' -Weekly @('Sunday','Monday','Tuesday','Wednesday','Thursday','Friday','Saturday')
New-FsrmFileManagementJob -Name 'PII - Move to Quarantine Folder' -Namespace 'D:\Public' -Action $action -Notification $notification -Condition $condition -Schedule $schedule
Quarantine In Action
Let’s put this all together and walk through the end-user experience.
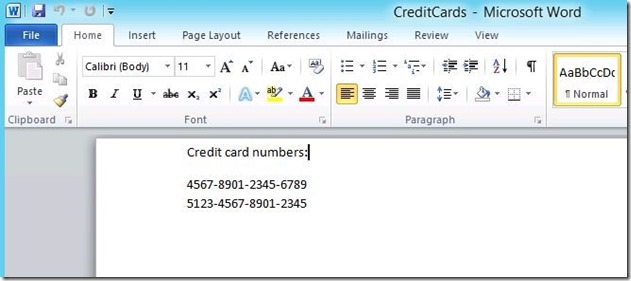
First the user creates a document containing PII:
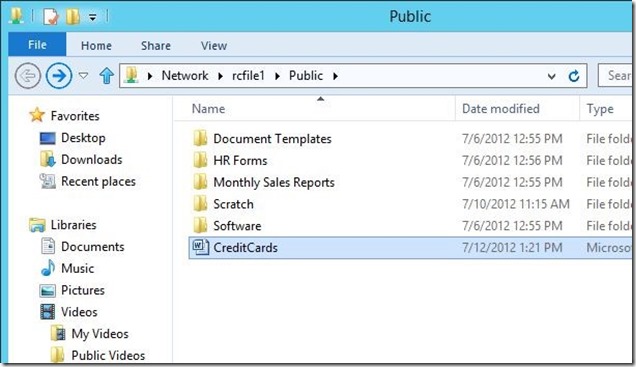
And then decides to save it on the Public share:
Within seconds, our file classification rule kicks in and marks the file as PII = High. At this point the file is protected by the Central Access Policy, even though it’s still located on the Public share. Only the document owner and administrators will be able to access the file. The classification also triggers an email notification to the user:
Later that evening, if the user does not take action, the scheduled file expiration task moves the file to the designated quarantine location and sends the user a final notification:
Hopefully the user will never get to this point – but if they do, the file server remains clean and it’s easy to get files back if users need them.
The quarantine location contains sub-folders by date, so administrators can periodically clean it out without removing recently-quarantined files. Another option is to use a custom action instead of the built-in file expiration action to remove the quarantined files, but that could cause more trouble than it’s worth if important data is permanently lost.
Summary
Dynamic Access Control is an incredibly powerful tool that can play a key role in securing your organization’s data. Supplementing your existing granular permissions with higher-level DAC policies allows you to enforce business rules on targeted data without requiring constant adjustment to the underlying ACLs. Data owners are free to assign permissions as needed within the confines you set through central policy.
Hope you found this useful,
Robert De Luca
