Part2: Step by step Guide for Configuring Kerberos Authentication in SharePoint 2013/2016
This is a continuation of part1 of my Integrated Windows Authentication blog series.
In this post, we will see how to configure Kerberos for SharePoint web application (2013/2016 won't matter as steps are same so I am going to be working on SharePoint 2013 farm for this setup)..
Let me outline 5 Simple steps to configure Kerberos Authentication in SharePoint:
Create SharePoint Web app with Negotiate(Kerberos) AUTH enabled from central administration Site.
Post web app creation, Confirm Authentication providers: Verify that Claims Authentication Type check box for "Enable Windows Authentication and Integrated Windows Authentication" is selected and dropdown is selected as Negotiate (Kerberos).
Add a DNA HOST (A) Record for the Host Header of the web application if you have chosen to make it a host header web application.
SETSPN: Set Service principal name (SPN) for the Service account running Application Pool of the Web application.
Allow Trust for delegation from DC ADUC - Delegate the Service account to "Trust the use for delegation to Kerberos".
Configure Kerberos in IIS: Set Kerberos as 'Top' Authentication 'provider' over NTLM and uncheck "Enable Kernel-mode" authentication.
Let's go through steps in detail………..
I assume you folks know about 1st and 2nd step as those are pretty basic ones really - if not, then there are tons of articles that will help you to create a new SharePoint web application and Set a DNA 'A' record for the host header of the web application.
I am pasting couple of them which will help create:
SharePoint web application: /en-us/sharepoint/administration/create-a-web-application
DNS HOST (A) record: /en-us/windows-server/identity/ad-fs/deployment/add-a-host--a--resource-record-to-corporate-dns-for-a-federation-server
By now, you should have a SharePoint web application with a host header (host header is not mandatory to have)
So, let's go into step 3…..
Set Service principal name (SPN) for the Service account running Application Pool of the Web application:
Now if you try to go to option 4 of setting Delegation without doing step 3, below is what will happen.
Delegation tab in Active directory users and computers (ADUC) for the account will not be available until a SPN is set.

This command will give you a black result:
PS C:\Users\Administrator> setspn -L Contoso\Spsvc
Registered ServicePrincipalNames for CN=SharePoint Service,CN=Users,DC=contoso,DC=com:
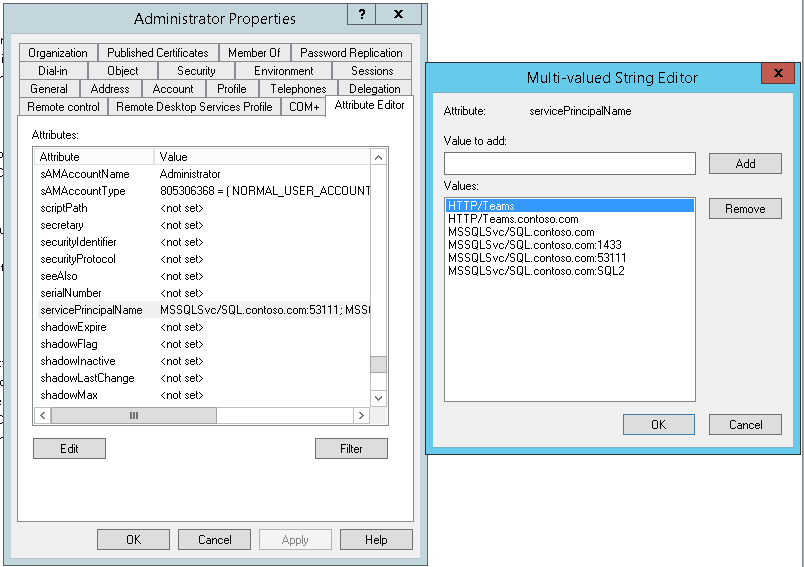
'Attribute Editor' tab also shows you servicePrincipalName value that has been set, in our case - It is not Set yet.
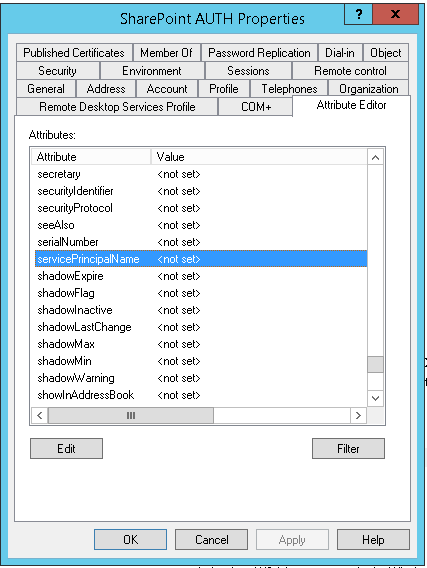
Delegation tab is only displayed when there is at least one value set in the servicePrincipalName attribute.
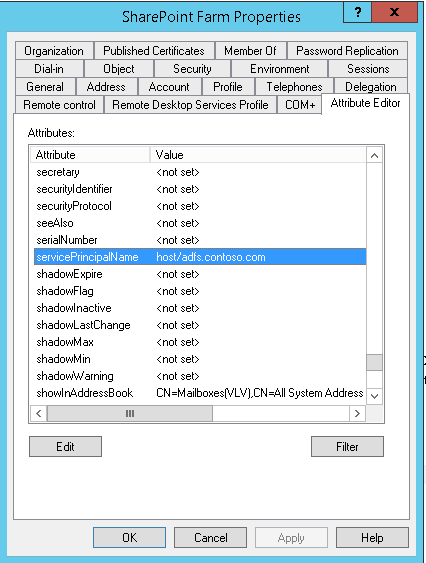
Let me quickly show you an account which has SPN set already (just as an example account beforehand on which I had set SPN - I will show you how to do so in this post later)

This command will show the SPN that is set.
PS C:\Users\Administrator> setspn -L Contoso\Spfarm
Registered ServicePrincipalNames for CN=SharePoint Farm,CN=Users,DC=contoso,DC=com:
host/adfs.contoso.com
And Even 'Attribute Editor' tab also shows servicePrincipalName value that has been set.
NOW, let's move to actually setting SPN.
Setting a ServicePrincipalName (SPN) can be performed in a number of ways; ADSIEdit, Attribute Editor in ADCU and SETSPN.EXE.
You need to first set the SPNs and then enable Delegation on the service accounts (Reason I've already explained above)
We are going to be using SETSPN.EXE Utility to Set ServicePrincipalName (SPN) of the service account.
In Active Directory, the servicePrincipalName (SPN) attribute is a multivalued, nonlinked attribute that is built from the DNS host name. The SPN is used in the process of mutual authentication between the client and the server hosting a particular service. The client finds a computer account based on the SPN of the service to which it is trying to connect.
Setspn.exe:
This command-line tool allows you to read, modify, and delete the Service Principal Names (SPN) directory property for an Active Directory service account. SPNs are used to locate a target principal name for running a service. You can use Setspn to view the current SPNs, reset the account's default SPNs, and add or delete supplemental SPNs.
SPN Format
When you manipulate SPNs with the Setspn tool, the SPN must be entered in the correct format. The format of an SPN is serviceclass/host:port/servicename, in which each item represents a name or value. Unless the service name and port are not standard, you do not have to enter them when you use Setspn. For example, if you have a service with the following characteristics:
- Name: MyService
- Running on a computer named DCA
- Uses the TCP or UDP port 8088
- Service name: MyS
- Location: in the directory under an organizational unit (OU) named CS, in a domain named cpandl.com
the SPN looks like the following:
MyService/DCA.cpandl.com:8088/CN=MyS,OU=CS,DC=cpandl,DC=com
From <https://technet.microsoft.com/pt-pt/library/cc773257(v=ws.10).aspx>
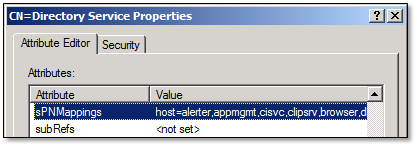
The HOST SPN (host/server.domain.com) works for multiple services like HTTP & RPCSS. If you would like to see the default Host to SPN mappings use LDP or ADSI Edit and navigate to: cn=Directory Services,CN=Windows NT,CN=Services,CN=Configuration,DC=[Your Domain Component]. Then look at the sPNMappings attribute.
In our case, we are going to be using SETSPN command with these Switches below:
General Steps are like these below………
Run setspn command with your web application's Application Pool Service Account – e.g. DomainName/App pool service account. To do so, the Application Pool Service account must have membership in Domain Administrator or Enterprise Administrator.
Open command prompt "Run as" Administrator.
(Optional step) Check if any SPN is registered for Application Pool Service Account.
setspn -L App pool service account
(Important command) Register SPN for Host Name on Application Pool Service Account.
setspn -S HTTP/spn host name <space>App pool service account
Note - The HTTP service above is case insensitive. Do not configure service principal names with "https" even if the web application uses SSL. If your web application has port number (e.g. port number - 1234), then it should be after Host name; else SPN will get registered but service ticket won't get generated.
(Important command) Now, register SPN for the Full Qualified Domain Name (FQDN) also.
setspn -S HTTP/Full qualified domain name <space>App pool service account
Note - If your web application has port number, then it should be after FQDN name; else SPN will get registered but service ticket won't be generated.
(Optional step) You can check numbers of service(s) registered for Application Pool Service Account.
"-L" option will list all the service(s).
setspn -L<space>App pool service accountIf the command ran successfully, you can see the list of services associated with the Service Account - App Pool Service Account.(Important command) For DB Server, instead of HTTP service, register MSSQLSvc service to register the SPN.
Setting SPNs:
DNS Host |
IIS App Pool Identity |
Service Principal Names |
Kerberos.contoso.com |
Contoso\SPAppPool |
HTTP/Kerberos HTTP/Kerberos.contoso.com HTTP/Kerberos:9090 HTTP/Kerberos.contoso.com:9090 |
To create the service principal names the following commands were executed:
SetSPN -S HTTP/Kerberos Contoso\SPAppPool
SetSPN -S HTTP/Kerberos.contoso.com Contoso\SPAppPool
SetSPN -S HTTP/Kerberos:9090 Contoso\SPAppPool
SetSPN -S HTTP/Kerberos.contoso.com:9090 Contoso\SPAppPool
Important |
Do not configure service principal names with HTTPS even if the web application uses SSL. |
In our example we used a new command line switch, -S, introduced in Windows Server 2008 that checks for the existence of the SPN before creating the SPN on the account. If the SPN already exists, the new SPN is not created and you see an error message.
If duplicate SPNs are found, you have to resolve the issue by either using a different DNS name for the web application, thereby changing the SPN, or by removing the existing SPN from the account it was discovered on.
Important |
Before deleting an existing SPN, be sure it is no longer needed, otherwise you may break Kerberos authentication for another application in your environment. |
Service Principal Names and SSL
It is common to confuse Kerberos Service Principal Names with URLs for http web applications because the SPN and URI formats are very similar in syntax, but it's important to understand that they are two very separate and unique things. Kerberos service principal names are used to identify a service, and when that service is an http application, the service scheme is "HTTP" regardless if the service is access with SSL or not. This means that even if you access the web application using "https://someapp" you do not, and should not, configure a service principal name with HTTPS, for example "HTTPS/someapp
From <https://technet.microsoft.com/en-us/library/gg502602(v=office.14).aspx>
Now………..
After configuration, if I go to Attribute editor of the Service account, I see SPNs:
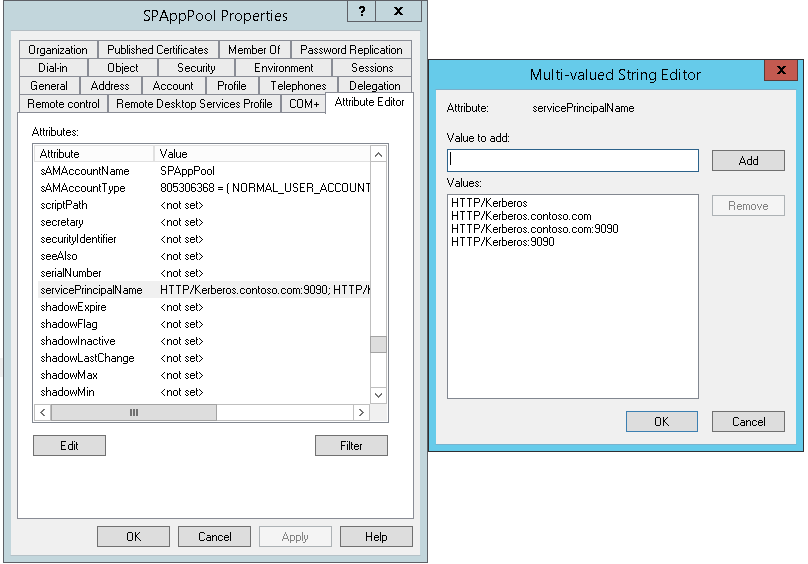
SPNs can be added or removed from "Attribute editor" tab also from user's properties but recommended way to do is through SetSPN Utility.
Having Set SPN in step 3, let's move to STEP 4……………..
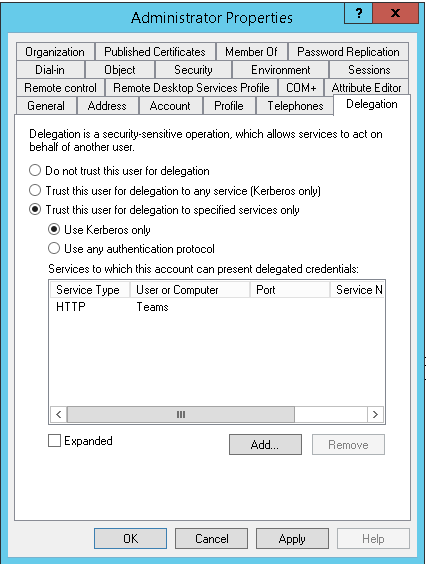
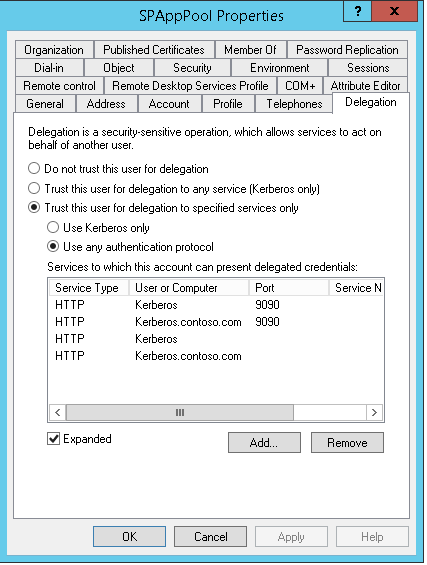
Allow Trust for delegation from DC ADUC - Delegate the Service account to "Trust the use for delegation to Kerberos".
Go to ADUC, locate your service account and go to it's properties by right clicking on it.
Click on Delegation Tab!
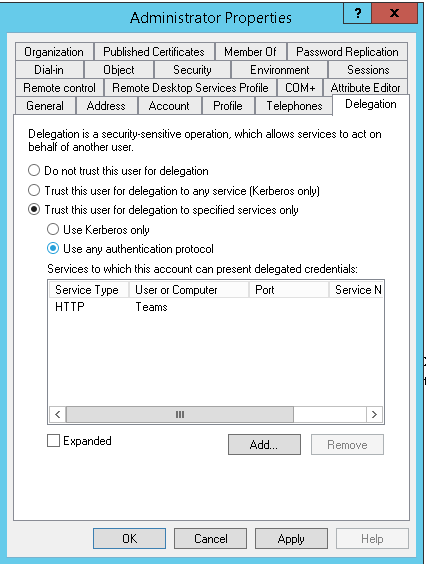
Delegation can be set by any of these 3 options:

Significance of all those 3 options are given below …………..
To configure a service's account for delegation if the service runs under its own domain user account
Right-click the user object in Active Directory Users and Computers.
Click Properties.
Click the Delegation tab.
If Do not trust this computer for delegation is selected, select the appropriate option:
If the Trust this computer for delegation to any service (Kerberos only) option is selected, then the account is using unconstrained delegation, which is not recommended.
If the Trust this computer for delegation to specified services only option is selected, then the account is using constrained delegation.
If the Use Kerberos Only option is selected, then the account is using constrained delegation without protocol transition.
If the Use any authentication protocol option is selected, then the account is using constrained delegation with protocol transition.
From </en-us/previous-versions/windows/it-pro/windows-server-2003/cc772815(v=ws.10)>
Moving on to Adding Delegation…………………..
Go to account properties> Delegation tab> Trust this computer for delegation to specified services only> Use any authentication protocol> Click on Add> Users and computers> Type Service account> check names.
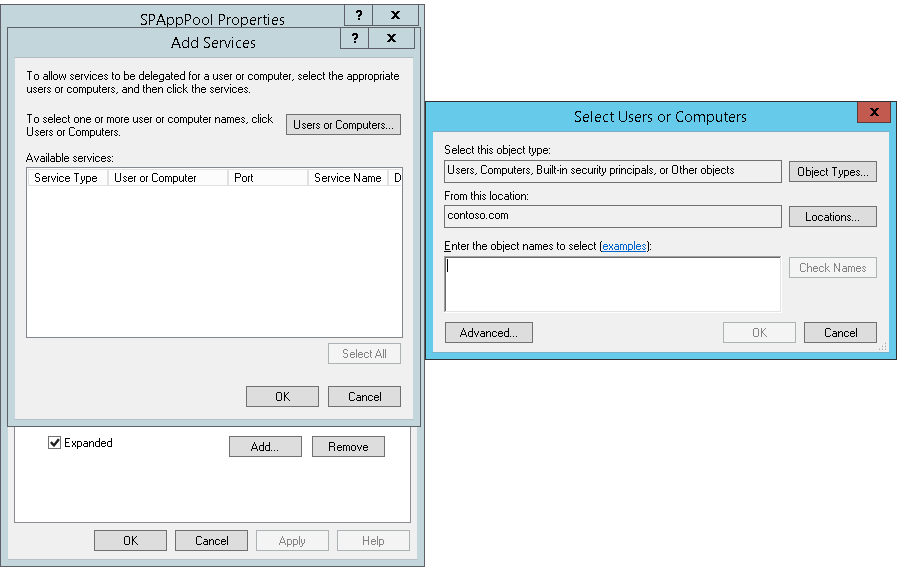
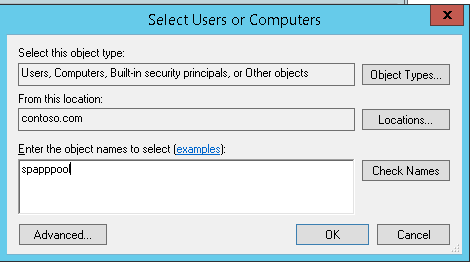
Click ok.
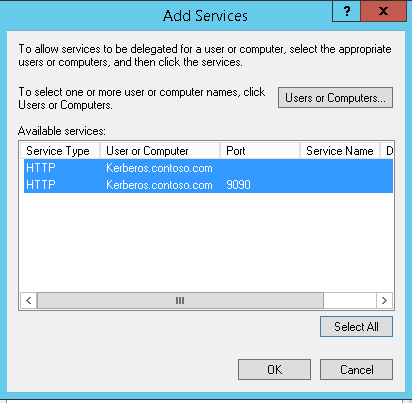
Click 'Select All' to select all services for delegation and click ok.
With that, Moving to Step 5……………..
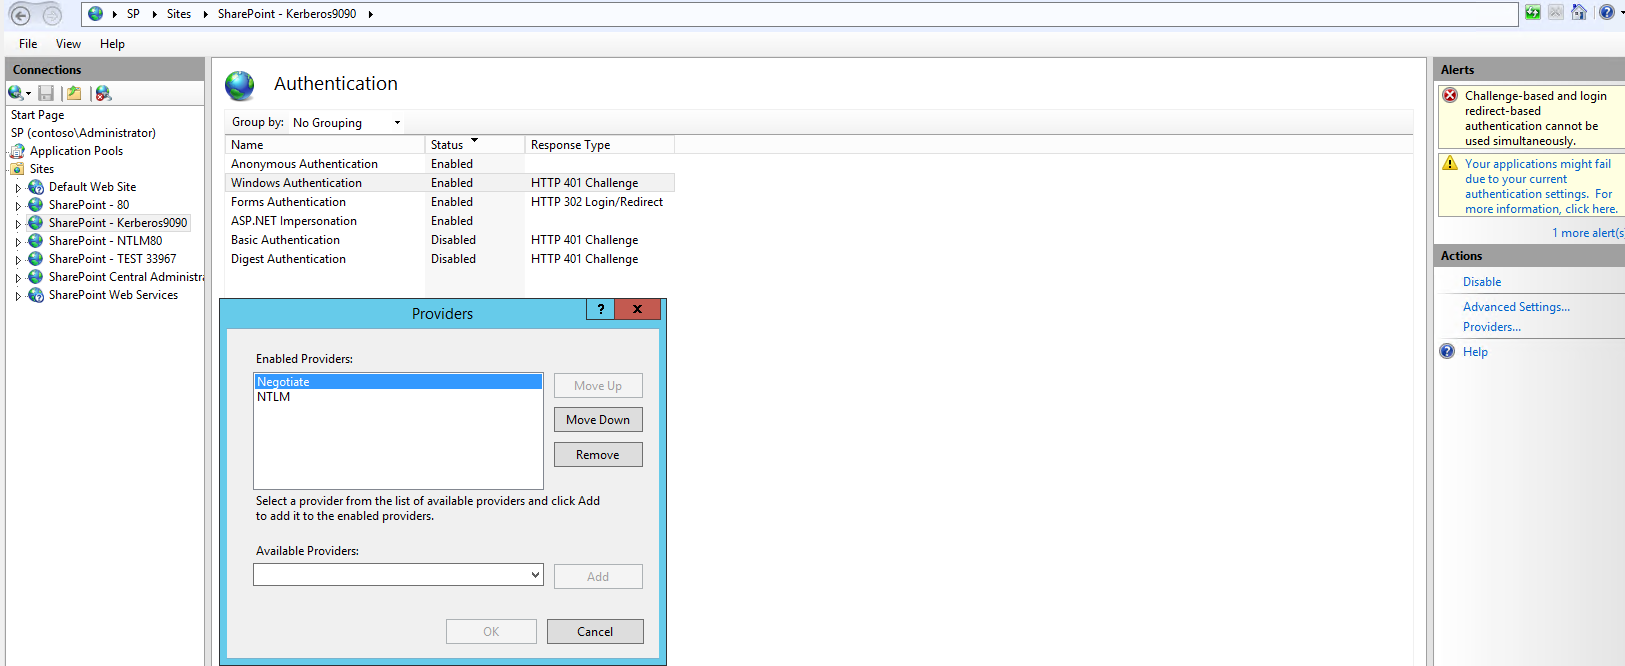
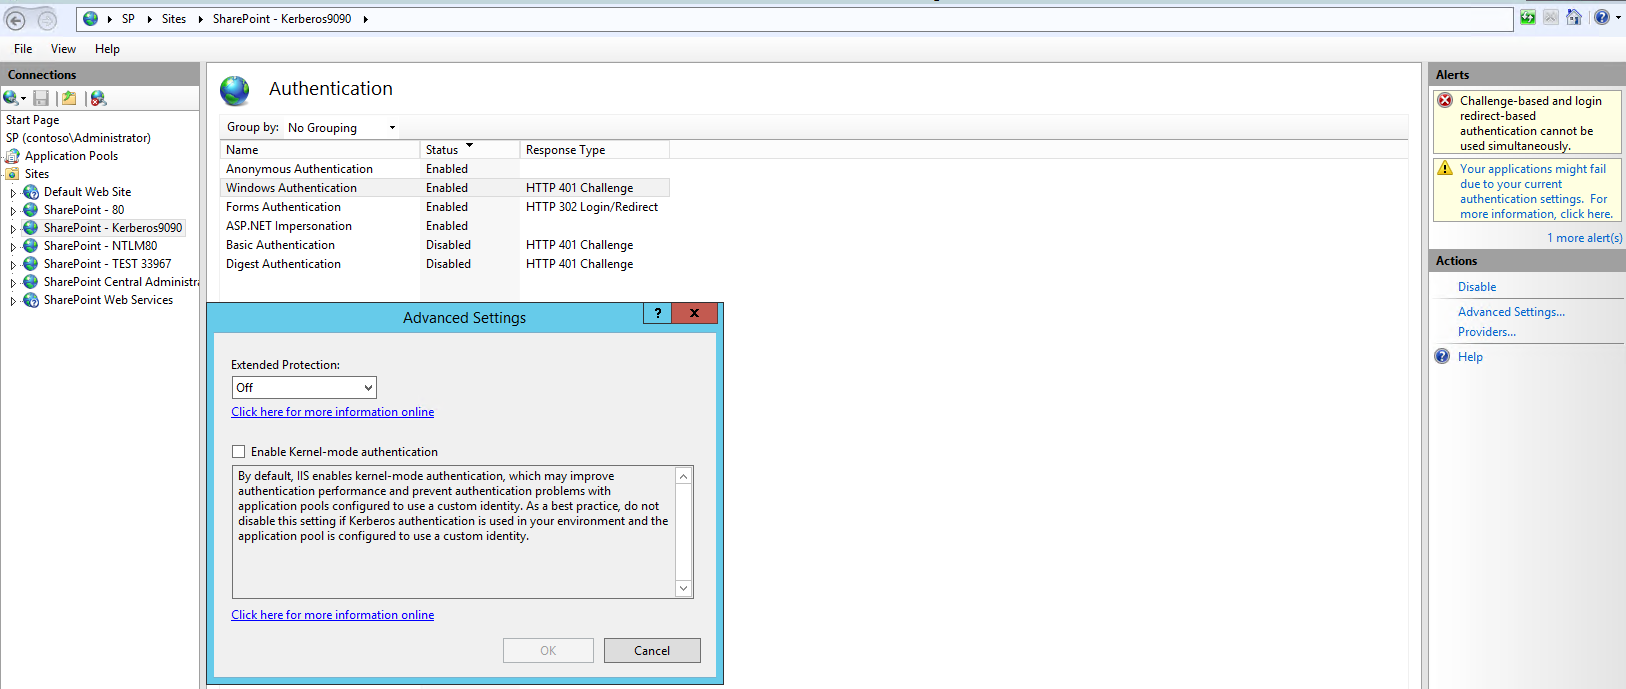
Configure Kerberos in IIS: Set Kerberos as 'Top' Authentication 'provider' over NTLM and uncheck "Enable Kernel-mode" authentication.
Go to IIS manager> Sites Tab> Select the web application - and in the middle pane, double click on Authentication under IIS section.
In the Authentication dialog, select Windows Authentication.
Click on Providers in the right actions pane.
Verify that Negotiate and NTLM are listed. Note that Negotiate option should be on the top.
Click Cancel and then again in the right actions pane, click on Advanced Settings.
Verify in the Advanced Settings dialog that Extended Protection is Off and that "Enable Kernel-mode" authentication is unchecked.
Click Cancel.
Ignore below warnings.
Update Site Bindings with Host Name and default Port number 80. If the web application's port number is not default port (i.e. port 80), then we need to convert it to port 80; else run SPN commands with non default port number
After this, our setup is done but We need to Verify that Kerberos authentication is enabled……………
To verify that Kerberos authentication is enabled on the web site
- Open IIS manager.
- Select the IIS web site to verify.
- In Features View, under IIS, double click Authentication.
- Select Windows Authentication which should be enabled.
- On the right hand side under Actions, select Providers. Verify Negotiate is at the top of the list.
Also, Verify that Kernel mode authentication is disabled……………..
Kernel mode authentication is not supported in SharePoint Server 2010. By default, all SharePoint Server Web Applications should have Kernel Mode Authentication disabled by default on their corresponding IIS web sites. Even in situations where the web application was configured on an existing IIS web site, SharePoint Server disables kernel mode authentication as it provisions a new web application on the existing IIS site.
To verify that kernel mode authentication is disabled
- Open IIS manager.
- Select the IIS web site to verify.
- In Features View, under IIS, double click Authentication.
- Select Windows Authentication, which should be enabled.
- Click Advanced Settings.
- Verify both EAP and Kernel Mode Authentication are disabled.
From <https://technet.microsoft.com/en-us/library/gg502602(v=office.14).aspx>
If everything is good, then by now, you have successfully configured Kerberos AUTHENTICATION for SharePoint Web application.
----------------------------------------------------------------------------------------------------------------------------
Next step is to verify that kerberos AUTH is actually working or not!
Steps to verify and best practices are mentioned in my Part3 post here … … .. .. …. .. …. …. --> See you there!
Check other Part links in this series too:
Part3: Troubleshooting Kerberos authentication and things to check when it fails
Additional References:
Explained: Windows Authentication in ASP.NET 2.0
Windows Authentication Deep Dive What Every Administrator Should Know
How the Kerberos Version 5 Authentication Protocol Works
Double-hop authentication: Why NTLM fails and Kerberos works
Kerberos configuration known issues (SharePoint Server 2010)
Things to check when Kerberos authentication fails using IIS/IE…
Kerberos and LDAP Error Messages
Kerberos errors in network captures
Service Principal Name (SPN) checklist for Kerberos authentication with IIS 7.0/7.5
Kerberos RFC: