Office 365 Things You Need To Know: Data loss prevention
|
Rob Waggoner |
Office 365 and Exchange 2013 include a capability called Data loss Prevention (DLP). DLP allows a company to prevent confidential data from leaving their company via email, or from being communicated via email at all (internal or external). Below I’ll show you an example of preventing Credit Card information from leaving a company via email, but you could use this same model to prevent just about any time of information from leaving your organization via email. For my example, I will show you how employees can share credit card information internally, but not externally. Of course, you could modify the rules to prevent internal communication as well, but for this example, I’ve chosen to just restrict external communication of the credit card.
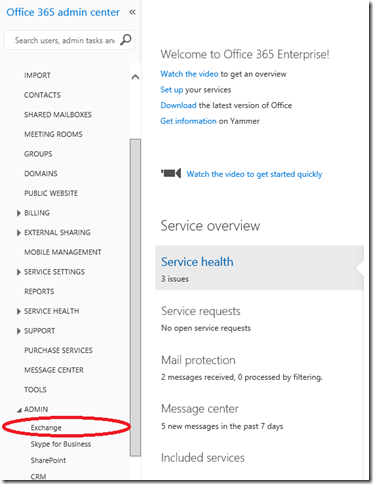
How do I setup DLP? Go into your portal, then expand ADMIN and choose Exchange
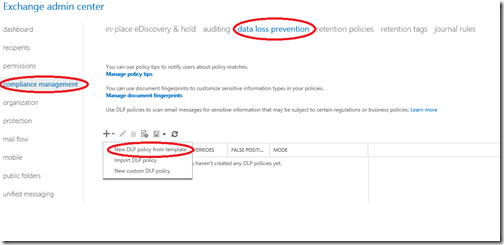
Once the Exchange admin center opens, Choose compliance management (on the left), then data loss prevention across the top. Now you can create a DLP policy by clicking on the + sign and choose New DLP policy from template.
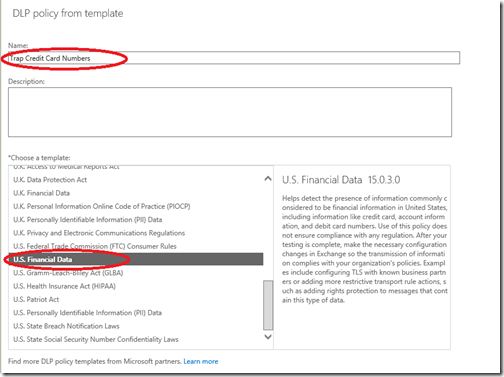
Here is where you have the ability to create a new policy based upon an existing template. Of course you could create your own custom template, but I’m going to leverage an existing template as a first example.
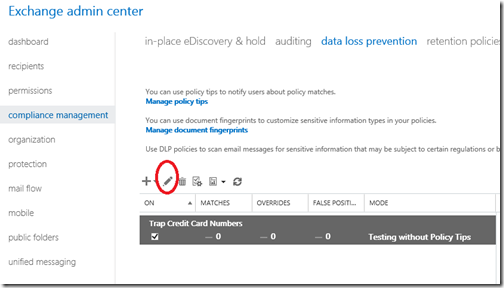
Once you’ve created the rule, you need to modify it because by default, the rule will be in test mode, invisible to the end user. Just click on the pencil icon to bring up the rule editor.
This screen now allows you to Enforce the rule, or Test DLP policy with Policy Tips. I’m going to go ahead and Enforce my policy tip.
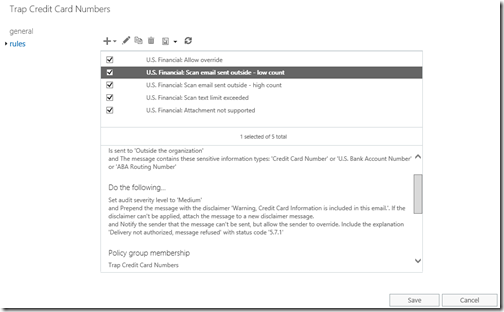
For the sake of this demonstration, I have also modified the U.S. Financial: Scan email sent outside – low count rule. The “low count” rule has a corresponding “high count” rule. The purpose of these rules is to let you define boundaries. Maybe people should be able to send one or two credit card numbers in an email, but not 10. You could modify these rules so that one or two credit card numbers generate a warning, where 10 or more credit card numbers in email will cause a message rejection. Here’s what my message rule looks like now.
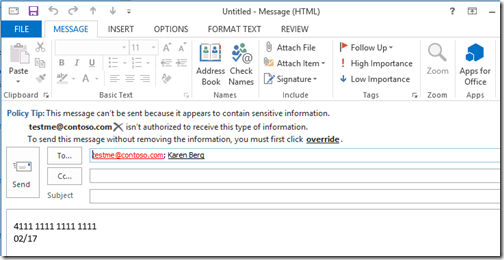
Once I’ve saved my new policy, I can see it in action in both the Outlook Web App and Outlook 2013. Here is the experience in Outlook 2013:
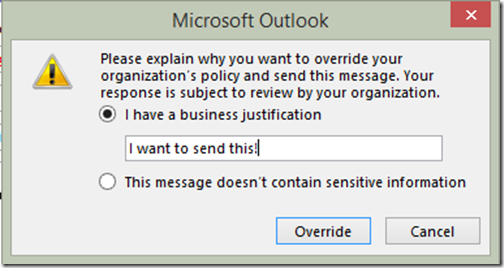
In Outlook, when I try to ignore this message and press Send, I receive:
I also enabled override. This way a user can override the rule in case there is a true business need to disclose this information, or even if the rule generates a false positive. Override can be disabled, hence blocking the information from being disclosed externally.
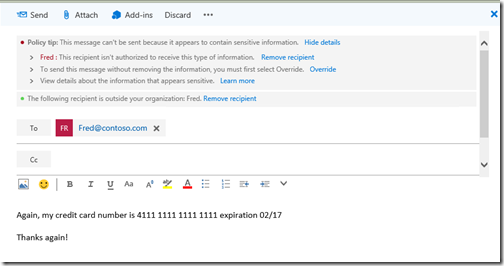
Here is the Outlook Web App view:
Take note that for both views, the user is alerted to the potential violation and they have the ability to Override the rule. The thing I like about these DLP rules is that they can be customized to meet your needs. You can even create new rules. For example, your customer may have customer numbers that they may want to keep confidential. You could create a custom template and setup a DLP rule to prevent customer numbers from leaving the organization. We have a lot more templates available, some of them are centered around international privacy protection and even HIPAA.
While I admit that DLP will be helpful, it will not prevent the malicious user that insists on disclosing private information from doing so, there is just no way to prevent everything, but this is a very helpful way to prevent the inadvertent disclosure while educating the end user of the concern.
Here is the information I used to assemble this example. I think the Channel 9 video is well worth the time to watch.
Channel 9 video: https://channel9.msdn.com/Events/TechEd/NorthAmerica/2014/OFC-B319#fbid=
Overview of DLP: https://technet.microsoft.com/library/jj150527(v=exchg.150).aspx
DLP Procedures: https://technet.microsoft.com/en-us/library/jj938003(v=exchg.150).aspx
Please check out our whole series of Office 365 blogs at https://office.msts2.com.
Until next time,
Rob
Technorati Tags: Rob Waggoner,DLP overview,block sensitive information in email

