Azure Site Recovery can Overcome Azure’s 127GB Boot Volume Limitation
|
Rob Waggoner |
Azure limits the size of your OS boot volume to 127 GB. For new workloads, this limitation is not a significant barrier because you can add additional volumes to your Azure VMs, but for existing on-premises workloads that were not built leveraging best practices, or have just grown over time, this size limitation may be a challenge if you want to take advantage of Azure. In this article I am going to show you how you can reduce the size of a Virtual Machine’s boot volume to below 127 GB by leveraging Volume Mount Points. Of course there are other ways to reduce the size of your boot volume, the hope is that you can just shrink the volume to get below the 127 GB barrier. If that is not possible, this Volume Mount Point solution may be something you can to leverage. This solution isn’t seamless, it does take some effort on your part, but it does solve the problem without having to re-architect your existing solution.
I encountered this issue when working with a partner that wanted to protect existing workloads with Azure Site Recovery (ASR). As you look at your customers environment, how many existing solutions have exceeded the 127 GB boot volume size? I will show you how you can leverage Volume Mount Points to reduce the size of the boot volume so you can use ASR to protect these VMs or so you can move and run these workloads to Azure.
Mount Points have been traditionally used for two things.
- You are clustering and use Cluster Shared Volumes (CSV). CSV’s are delivered using Volume Mount Points.
- You use Volume Mount Points if you run out of drive letters. Since the alphabet only has 26 letters, we support the use of Volume Mount Points to add additional storage to your largest servers.
As you see, Volume Mount Points have been used for some of our most critical workloads. This is a proven technique and adding Volume Mount Points to an existing workload is much easier than re-architecting your existing workloads.
Here is an article that shows you how to setup a Volume Mount point. This article was created for Server 2003, but the steps are the same for Server 2012 R2. I include a high level step by step process below, and will show you when you need to leverage this article.
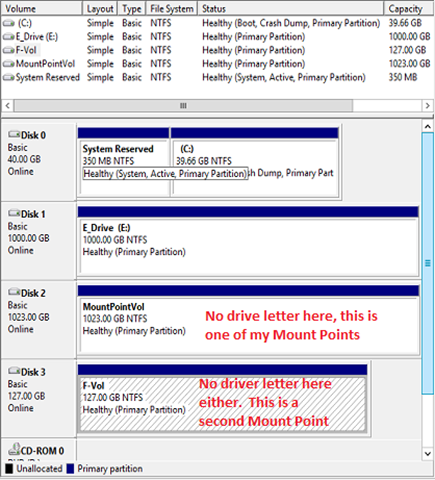
I’m not going to go through all of the scenarios, but from a high level you need to add an additional virtual hard drive to your VM, then mount that virtual hard drive as a directory within your C: drive. Here is a screen shot of my Disk Manager configuration:
 |
Notice my Disk 2 & Disk 3, do not have drive letters? These are Volume Mount Points. Their storage is available via the C: drive with separate directories representing each new volume. |
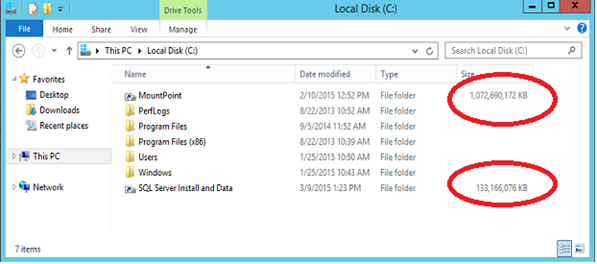
Below is a screen shot of my C: drive, I have two Mount Point folders available to C:, the MountPoint folder and the SQL Server Install and Data folder. Since I’m just using this VM for illustration, I do not have many files in each of the folders, but this demonstrates the capability. Also notice that the size of each Volume Mount Point is presented in Explorer as well.
Now that I’ve shown you Volume Mount Points, your next question is: How do I use them for an existing workload? This is where I said it wasn’t going to be seamless, you need to do a bit of work, but I am talking about just moving files around.
You need to attach your new volumes and then move some of the data that currently resides on your C: drive into the Mount Point folder you just added. Of course it is best to move data that is not used often, but if that is not an option, you can also move more complex solutions like SQL. Notice my second Mount Point folder above.
Here is a high level list of the steps needed to take advantage of Volume Mount Points:
- Be sure to backup your VM before you start moving data! Please have a good backup in case you need to roll back.
- Add a new virtual hard drive to your VM.
- Within the VM, go to Disk Manager and format your new volume, you do not need to add a drive letter.
- If you are moving an application and data, you will probably need to stop the application and services so you can move the files.
- Rename the original folder. You do this so the new Volume Mount Point can use the original name (hence transparent to the applications). For this example, if we have the directory C:\BigFiles. I would rename it to C:\BigFiles-Orig,
- Follow the instructions in this article and name the folder for your new Volume Mount Point C:\BigFiles. By reusing the original name, the Mount Point should be transparent to the application.
- Copy (or move) the contents of C:\BigFiles-Orig to the new folder C:\BigFiles.
- Remove the folder C:\BigFiles-Orig and its contents to reduce the physical size of your boot volume.
- Defrag the OS disk. You need to do this so you can shrink the boot volume below 127GB.
- Shrink the OS partition (below 127 GB).
- Then resize the virtual hard disk to reduce its physical size to below 127GB.
- Test your solution to make sure your applications do not have a problem with Volume Mount Points. I haven’t heard of any applications that have issues, but let’s make sure.
A couple of items to remember:
- Azure does not support VHDX virtual hard drives, but ASR does. If you are using VHDX’s on premises, you can use ASR to protect those VMs and ASR will take care of the conversion within Azure to VHD’s.
- At the time of publishing, Azure and ASR do not support Generation 2 VMs. The ASR team is looking for a way to overcome this constraint.
- I tested the Volume Mount Points within Hyper-V VMs protected with ASR and with VMs running within Azure. Both run without issue and are supported.
- If your on-premises workload uses the D: drive for data, ASR will address this during the protection process. You will get to keep your D: drive (which is typically used as the temporary storage drive), ASR will move the temporary storage drive to a different letter so it will not interfere with your workload if you choose to run it in Azure.
- Volume Mount Points is a supported solution for this scenario. I’ve worked with our internal teams to ensure this solution not only works, but is supported by our support teams.
I’ve spent a lot of time with ASR and Azure in general. My team has built a number of videos that walk you through specific scenarios in Azure here.
Until next time,
Rob
Technorati Tags: Rob Waggoner,ASR,Azure Site Recovery,127 GB boot drive,127 GB limitation


