Mastering Identity with Azure Active Directory – Episode 5: Working with SaaS applications
The fifth part of John Craddock’s series into Azure Active Directory shows you how to open up a plethora of SaaS applications to your Azure AD users.
By John Craddock  In this series, I will take you through the key aspects of Azure Active Directory, and you will discover how using Azure AD you can build identity solutions for the future. The series is about the technology rather than the marketing hype. It’s also something I cover in more depth in my masterclass, which is a deep-dive into the technologies and goes into the real technical detail. For an introduction to this series and some background on myself, see Episode 1: Introductions all round.
Caveat: To the best of my knowledge the information was accurate at the time of writing this blog but changes to Azure AD and the portals are frequently happening, and the precise details may change.
Episode 5: Working with SaaS applications
Hello again, back to my blog. I had planned to make the blogs available every week, however I hadn’t anticipated how much work they were! A catch phrase we have used on many projects is “All you’ve got to do is…. [long pause] And 2 weeks later…”. Since I saw you last, I have run an identity master class in Oslo; it was a really interactive week, and the evaluations were amazing! Thanks to all those who attended.
So what am I covering in this episode? I want to start by looking at the challenges that face an organisation when provisioning access for users to cloud services. Let’s broaden the scope to include any web application that is available via the Internet. This is illustrated in Figure 1.
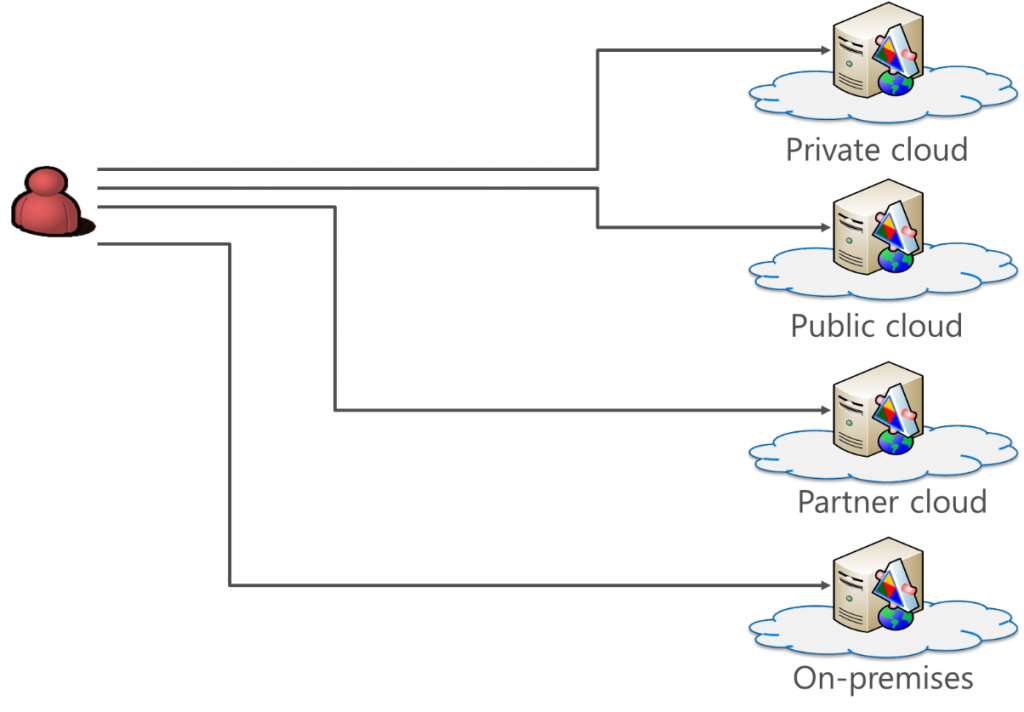
Figure 1: Applications everywhere
Looking at Figure 1 our challenge is how do our users authenticate to all the different web applications? Each application provider could maintain their own identity store, and users could be tasked with remembering multiple usernames and passwords. We all know this is unsatisfactory as users expect SSO and having to remember multiple passwords just causes password abuse! The same password may be used for multiple sites, and if a site is breached, the hacker will play the harvested usernames and passwords against other sites to see what else they can gain. Another major impact of this type of arrangement is how accounts are disabled when a user leaves an organisation; with difficulty, and it results in many orphaned accounts.
So what the solution? It’s federated identity. When the user attempts to access a Site A, they are redirected to their identity provider (IdP) to authenticate and get an access token for Site A. The access token is digitally signed by the IdP and contains assertions (claims) about the user. These assertions may include the user's name, email address, etc. After authenticating with the IdP, the user returns the token to Site A. The Site validates the token by checking the digital signature and the token’s timestamps and, if satisfied with the results, accepts the token as proof that the user is authenticated and the assertions are true.
When a user goes to Site N, once again they are redirected to their IdP for authentication but this time, as they have already authenticated, they have an authentication cookie issued by the IdP. The cookie is presented to the IdP as proof of authentication and the IdP simply issues an access token for Site N. So now we have SSO to all the sites. When a user leaves an organisation, only one account needs to be disabled to block access to all sites.
Fantastic result, but what if a site can not be configured for federation? The site might require a username and password. Well, Microsoft has thought of that in their Azure AD SSO configuration as they allow a username and password for a site to be stored in a secure vault for each Azure AD user. After the user has authenticated with Azure AD, the appropriate username and password can be injected into the browser to allow access to the site.
In Azure AD we have a variety of ways of adding applications and these can be seen in Figure 2.
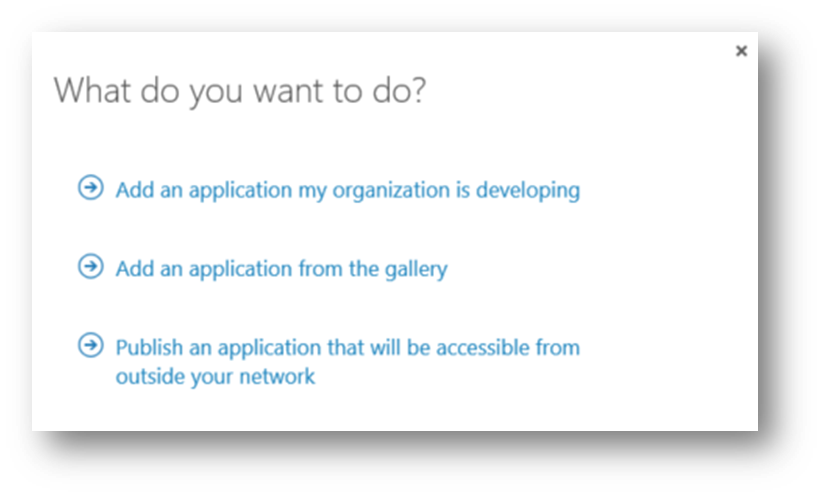
Figure 2: Adding applications to Azure AD
The first option allows you to configure an application to work with Azure AD as the identity provider, and I have covered the protocol details in part two of this series. In the next blog, 'Managing your applications', I will go into more detail. The last option in Figure 2 is to publish an application using the Azure AD Application Proxy, and I will be looking at that in Part 7 of this series.
Here we are looking at “Add an Application from the gallery.”
At the time of writing this blog, there are 2777 applications that can be added with SSO capability and made available to your users. Once an application is assigned to a user, the user accesses the application via https://myapps.microsoftoft.com, see Figure 3.

Figure 3: Accessing applications
To configure the application requires:
- Configuring the SSO method
- Configuring account provisioning if it supported
- Assigning the user to the application
- Assigned directly or via group membership or self-provisioning
The options can be seen in Figure 4.
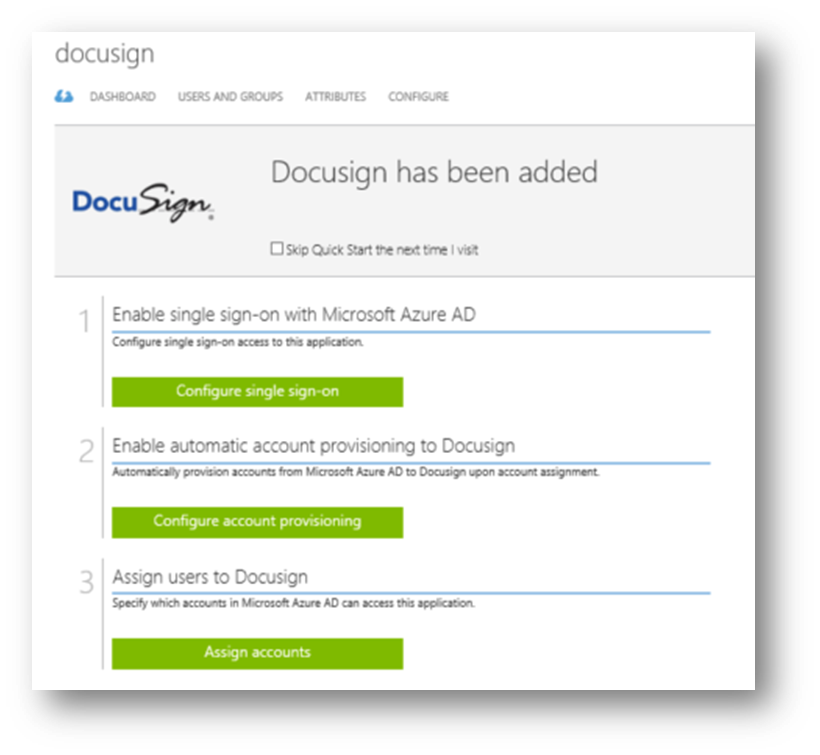 Figure 4: Configuring the application
There are three options for SSO, it depends on the application as to which options are available, for example, the Federate with Azure AD option will only be available if establishing federation through the wizard is possible. The possible options available are:
- Federate with Azure AD
- Use the password vault to store a username and password for the application securely
- Use an existing SSO solution
- This option assumes that you already have a solution for SSO and simply allows the application URL to be added as a target to the user’s access panel (myapps.microsoft.com)
Federating with Azure AD
How you establish federation between Azure AD and the application will vary depending on the target application. It may be as simple as proving administration credentials for the target application and clicking one button! If the target has the appropriate APIs exposed then the federation and user provisioning can be automatically enabled. Other applications will require you to gather the Azure AD metadata for federation and sign into the target application’s administration portal to complete the process. For some applications, you will need to email the details to the target company support team and they will complete the process.
So how do you do it? Luckily for us, Microsoft has provided tutorials for configuring the various applications, which you can find here. In the Google Apps tutorial you will find a great video that shows you how to set up federation and user provisioning in just a couple of clicks. I’ll show you the result of this in my video at the end of this blog.
Password vault
If federation is not an option, then Azure AD can store the username and password for the site. When the user selects the link to the site in the access panel, the username and password fields in the browser are automatically populated with the credentials from the user’s secure vault.
There is the capability to use a shared account for a group of users, as an example, this feature allows all members of the group to all access a corporate social media account such as Twitter. Azure AD supports automatic password rollover for Facebook, Twitter, and LinkedIn. When configuring rollover, the rollover period can be configured.
Account provisioning
Looking back at Figure 4 you will see the option to configure account provisioning. Despite the fact that authentication is being performed by Azure AD, many applications will need to create a profile for each user that will connect. This could be so that application can identify a user as federated and redirect the browser to Azure AD for authentication, it could be for licensing purposes, or the application may require other user details. Automatic user provisioning can be performed by Azure AD provided the application exposes a web interfaced defined in the System for Cross-Domain Identity Management (SCIM) 2.0 protocol specification. This protocol allows Azure AD to create, modify and delete users and groups that are assigned to the web application. You must provide Azure AD with a user account for the web application that has sufficient privileges to execute the desired operations.
At the moment only 18 applications support SSO and full user management, you can see the list here.
Assigning the user to the application
A user can be assigned to an application, directly, via group membership or via self-service. Once the application is assigned it will be available to the user via the access panel and if automatic provisioning is enabled for the application the user will be added to the target application via SCIM.
Please watch the video below, where I show you the password vault in operation. You will also see federated authentication and automatic user provisioning to Google Apps. That’s it until next time.
For details of all the episodes in this series, look here. To learn and become skilled in implementing identity systems based on Azure AD, on-premises AD and AD FS join me at one of my Masterclasses. To find out more visit XTSeminars.