5 Second Delays Add Up – The Case of the 4 Hour + In-Place Upgrade
[How does simple configuration oversight affect in-place upgrades for Windows 10? Read on to find out.]
Hello, Nandan here again!
Over the last couple of years, as businesses have started adopting Windows as a Service, one of the big changes in managing the Windows life-cycle is the in-place upgrade. Clearly, with the shorter release cadence, it isn’t possible to “rebuild” a user’s device every time a new build of Windows 10 is approved for deployment within the organization. So, we upgrade in-place from 1703 to 1709 to 1803 and so on.
One of the most common problems that I have seen with this approach is the amount of time it takes for an in-place upgrade to complete. In an ideal scenario, this process should take between 45 minutes to an hour. This is the time I have seen on my personal desktop at home, which is a stand-alone, unmanaged device. This is also the unofficial guide time for the in-place upgrade. I say unofficial, because it’s very difficult to put a finger on exactly how long the in-place upgrade should take. There are various factors involved. How many users are using the machine, and how many profiles do we have on the system being upgraded? How large are these user profiles? Where is the user data stored? Is the AV configured for real-time scanning for write operations (because a lot of data is being written to the disk during the in-place upgrade, real-time scanning can directly influence the time this process takes)?
At a very high level, the following steps are involved in the upgrade process:
- The Windows 10 OS image is downloaded
- The Windows setup engine runs through various compatibility checks as a way to ensure there are no known issues with applications, drivers, BIOS, etc
- User data is inventoried; this is needed so that it can be restored at the end of the upgrade process
- Setup then completes the actual upgrade of the operating system – this process involves laying out the new operating system on to the disk and moving the old operating system out of the way
I will be following up with a separate post that dissects the in-place upgrade in a few weeks.
A few months ago, one of the customers I was working with sent me an email. They were transitioning from 1607 to 1709 and had observed that in-place upgrades were taking over 4 hours plus at the longest, with an average time somewhere between 2.5 to 3 hours. In either case, compared to the normally expected upgrade times, this was way off the mark. To get to the bottom of this, we donned our troubleshooting hats and began picking through the logs to see where the delays were and how we could bring the upgrade times to an acceptable value.
The test machines we were using were shared systems with multiple user profiles. User files and documents were redirected to a NAS device and a few of them had their Documents folder as large as 25 GB.
We started with the most important log that is used for issues in the Windows setup process – the setupact.log file. This file is found under the C:\$Windows.~BT\Sources\Panther folder. The folder is normally hidden, so you might need to toggle the settings for hidden files and folders from Explorer options if you don’t see it.
The customer was using an in-place upgrade task sequence in SCCM to perform the upgrade. The delays we see below were observed after the operating system image download had completed and setup.exe had been invoked.
The big delays were happening after the OS finished downloading the image and the first reboot, and then post the first reboot.
- Time taken after the OS image was downloaded to first reboot: 150 minutes
- Time taken for the upgrade to complete after the first reboot: 100 minutes
The log started showing some very clear patterns. Below is a snippet showing 5 second delays:
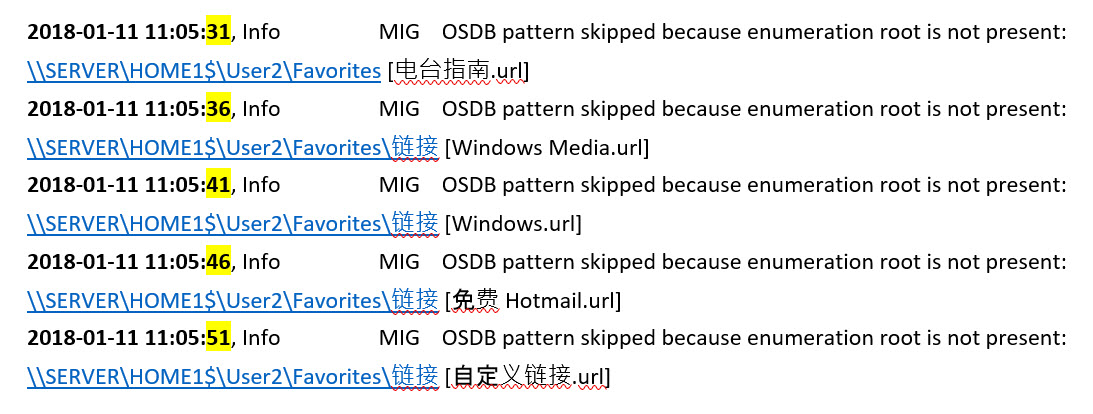
The next snippet shows similar delays, but this time the delays were up to 10 seconds.
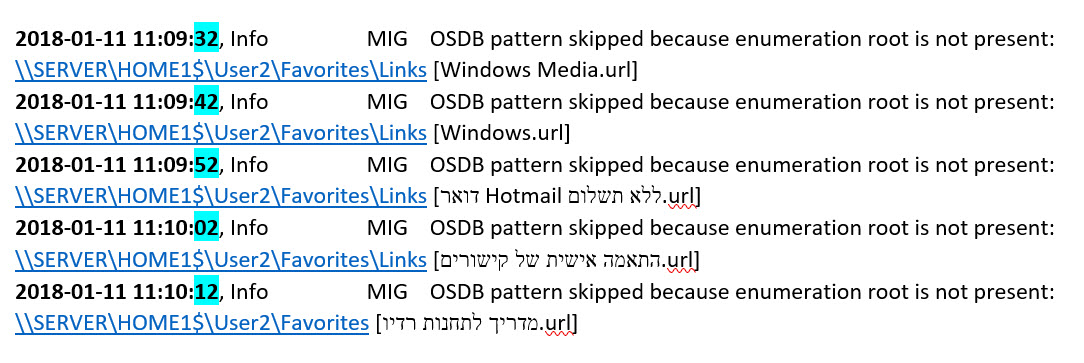
There are a couple of things to note here:
- What are those strange characters that we see in the file names? This is out of scope for the current discussion, and I will revisit this when I work on the dissection of the in-place upgrade.
- And probably, the bigger question - what is happening during these 5 or 10 second delays?
Considering we are accessing a network share, my first thought was this could be a networking issue. Two tools popped out from the arsenal – Procmon and Network Monitor. I decided to start with Procmon.
We started running setup for the upgrade, manually this time, because we knew that the actual download of the image was not causing any delays. By running setup from a USB stick, we were able to speed up the troubleshooting process. After starting setup, we monitored the setupact.log file for the phase where user data is processed, which is where we see the delays above and then started a Procmon trace. For the delays, the trace showed…
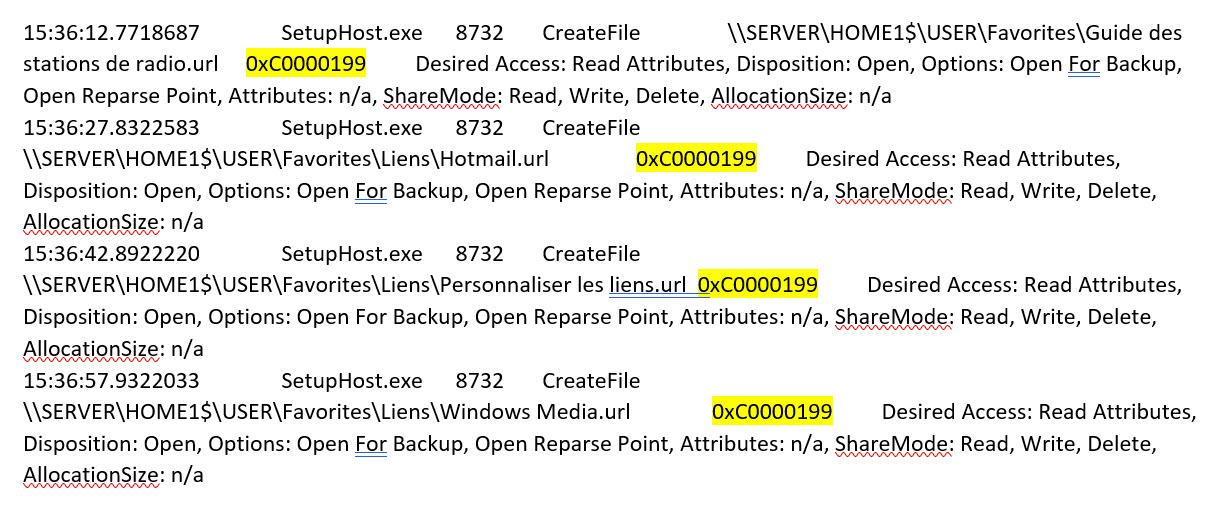
The status code for these operations is 0xC0000199. This translates to:
![]()
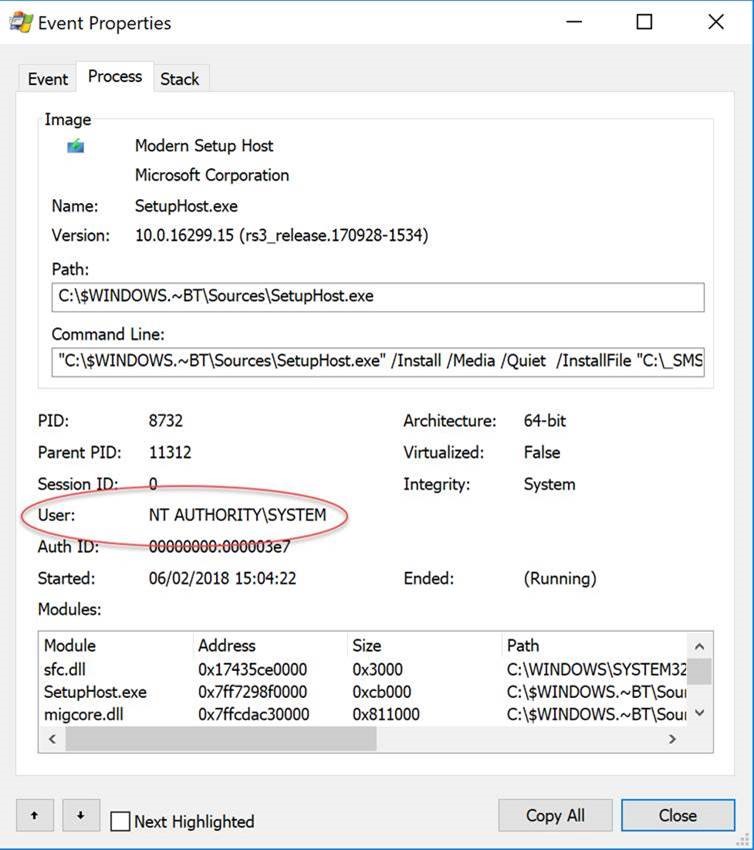
And, these operations were performed by setuphost.exe, which was running under the context of the System account.
On digging around further, I found that the path to the network share was using the CNAME record for the NAS device hosting the file shares. In the paths we see in the snippets above, SERVER is an alias, not the actual hostname. So, we started testing this further. On a test system, we opened a command window running under the context of the system account (PSExec to the rescue).
- Try to map a drive using the A record for the NAS device – Successful
- Try to map a drive using the CNAME record for the NAS device – 0xC0000199 after 5 seconds
That second result is the same symptom we were seeing during the In-Place Upgrade.
This got us looking at authentication options for the NAS and how the appliance was generally configured. The customer was using Kerberos authentication for the NAS device, and the problem seems to be related to issues with how authentication options and SPNs are registered for the records that point back to the NAS. We found an interesting article on the NetApp website (the customer was also using a NetApp filer for their storage requirements).
https://kb.netapp.com/app/answers/answer_view/a_id/1030858
The final resolution was missing SPNs. For the name in the A record there were SPNs registered. For the name in the CNAME record, there were no SPNs registered. Registering SPNs for the CNAME record got the connections to the shares working, using the alias. Once this was done, upgrades started completing in a 45 to 60 minute range – which is what the normally expected times for an in-place upgrade are and what the customer was also expecting.
For those that don’t normally work on DNS and networking – an easy way to understand the CNAME record is a nickname or an alias.
- Name to IP Address mapping – A Record
- Alias to Name mapping – CNAME Record
For example, your name is Jonathan and your phone number is 123456. Friends and family know you as John. In DNS terms, this would be stored as:
- Jonathan (A Record) 123456
- John (CNAME Record) Jonathan
Anyone looking for the phone number can look for John or Jonathan, and they will receive the same number.
In the same way, when you create a DNS name record for your NAS filer, it might map the IP address to a complex name like filer-xxxxxx-serial_number.domain.com. However, you might want to make it easier to access the NAS device and just call it fileserver.domain.com. In this case, you end up with:
- filer-xxxxxx-serial_number.domain.com (A Record) 192.168.100.120
- filerserver.domain.com (CNAME Record) filer-xxxxxx-serial_number.domain.com
Which means…
fileserver.domain.com maps to filer-xxxxxx-serial_number.domain.com maps to IP address
Ultimately, the CNAME or the A record map to the same underlying IP address.
Here’s a good article describing these records - https://support.dnsimple.com/articles/differences-between-a-cname-alias-url/
For information on Service Principal Names, review - https://msdn.microsoft.com/en-us/library/ms677949(v=vs.85).aspx