Getting Started with Windows 10 Device Guard – Part 2 of 2
Hi, my name is Debs Turner, I’m a Premier Field Engineer in the Devices and Mobility team with Microsoft UK.
This article is the second in a two part series which I have produced to show how you can Deploy, Configure and Manage Device Guard in a lab environment. These are aimed at those who have a basic understanding of the Device Guard feature in Windows 10. If you’d like to learn more about Device Guard before continuing; please review our comprehensive Device Guard Deployment Guide - this provides detailed information on the prerequisite requirements and explains how virtualisation based security and code integrity policies work.
The aim of these two blogs is to simplify the process of testing Device Guard, by providing you with Step-by-Step Instructions, Screenshots and Automation Scripts that will help you test, evaluate and implement Device Guard.
In PART 1 we covered the following steps:
Create a code integrity policy from a “Golden computer”
Audit code integrity policies
Create code integrity policy from audit capture in the event log
Merge code integrity policies
Enforce code integrity policies
In this second article, we will cover the following steps:
Create catalog files with Package Inspector
Create code integrity signing certificate
Sign catalog files with SignTool.exe
Add catalog signing certificate to code integrity policy
Deploy catalog files with updated CI policy
Sign code integrity policies with SignTool.exe (Optional)
Here’s a breakdown of my Lab Environment
Virtual Machines
1 x Windows Server 2016 which is the Contoso.local Domain Controller and Certification Authority - WIN-6K9DP1F08A5.contoso.local
1 x Windows 10 Enterprise Client - GOLD-MACHINE.contoso.local - this machine will be our "Gold Machine" that has all the software, drivers & updates that we want in our environment and on which we will configure Device Guard in Audit Mode to capture activity with the Package Inspector tool.
File locations
C:\MyCIPolicy
C:\MyCatalogs
C:\MyCertificates
1 x Windows 10 Enterprise Client - TARGET-MACHINE.contoso.local - this machine will our Target System that we will target to enforce and test our policies.
Note The scripts pertain to my lab environment but feel free to tailor to yours.
Readiness
Note Before configuring Device Guard, it's important to check whether your hardware is compatible. You can do this by downloading the Device Guard and Credential Guard hardware readiness tool here Device Guard and Credential Guard hardware readiness tool.
Resources
Note If you'd like a ready made environment to test and deploy Device Guard; why not head over to our TechNet Virtual Lab which has been made available so that IT pros can deploy Device Guard in a VM environment without any additional software or setup TechNet Virtual Lab: Deploy Device Guard.
Background Information
Often businesses have line of business applications that are unsigned and for which the process of signing is either too difficult or just not an option. To allow unsigned line of business applications to run, we can create catalog files. Catalog files contain information about our trusted application which once signed and deployed can be managed by our code integrity policy like any other signed application whilst still blocking unsigned code (most malware is unsigned). To create catalog files, we use a tool called Package Inspector. The Package Inspector when initiated, will monitor and capture application activity on any local drive (as required) and must be run on a machine that has a code integrity policy deployed in audit mode (in our case, GOLD-MACHINE).
Demo Steps
In this demo, we will create a catalog file for our unsigned application, create a code integrity certificate to sign the catalog file, add the catalog signing certificate to our code integrity policy and deploy to our TARGET-MACHINE.
Finally, we will take a look into the optional step of signing our code integrity policy as an additional security measure.
Create Catalog Files with Package Inspector
To add an unsigned app to a code integrity policy, we need to start with a code integrity policy created from a golden image. That is to say, a device that has all the software and drivers installed that we require to run in our environment. The golden image (in our case, GOLD-MACHINE) must have the policy applied in AUDIT MODE to ensure that software and applications can be allowed to run and thus be captured by the package inspector. We covered deploying a code integrity policy in audit mode to our GOLD-MACHINE in Part 1.
On our GOLD-MACHINE, we will scan the C drive but you can specify any local drive as required.
To start the package inspector and have it scan the C drive, we will run the following command.
PackageInspector.exe Start C: 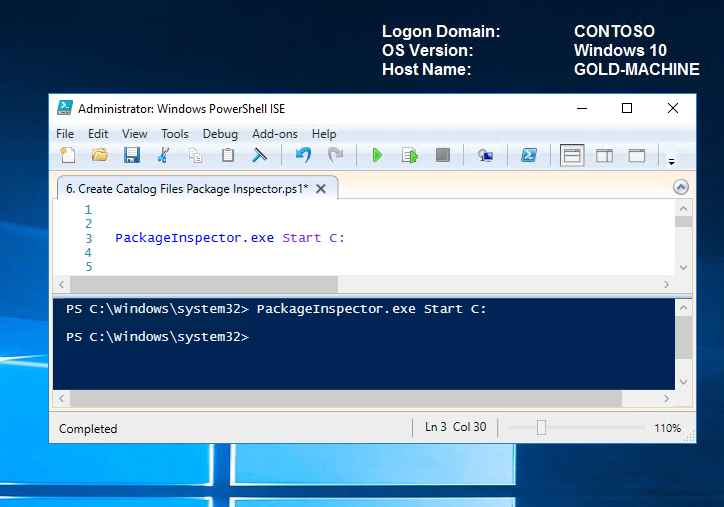
The package inspector will now monitor the C Drive for any changes.
- Copy your installation media to the C drive, to ensure that Package Inspector finds and catalogs the installer itself. If you skip this step, the code integrity policy may trust the application to run, but not to be installed (assuming you want to allow installations i.e. application is not part of your image). All binaries that are used while Package Inspector is running will be part of the catalog files.
- After the installation, start the app and make sure that any product updates are installed and any downloadable content was found during the scan. Then, close and restart the app to make sure that the scan found all binaries.
- On completion, stop the package inspector and create the catalog files by running the command below.
Note You can install as many applications as required before stopping the package inspector and creating your catalog files.
Stop the package inspector and specify the name and location of catalog files to be created PackageInspector.exe Stop C: -Name "C:\MyCatalogs\LOBApp-Contoso.cat" -cdfpath "C:\MyCatalogs\LOBApp.cdf" 
On double clicking the newly created catalog file, notice that it is not currently signed.
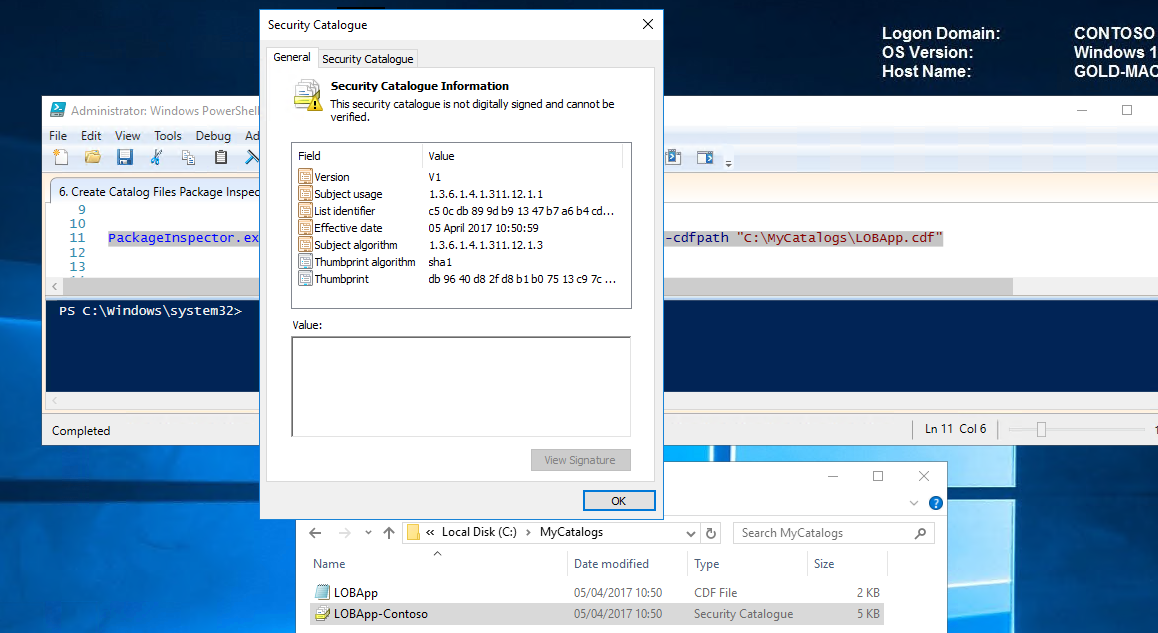
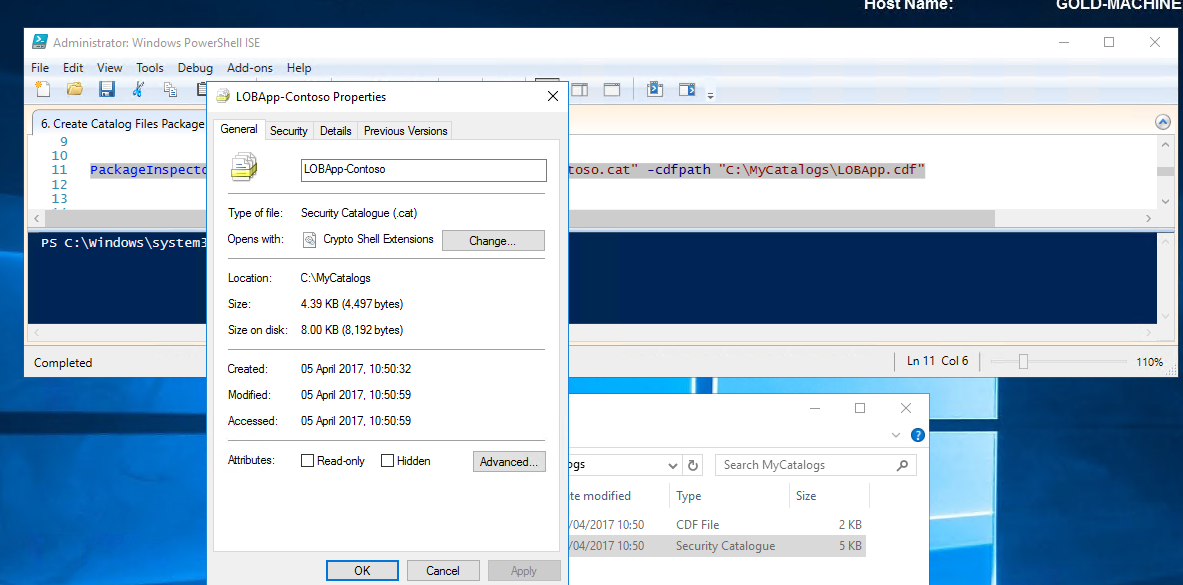
Selecting properties of the cat file also displays the absence of the digital signature tab.
In order to trust our catalog file; we'll need to sign it with a code integrity signing certificate which we will create in the next step.
Create Code Signing Certificate
To sign our catalog file, we require a code signing certificate. If you already have a code integrity signing certificate, you can jump to the next step of signing your catalog file with SignTool.exe.
To create a code integrity certificate, please refer to my step by step guide here - Create code integrity signing certificate.
Sign Catalog Files with SignTool.exe
To trust the catalog file within a code integrity policy, we must first sign it with our code integrity certificate.
We will be signing our catalog with signtool.exe which I obtained by installing SDK 10 .
Note The certificate must be installed in the user’s personal store on the computer that will be signing catalog files and/or code integrity policies (in our case GOLD-MACHINE). Because the signing is going to take place on the computer that we requested the certificate on in the previous step Create Code Integrity Signing Certificate, we don’t need to export the certificate. If we wanted to sign on another computer, we would need to export the .pfx certificate with the necessary keys and properties and secure with a strong password. Once exported, we would need to import into the personal store for the user who will be signing the catalog files or code integrity policies and on the specific computer that will be signing them.
In the previous step, we created our certificate "ContosoDGSigningCert" and enrolled into our personal store on GOLD-MACHINE. Let's go ahead and sign our catalog residing in C:\MyCatalogs by running the following command.
C:\WindowsKits\bin\x64\signtool.exe sign /n "ContosoDGSigningCert" /fd sha256 /v "C:\MyCatalogs\LOBApp-Contoso.cat" 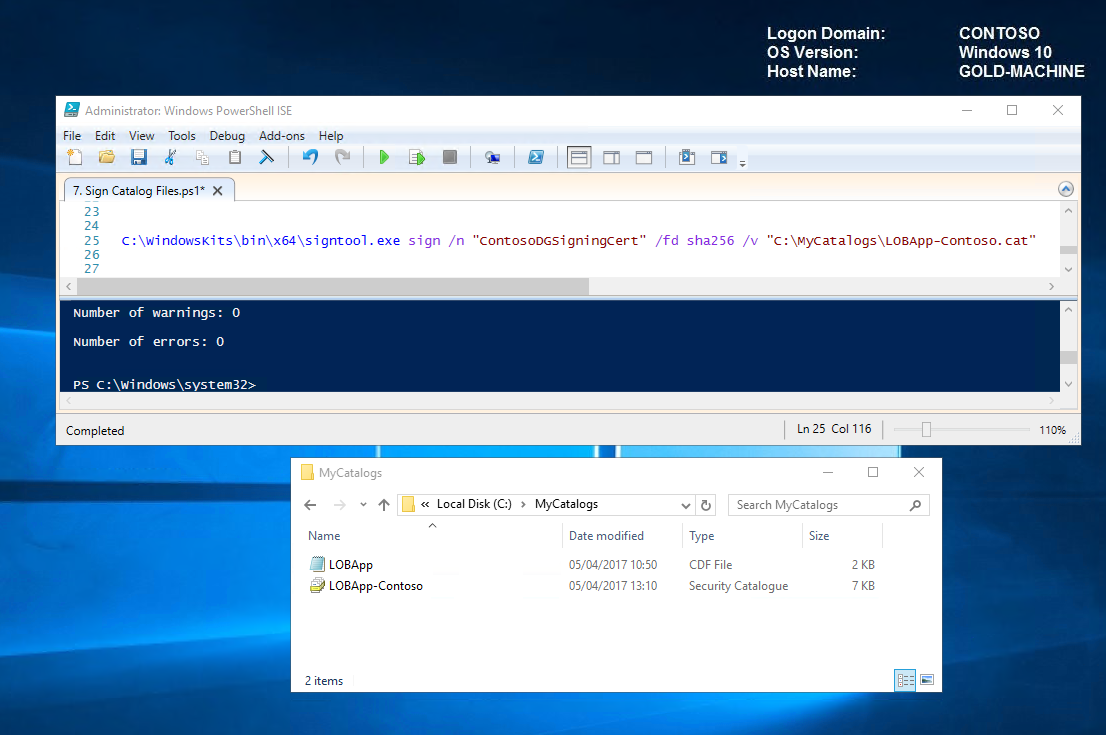
See now that the security catalog is now valid.
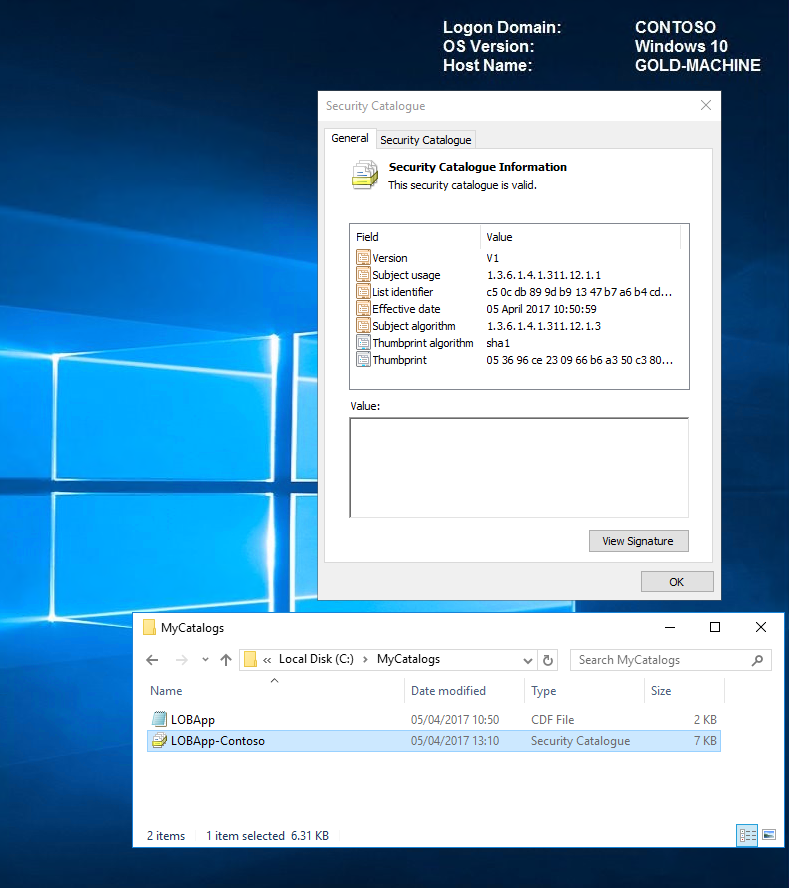
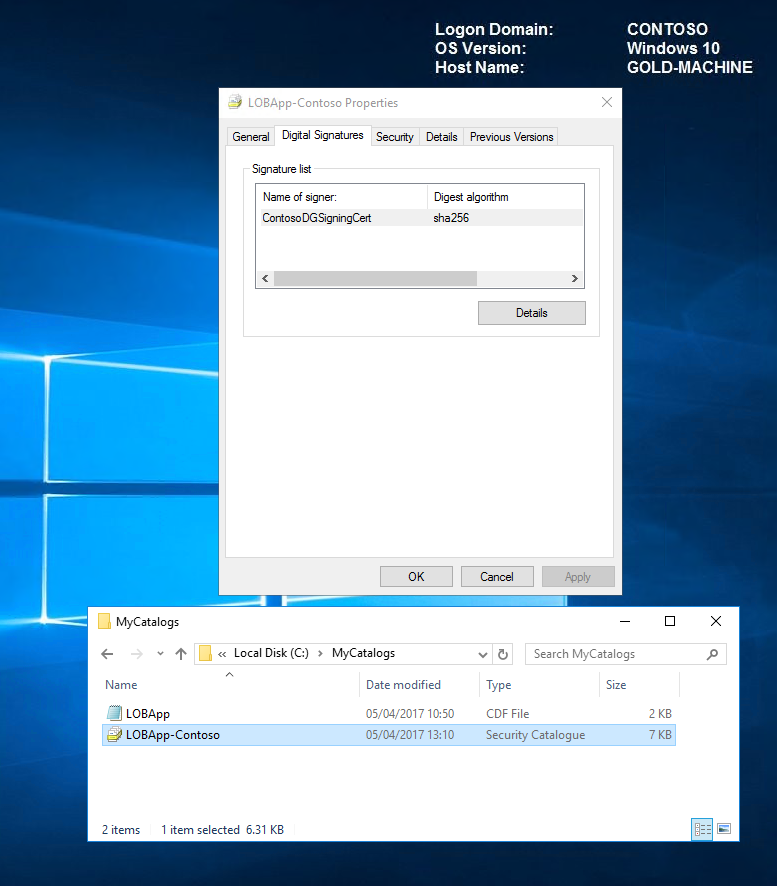
On viewing the catalog properties, we now have a digital signatures tab and can see our ContosoDGSigningCert in the signature list.
Now that we have our signed catalog, we need to prepare our code integrity policy to be able to manage and trust it in our environment. We will do this in the next step by exporting our certificate and adding it to our CI policy using the Add-SignerRule.
Add catalog signing certificate to code integrity policy
In order for our catalogs to be trusted, we need to export our code signing certificate and add it to our code integrity policy.
To export the certificate, carry out the following steps.
- Right-click the certificate, point to All Tasks, and then click Export.
- Click Next, and then select No when asked to export the private key.
- Choose the default settings, and save accordingly. We exported our certificate - ContosoDGSigningCert.cer to C:\MyCertificates.
Now that we have exported our certificate, let's go ahead and trust our catalog file by adding the signer rule to our code integrity policy.
To add the signer rule to our code integrity policy, we'll run the following command on GOLD-MACHINE.
Add-SignerRule -FilePath C:\MyCIPolicy\MyDEFAULT_CIPolicy.xml -CertificatePath C:\MyCertificates\ContosoDGSigningCert.cer -Kernel -User -Update 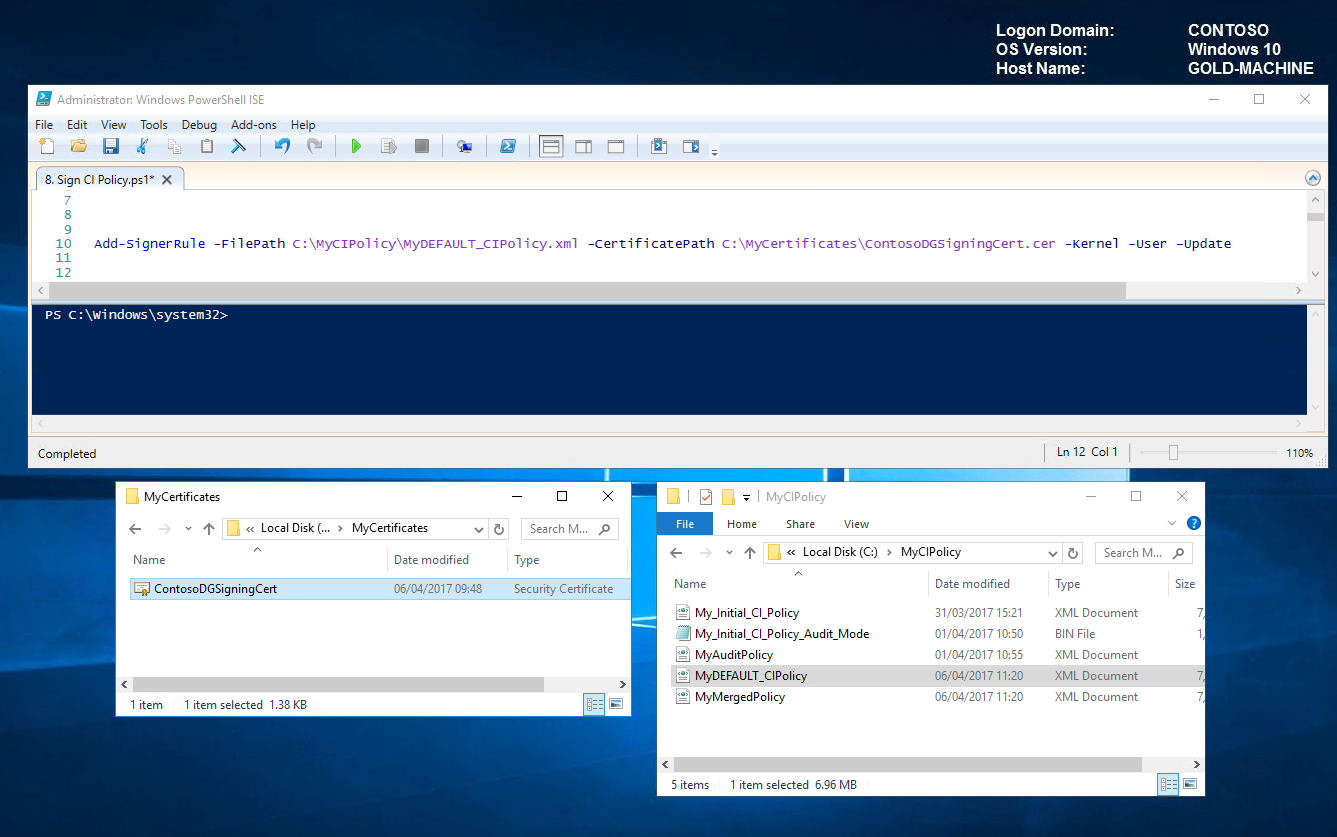
You can learn more about the SignerRule, here https://technet.microsoft.com/itpro/powershell/windows/configci/add-signerrule
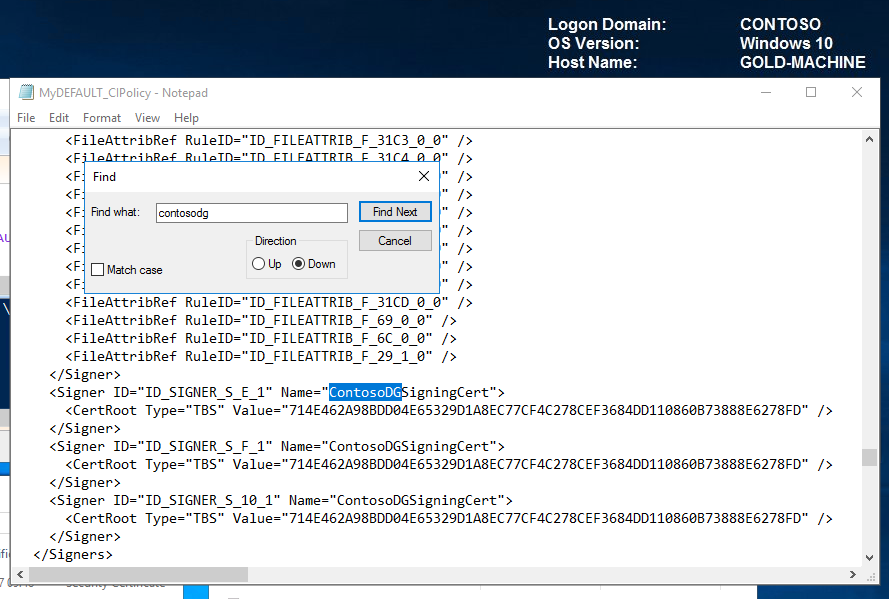
On opening MyDEFAULT_CIPolicy.xml in notepad, we can now see the signers for ContosoDGSigningCert.
The last thing we need to do before we can deploy and trust our catalog files and updated code integrity policy is convert the policy to binary so that it can be interpreted by the client.
Convert to Binary ConvertFrom-CIPolicy C:\MyCIPolicy\MyDEFAULT_CIPolicy.xml C:\MyCIPolicy\MyDEFAULT_CIPolicy.bin 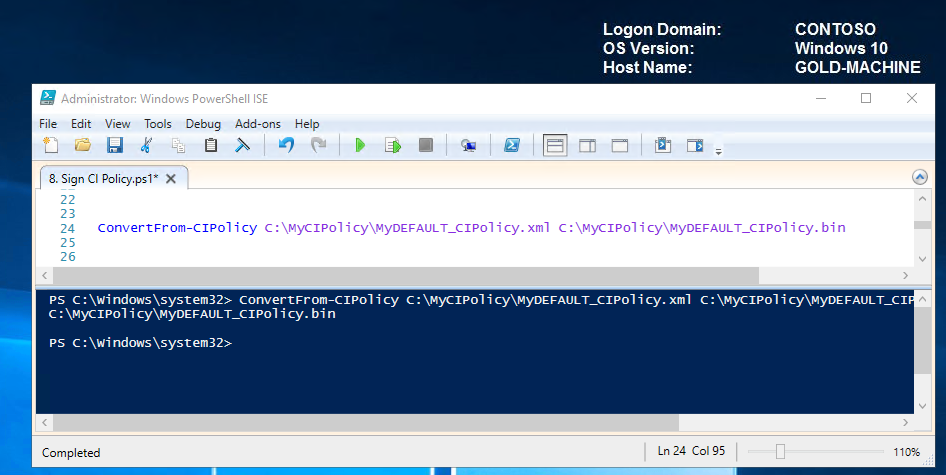
In the next step we will deploy our catalog file along with our updated Code Integrity Policy to our TARGET-MACHINE.
Resources
In this demo, we utilised the signtool.exe from SDK 10 to sign our catalog files.
Another way to sign catalog files is via the DEVICE GUARD SIGNING PORTAL. Check out the links below for more details.
/en-us/microsoft-store/device-guard-signing-portal /en-us/microsoft-store/add-unsigned-app-to-code-integrity-policy
Deploy catalog files with updated CI policy
For this demo, we will manually copy the signed catalog files via scripts to their intended folder on the TARGET-MACHINE.
Note For large-scale implementations, you would likely use Group Policy or an enterprise systems management product such as System Center Configuration Manager which also simplifies the management of catalog versions.
Copy catalog files to the default location Copy-Item C:\MyCatalogs\LOBApp-Contoso.cat "\\TARGET-MACHINE\c$\Windows\System32\CatRoot\{F750E6C3-38EE-11D1-85E5-00C04FC295EE}"
Copy, rename and convert updated code integrity policy to the default location Copy-Item C:\MyCIPolicy\MyDEFAULT_CIPolicy.bin \\TARGET-MACHINE\c$\Windows\System32\CodeIntegrity\SIPolicy.p7b 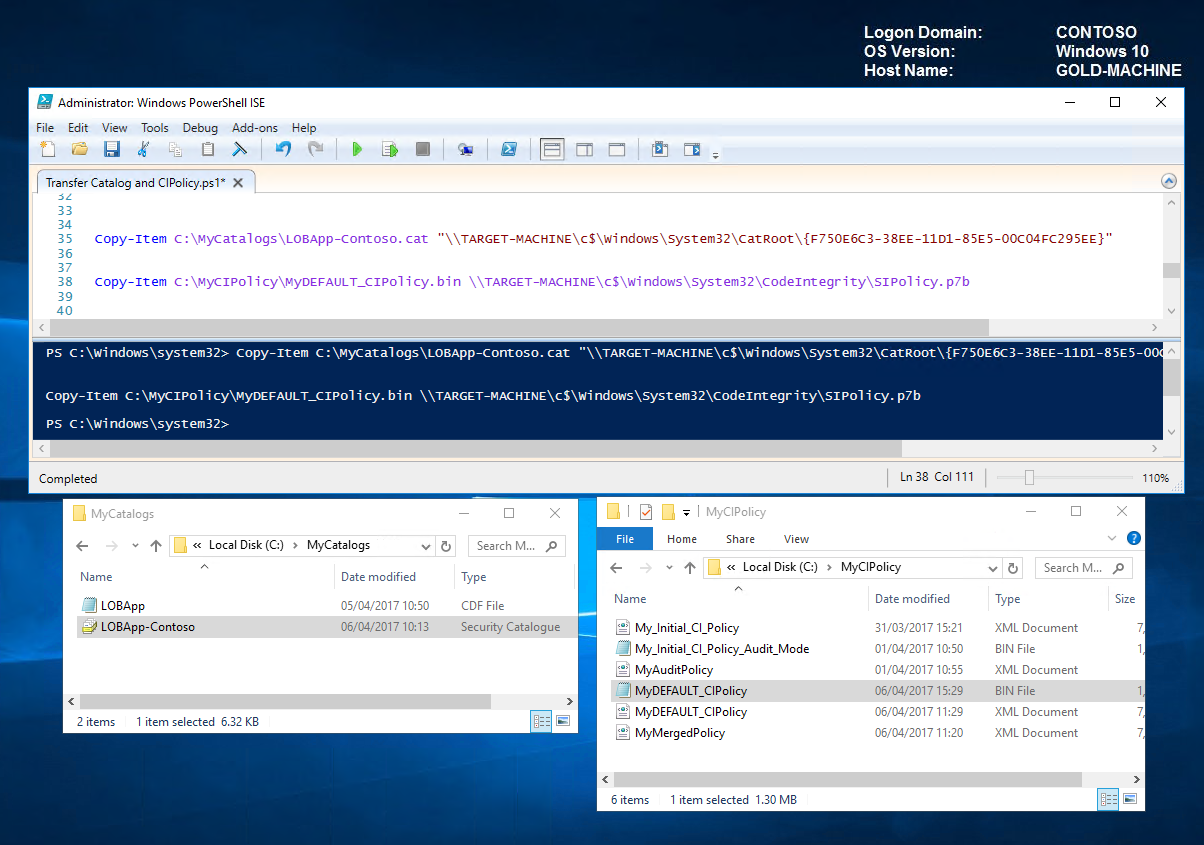
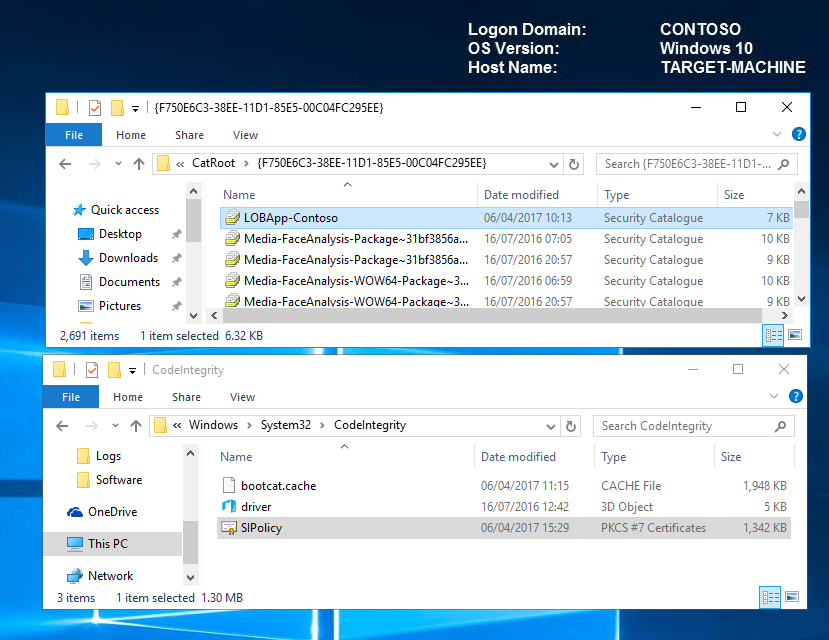
Let's head over to the TARGET-MACHINE and verify the transfer. We can see that our catalog LOBApp-Contoso catalog exists and that the timestamp of the code integrity matches that of our updated policy.
Reboot the TARGET-MACHINE for the new policy to take effect. Our LoB apps captured in the catalog file should now be trusted and allowed to run.
Note As a proactive measure; it would be worth testing and manipulating the applications to their full capacity on a subset of test computers before deploying fully, to ensure functionality and confirm that no files were missed during the package inspector capture.
Resources Below are some great links when thinking about how you will deploy and manage your catalog files.
Deploy catalog files with Group Policy Deploy catalog files with System Center Configuration Manager Inventory catalog files with System Center Configuration Manager
Managing Windows 10 Device Guard with Configuration Manager
Sign code integrity policies with SignTool.exe (Optional)
Signed code integrity policies give organizations the highest level of malware protection available in Windows 10. In addition to their enforced policy rules, signed policies cannot be modified or deleted by a user or administrator on the computer. These policies are designed to prevent administrative tampering and kernel mode exploit access. With this in mind, it is much more difficult to remove signed code integrity policies than unsigned ones.
Before you sign and deploy a signed code integrity policy, it is recommended that you audit the policy to discover any blocked applications that should be allowed to run.
We will sign our code integrity policy with our CA-generated code signing certificate but because we're doing it for the first time; we'll take extra precautions and make sure that we retain administrative troubleshooting options. We can do this by enabling the following rule options:
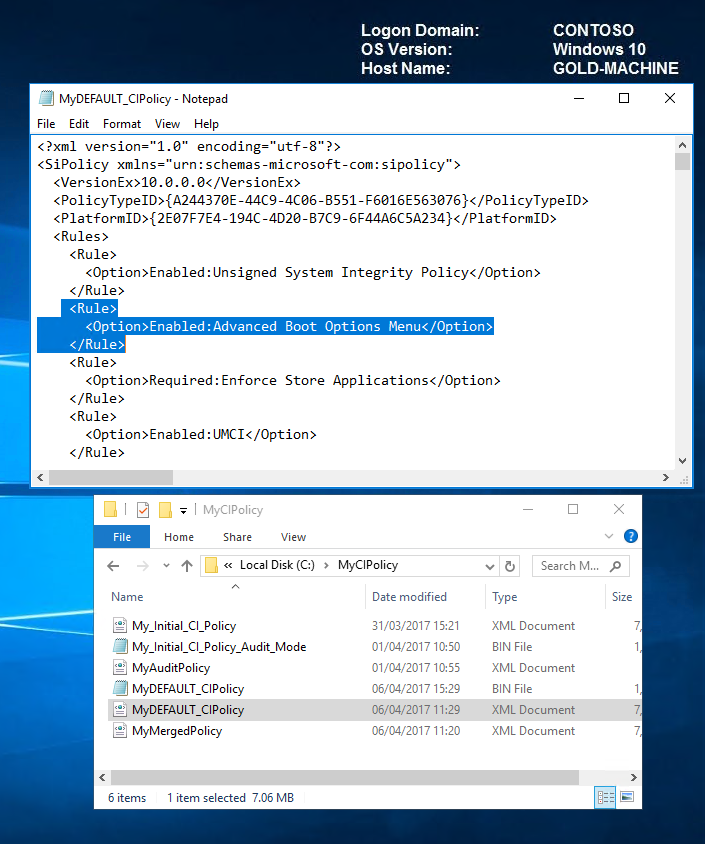
Option 9 - Advanced Boot Options Menu
Option 10 - Boot Audit on Failure
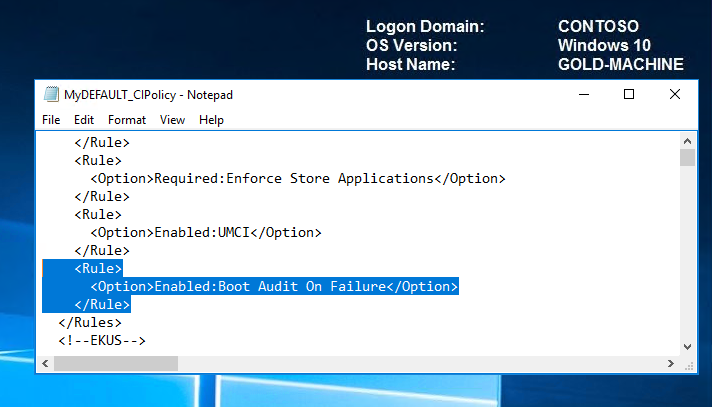
On looking at our code integrity policy below; we can see that rule 9 is enabled but 10 is not.
Let's enable option 10 now by running the following command.
Set-RuleOption -FilePath C:\MyCIPolicy\MyDEFAULT_CIPolicy.xml -Option 10 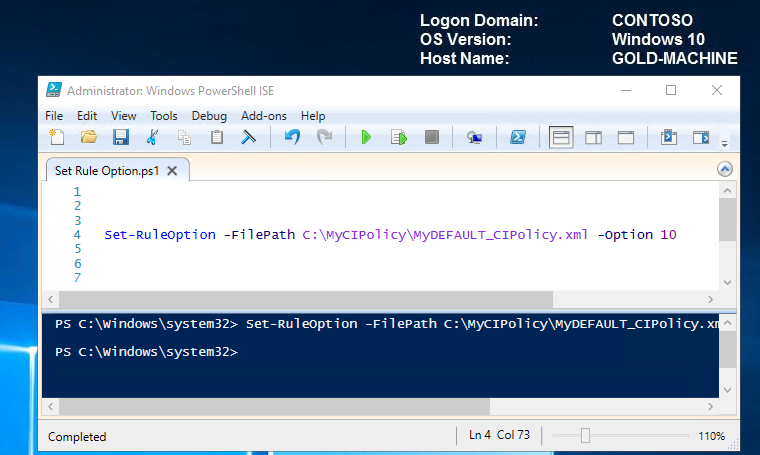
We can see now that option 10 has now been added successfully and is therefore enabled.
To ensure that a rule option is enabled, you can run these commands even if you're not sure whether the option is already enabled, if it is, the command has no effect. When validated and ready for enterprise deployment, you can remove these options.
You can view all rule options by typing the following command.
Set-RuleOption -Help
Once we have all the rules in place; we need to convert our policy xml to binary before signing.
Convert to Binary ConvertFrom-CIPolicy -XmlFilePath C:\MyCIPolicy\MyDEFAULT_CIPolicy.xml -BinaryFilePath C:\MyCIPolicy\MyDEFAULT_CIPolicy.bin
Now let's use the signtool.exe to sign the binary file.
Sign CI Policy C:\WindowsKits\bin\x64\signtool.exe sign -v /n "ContosoDGSigningCert" -p7 . -p7co 1.3.6.1.4.1.311.79.1 -fd sha256 C:\MyCIPolicy\MyDEFAULT_CIPolicy.bin 
Once signed, the code integrity policy can be deployed and tested either through group policy (covered in Part 1) or manually via scripts as follows:
Deploy Signed CI Policy to TARGET-MACHINE and reboot Copy-Item C:\MyCIPolicy\MyDEFAULT_CIPolicy.bin \\TARGET-MACHINE\c$\Windows\System32\CodeIntegrity\SIPolicy.p7bRestart-Computer -ComputerName TARGET-MACHINE -Force  Back to Top
Note Signing code integrity policies is the last step in a code integrity deployment. It is much more difficult to remove a signed code integrity policy than an unsigned one. Before you deploy a signed code integrity policy to deployed client computers, be sure to test its effect on a subset of computers.
And that's it! We covered creating a catalog file for our unsigned application and a code integrity certificate to sign the catalog file. We added the catalog signing certificate to our code integrity policy and deployed to our TARGET-MACHINE. Finally, we looked at the optional step of signing our code integrity policy as an additional security measure.
Tip Code integrity policies allow explicitly defined applications to run but if you wanted to have more control over who can and can't run them; you could further granulate using AppLocker.
So that's the end of my Device Guard blog. I hope you found it useful! Please feel free to comment and/or add any suggestions.