SCOM Cross Domain ACS Collector and Forwarder Configuration
SCOM ACS Collector and Forwarder configuration in the same domain is straight forward. However, there are a few additional steps to be configured if your ACS Collector and Forwarder are in different domain.
Below is the TechNet article already available. However, I am providing more detailed steps with few tips and tricks.
https://technet.microsoft.com/en-us/library/hh872886(v=sc.12).aspx
Steps:
- Firstly, we need to configure the ACS forwarder either as a workgroup agent or an agent pointed to a gateway, in another domain as compared to the Collector where there is no two-way transitive trust between the domains. Steps to configure the same are explained in the below articles.
- On the ACS Forwarder:
- An agent is installed on the computer that will serve as the ACS Forwarder. For more information, see Operations Manager Agent Installation Methods.
- A certificate and certification authority [CA] certificate is installed on the computer hosting the agent. For more information, see Authentication and Data Encryption for Windows Computers in the Deployment Guide.
- On the ACS Collector:
- A certificate (and CA certificate) is installed on the management server hosting the ACS Collector. For more information, see Authentication and Data Encryption for Windows Computers in the Deployment Guide.
- The pending agent is approved and communication between the agent and the management server is operating properly. For more information, see Process Manual Agent Installations.
- The ACS Collector and database is installed. For more information, see How to Install an Audit Collection Services (ACS) Collector and Database in the Deployment Guide.
- Once the collector is installed, you can verify the same under the below view in Operations Manager console.

- Also, refer to the below article to filter out the events you want to collect from the forwarder before you configure the forwarders. Or else, it might flood your ACS database.
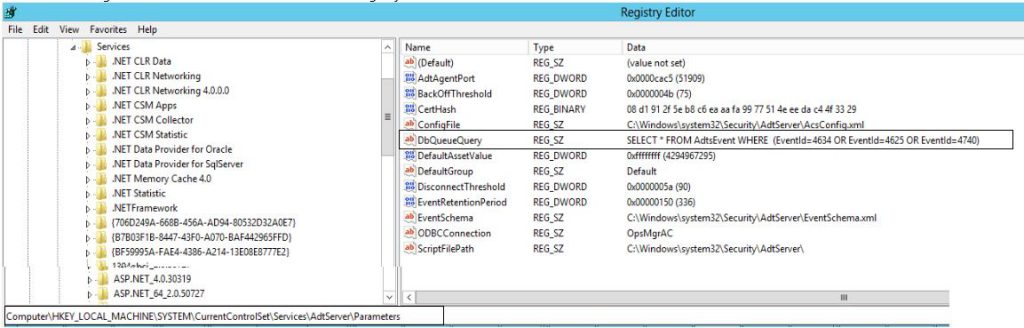
**Microsoft do not support manually grooming data out of ACS database. So if you flood the database the only way out is to wait for 42 days, the default retention period. https://technet.microsoft.com/en-us/library/ee909501.aspx - The current setting of the filtration can be found in the below registry on the collector.
- Verify if the certificates on the forwarder and collector are configured properly.
- The root CA and the intermediate CAs(if any) for the certificate on the collector should be imported to the Root CA Store and Intermediate CA Store of the forwarder respectively.
- The root CA and the intermediate CAs(if any) for the certificate on the forwarder should be imported to the Root CA Store and Intermediate CA Store of the collector respectively.
**If the above steps are not configured an event 4369 will be logged on the forwarder.
- To assign a certificate to the ACS Collector
- On the Windows desktop, click Start, and then click Run.
- In the Rundialog box, type cmd, and then click OK.
- At the command prompt, type <drive_letter>: (where <drive_letter> is the drive where the operating system is installed), and then press ENTER.
- Type cd %systemroot% , and then press ENTER.
- Type cd system32\security\adtserver, and then press ENTER.
- Type net stop adtserver, and then press ENTER.
- Type adtserver -c, and then press ENTER.
**The adtserver tool will only display the certificates where the “Intended Purpose” of the certificates have “Client Authentication”
**It will show you the friendly name in the command prompt not the subject name.
**The certificate do not support Cryptography Next Generation (CNG) key provider.
- In the numbered list of certificates, find the certificate used for Operations Manager, type the number in the list (should be 1), and then press ENTER.
- Type net start adtserverand then press ENTER.
- To export the certificate on the forwarder
- On the Windows desktop, click Start, and then click Run.
- In the Rundialog box, type mmc, and then click OK.
- On the Filemenu, click Add/Remove Snap-in.
- In the Add/Remove Snap-indialog box, click Add.
- In the Add Standalone Snap-indialog box, click Certificates, and then click Add.
- In the Certificates snap-indialog box, select Computer account, and then click Next.
- In the Select Computerdialog box, select Local computer (the computer this console is running on) , and then click Finish.
- In the Add Standalone Snap-indialog box, click Close.
- In the Add/Remove Snap-indialog box, click OK.
- In the Console Root\Certificates (Local Computer) pane, expand Certificates (Local Computer) , expand Personal, and then click Certificates.
- In the results pane, right-click the certificate you are using for Operations Manager, point to All Tasks, and then click Export.
- In the Certificate Export Wizard, on the Welcomepage, click Next.
- On the Export Private Keypage, select No, do note export the private key, and then click Next.
- On the Export File Formatpage, select DER encoded binary X.509 (.CER) , and then click Next.
- On the File to Exportpage, click Browse.
- On the Save Aspage, select a folder and file name for the certificate, ensure that the Save as type is set to DER Encoded Binary X.509 (*.cer) , and then click Save.
| Note |
| You will need to copy this certificate to the computer hosting the ACS Collector, so choose a location that the ACS Collector can read from, or consider saving the certificate to a disk, USB flash drive, or network share. In addition, it is recommended that you include the computer name in the file name if you are exporting certificates from more than one computer. |
- On the File to Exportpage, ensure that the path and file name are correct, click Next, and then click Finish.
- To configure named mapping to the certificate
- Log on to the computer hosting Active Directory.
- On the Windows desktop, click Start, point to Programs, point to Administrative Tools, and then click Active Directory Users and Computers.
- Expand the domain name, right-click Computers, point to New, and then click Computer.
- In the New Object - Computer dialog box, enter the NetBIOS name of the computer that is hosting the ACS Forwarder, and then click Next. Repeat this step for every computer that hosts an ACS Forwarder.
- In the Managed dialog box, ensure that This is a managed computer is not selected, and then click Next.
- In the New Object - Computer dialog box, click Finish.
- In Active Directory Computers and Users, in the right pane, right-click the computer (or computers) you added, and then click Name Mappings.
- In the Security Identity Mapping dialog box, click X.509 Certificates, and then click Add.
- In the Add Certificate dialog box, click the Look in menu, select the location where the exported certificate is located, and then click Open. ** This certificate should be of the forwarder
- In the Add Certificate dialog box, ensure that Use Subject for alternate security identity is selected, and then click OK.
- In the Security Identity Mapping dialog box, click OK.
- Repeat steps 4–11 for each computer you have added.
- After you complete these procedures, you need to enable the ACS Forwarders. For more information, see How to Enable Audit Collection Services (ACS) Forwarders.

- To run the adtagent command on the forwarder.
- On the Windows desktop, click Start, and then click Run.
- In the Run dialog box, type cmd, and then click OK.
- At the command prompt, type <drive_letter>: (where <drive_letter> is the drive where the Operating System is installed), and then press ENTER.
- Type cd %systemroot% and then press ENTER.
- Type cd system32 and then press ENTER.
- Type adtagent -cand then press ENTER.
**The adtserver tool will only display the certificate where the “Intended Purpose” of the certificates have “Client Authentication”
**It will show you the friendly name in the command prompt not the subject name.
**The certificate do not support Cryptography Next Generation (CNG) key provider.
- You will see a numbered list of certificates. Find the certificate used for Operations Manager, type the number in the list (should be 1), and then press ENTER.
- Type exit to close the command window.
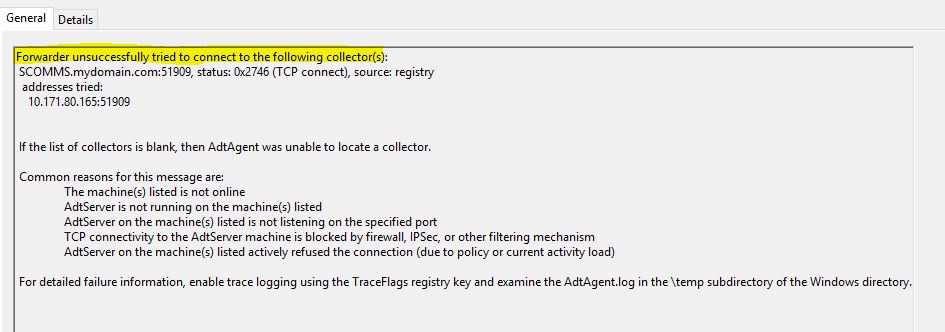
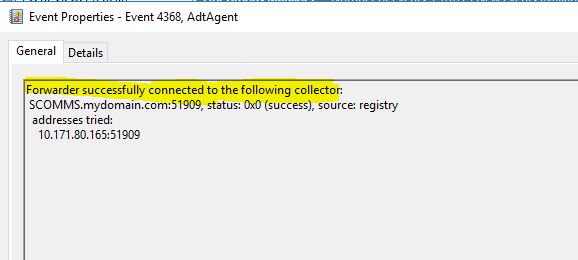
- Verify if we have received the event 4368 on the forwarder.
- Run the below queries to verify the events are collected in the ACS database.
--This query will give you the partition ID which is active for data insertion.
select PartitionId from dtPartition
where Status = 0
--Append the ID in the above query in the table name dt_Event in line 1 in bold.
-- Replace the name of the forwarder in line 3 in bold
select de.EventNo,dm.Description from [dbo].[dtEvent_cf3e35ff_e525_4200_8520_09765c4bcfba] de
join [dbo].[dtMachine] dm on de.AgentMachineId=dm.Id
where dm.Description like '%ASH-DC%'
--and de.EventNo ='4776'
order by de.CreationTime desc
- Run the default ACS reports to verify the reports are populating the data.
Some articles which you can refer to while working on this.
https://technet.microsoft.com/en-us/library/hh212908(v=sc.12).aspx https://technet.microsoft.com/en-us/library/ee909501.aspx https://blogs.technet.microsoft.com/operationsmgr/2010/05/12/solution-the-acs-forwarder-in-operations-manager-2007-may-frequently-log-connection-and-disconnection-events/