Enabling OCS integration with Exchange 2010 – IM
I was in Maryland this week and one of my customers wanted to know how to integrate OCS with Exchange for OWA Chat and Presence. To get Office Communication Server IM integration with Outlook Web Apps, we need to work on the following area:
· Install OCS 2007 R2 Web Service Provider
· Obtain information about the certificate used by the CAS server to communicate with OCS 2007 R2
· Edit the Outlook Web Apps Web.Config file with integration information
· Enable the IM Integration
· Restart IIS service on the CAS server
· OCS 2007 R2 Configuration
Install OCS 2007 R2 Web Service Provider
The CWAOWASSPMain is available here.
To install the OCS 2007 R2 Web Service Provider, follow the procedure below:
1. Start and install CWAOWASSPMain.msi
2. Locate the “C:\Web Services Provider Installer Package” directory
3. Double-click on vcredist_x64.exe to install the Visual C++ 2008 Redistributable Setup.
4. Double-click on UcmaRedist.msi to install Office Communication Server R2 API Core Redistributable Setup.
5. Open a CMD windows with Admins privileges, and run the CWAOWASSP.MSI to install the Office Communication Server Web Service Provider.
To verify if the installation of the above packages are completed correctly, check the following entries:
1. Key “InstantMessaging” has been created in registry under HKEY_LOCAL_MACHINE\SYSTEM\CurrentControlSet\Services\MSExchange OWA\
2. String Value under InstantMessaging with name "ImplementationDLLPath" and value "<Your Exchange Install Path>\ClientAccess\owa\bin\Microsoft.Rtc.UCWeb.dll" has been created.
3. The DLL Microsoft.Rtc.UCWeb.dll is present in the directory <Your Exchange Install Path>\ClientAccess\Owa\Bin.
4. The DLLs SIPEPS.dll and Microsoft.Rtc.Collaboration.dll are present in the Microsoft .NET Framework Global Assembly Cache (GAC).
Obtain Certificate Information
In order for the Office Communication Server Web Service Provider to connect to the Office Communication Server to provide service, it needs a certificate to establish MTLS (Mutual TLS) between the CAS server and the Office Communication Server Front-End server. The best option is to obtain a certificate for the CAS server,
To get the certificate information on the CAS server, open an Exchange Management Shell session on the Exchange 2010 CAS Server. Type in the following cmdlet:
Get-ExchangeCertificate |fl
The items we are interested are:
· Issuer: which most like in the format like this for internal CA “CN=contoso-NADC-CA, DC=contoso, DC=edu”
· SerialNumber: which is a 20 digits hex number. .
Edit Web.Config File
The information attributes needed for Office Communication Server Web Service Provider to work with Outlook Web Apps are already added to the Web.Config file under Outlook Web Apps, but some of the detail regarding the OCS server name and certificate need to be filled in.
Using the Windows Explorer, navigate to the following location:
C:\Program Files\Microsoft\Exchange Server\V14\ClientAccess\Owa
Locate and open the web.config file, using notepad, and apply the following:
1. Search for IMPoolName. You will see the following three entries:
<add key="IMPoolName" value="" />
<add key="IMCertificateIssuer" value="" />
<add key="IMCertificateSerialNumber" value=""/>
2. Populate the server name:
<add key="IMPoolName" value="FQDN_OF_THE_OCS_POOL" />
Example: <add key="IMPoolName" value="NAOCS7.contoso.edu" />
3. Populate the Certificate Issuer:
<add key="IMCertificateIssuer" value="<issuer>" />
Example: <add key="IMCertificateIssuer" value=" CN=contoso-nadc-ca, DC=contoso, DC=edu " />
If the certificate issuer value contains double quotes (“), use the example shown below:
<add key="IMCertificateIssuer" value=’CN=…, OU="(c) 2008 Contoso, Inc.", OU=www.contoso.edu/CPS is incorporated by reference, OU=…, OU=…, O="Contoso, University.", C=US’ />
Just to clarify, this certificate issuer value is your CAS server certificate. It is needed so when the OCS Web Service Provider starts, it knows which issuer certificate to pick up.
4. Populate the Certificate SerialNumber:
<add key="IMCertificateSerialNumber" value="<SerialNumber with space between each octet>" />
Example:
<add key="IMCertificateSerialNumber" value="60 D5 83 00 00 00 00 00 00 00 3C" />
5. Save and close Web.config.
Enable the IM Integration
Once the Web.Config file is updated with the correct CAS certificate information,
Get-OwaVirtualDirectory | Set-OwaVirtualDirectory –InstantMessagingType OCS
Restart IIS service on the CAS server
The last step on the Exchange Server 2010 side is the restart the IIS service on the CAS server. To do it, open a command prompt window and type in “IISReset”.
OCS 2007 R2 Configuration
The Exchange Server 2010 Outlook Web Access IM Integration component is implemented as an OCS 2007 end-point. In order for the integration component to be able to sign-in to OCS 2007 R2 it is necessary to configure the OCS 2007 R2 server to trust the Exchange Client Access Server.
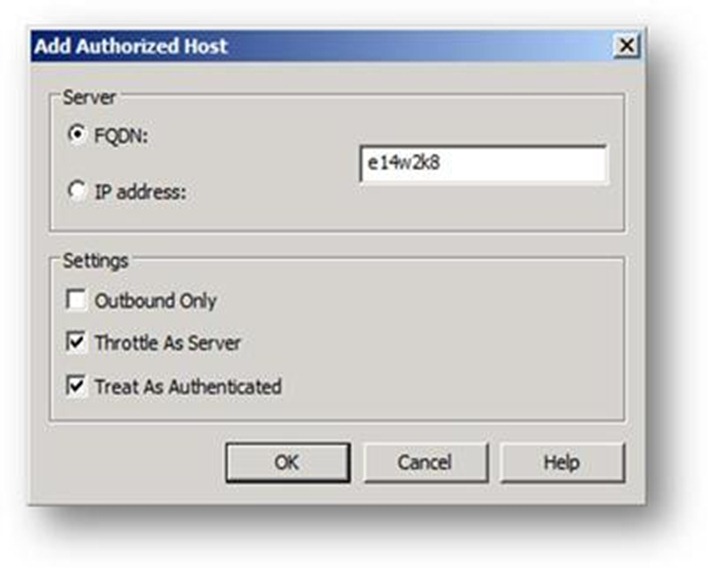
This is configured by adding the Exchange Client Access Server as a trusted server on the OCS 2007 R2 Front-End.
The following steps can be followed to perform this operation:
1. As an OCS administrator, start the Office Communications Server 2007 R2 management console
2. Navigate to your OCS 2007 R2 Pool (ocsse.contoso.edu) and open the Front-End Properties
3. Click
4. Ensure you check that the connected is to be treated as authenticated and throttle as server.
Note: |
You need to add an entry for every Client Access Server that has the IM Integration components installed. |
5. Validate the configuration changes by clicking OK.
6. You may need to stop and restart the OCS Front-End services if you wish the changes to take effect immediately. This will however disconnect any active users. For more info on this from Technet go to this article: https://technet.microsoft.com/en-us/library/ee633458.aspx
