Installing Windows Server 2012 in Core Mode - Step by Step - Part II
In the last article we installed Windows Server 2012 in Core Mode but we still need to configure the server. Now we are going to walk through various options and configuration methods. You will want to take note of two commands right away, since the only window you will see in Core mode by default is the command prompt. By typing in “help” at the prompt then hitting “enter” you will find a list of commands available for general system maintenance. The command I will be focusing on in this lesson is “sconfig.cmd”.
Important note: Near the end of this lab and follow up labs will require a Windows 8 Pro client machine or Server 2012 GUI installation to continue for more advanced configuration.
By entering “sconfig.cmd” at the command prompt then pressing the “enter” key you will arrive at the following screen:

First option we should take is to change the computer name. Select option 2. Provide a new name for the computer then hit the “enter” key. The server will prompt you for a reboot, click on “Yes.”

Once the server has rebooted re-launch sconfig.cmd and continue. You can join the computer to a domain by selecting option 1, for sake of time in this lab, I will not be joining the server to a domain. I will be providing an IP address however. Select option 8 and hit the “enter” key.

Select Static “S”, then provide an IP address and DNS servers where applicable to your local subnet then select option 4 to return to the main menu:

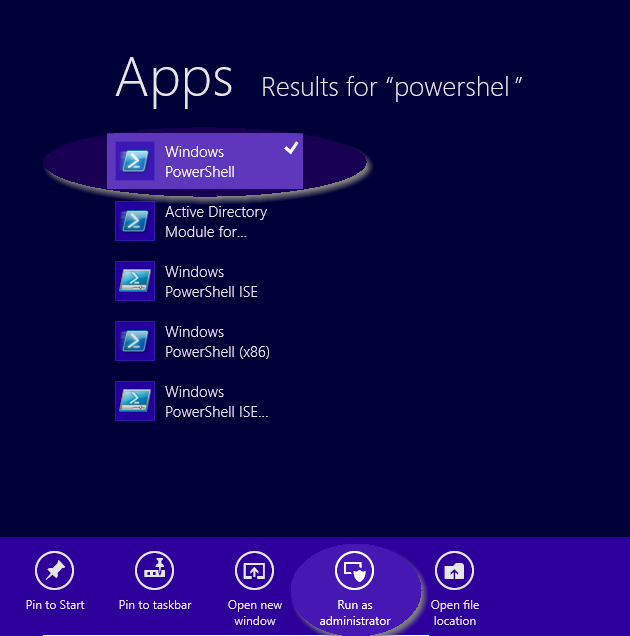
While Remote Management is enabled we need to run a command on our client machine that will be connecting to the server. This will be performed on your Windows 8 client machine. To begin we need to get to the Powershell prompt. Return to the main Start screen of Windows 8 by pressing the Windows key. Type in "Powershell" and you should see the following screen, right click on "Powershell" and then click on "Run as administrator" at the bottom of the screen:
Now enter the following command replacing the <YourtargetServernameHere> with the server name both the short name and the fully qualified name(hint this might come from your home dsl router, mine did) of the target server. These will be added with quotations as seen here:
Set-Item WSMan:\localhost\Client\TrustedHosts -Value <YourtargetServernameHere> –Force

Optional: I added a host file entry for the server name and IP address in my lab since I did not have a DNS server available yet.
Be sure you can ping your server by name before continuing. Once that is complete you will want to install the Remote Server Administration Tool for Windows 8. After installing the RSAT suite, we test out the connectivity. Return to the main Start screen of Windows 8 by pressing the Windows key. Locate the newly installed suite of icons, I labeled my tile group as “Server Tools” as seen here:

Launch Server Manager. Now click on “Add other servers to manage”

It will start searching the domain if your computer is joined to the domain, and you joined your server to the domain then it should find the server in the list. Since I am operating in a workgroup for this lab, I had to manually enter my server name by clicking on the “DNS” tab, then typing in my server name. Once you see it populate below with the correct IP address, click on the arrow to move it to the right hand menu labeled “Selected”, then click “OK”:

Click on the “All Servers” menu on the left hand side of the Server Manager screen. You will notice that mine has a Kerberos error. This is because we need to manage the server as a different administrator since my Server 2012 core machine is not a domain member. Right click the server and select “Manage As…”

Enter in the credentials too match your environment, mine looked like this:

It should take you back to the Servers screen and you will hopefully see this type of “In progress” activity:

Once the login process completes your screen should look like this:

Now right click the server and see what functions are available to be performed:

This will conclude part II of this series. In our next installment we will turn on some Roles and Features. If you are anxious to do more, you can always follow some of the other labs that were written for the GUI installation process, since nearly all of that process will work correctly as long as you stick to the RSAT tools as the GUI for your Windows Servers.