(RDS) Tip of the Day: Getting started with Windows Virtual Desktop
Thanks to Pieter Wigleven for today’s tip!
[Pieter does a phenomenal job in this article by providing detailed walkthroughs and explaining every configuration option to setup Windows Virtual Desktop. I encourage everyone to read the full article HERE]
With the public preview for Windows Virtual Desktop now available, we wanted to provide a quick overview of the steps required to get your environment up and running.
Before I begin; however, I’d like to take a few moments to explain what Windows Virtual Desktop is and how it can help you deploy and scale Windows and Office on Azure in minutes, with built-in security and compliance.
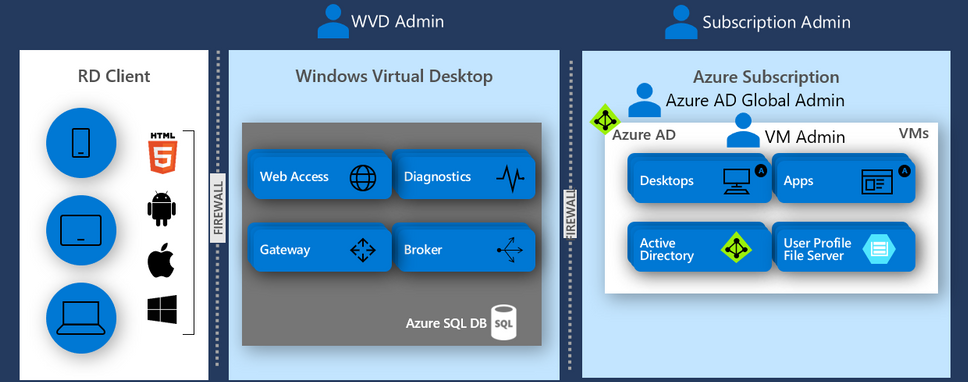
Windows Virtual Desktop is a comprehensive desktop and app virtualization service that runs in the cloud. Here is a quick list of some of the key features and functionality:
- Infrastructure services like gateway, brokering, licensing, diagnostics are provided as a service in Azure. There’s no need to deploy and maintain any on-premises infrastructure.
- Windows Virtual Desktop can leverage Azure Active Directory (Azure AD) as the identity provider, allowing you to leverage additional security controls like multifactor authentication (MFA) or conditional access.
- Once a user is connected to Windows Virtual Desktop service, access to Active Directory joined virtual machines (VMs) will be provided using Azure AD identities. In environments where Active Directory Federation Services (AD FS) is implemented for single sign-on (SSO), the user won’t be prompted for credentials when connecting to the VM, providing a seamless sign-on experience.
- Reverse connect technology means your destination VM doesn’t need any inbound ports to be opened. Even the default RDP port, TCP/3389, doesn’t have to be open. Instead, an agent creates an outbound connection using TCP/443 into the Windows Virtual Desktop management plane. Azure is your reverse proxy for RDP traffic.
- Virtual machines in Windows Virtual Desktop are not exposed to the Internet directly. They can run using a private IP address and run isolated from other workloads or even the Internet. (The reverse connect technology allows the VMs to be accessed.)
- Windows Virtual Desktop introduces Windows 10 multi-session, allowing you to offer a Windows 10 Enterprise experience where multiple users can log into the same Windows client VM simultaneously via RDP. (Multi-session was historically only possible on Windows Server operating systems.)
- Access to FSLogix technology, making your Office experience in a non-persistent environment feel like you are using a traditional PC.
- Windows Virtual Desktop supports full desktop, RemoteApp, and persistent or non-persistent, dedicated or multi-session experiences.
- Organizations with “Windows 10 Enterprise E3 Per User” licenses or better (e.g. Windows 10 Enterprise E5 or Microsoft 365 E3, E5, F1, or Business) or RDS CALs can use Windows Virtual Desktop for no additional charge apart from Azure compute/storage and network usage billing. Reserved instances can be used to reduce Azure costs up to 80%.
Now let’s move on to the steps you need to take to get started.
Windows Virtual Desktop prerequisites
To set up Windows Virtual Desktop, you will need a few resources and to complete a few initial setup steps:
- An Azure subscription with sufficient credit (needed to host resources).
- Download and install the Windows Virtual Desktop cmdlets for Windows PowerShell on a device.
- Make sure your virtual network in Azure is configured in such a way that new VMs have your Domain Controller or Azure AD Domain Services (Azure AD DS) set as the DNS (otherwise the domain join step will likely fail). For guidance on how to configure DNS when using Azure AD DS, see Enable Azure Active Director Domain Services. For guidance for using a Domain Controller, see Name resolution for resources in Azure virtual networks.
- Make sure all Azure resources are in the same region.
- If you require seamless SSO (HTML5 client excluded), you will need AD FS or users will have to authenticate when gaining access to the VM. (Steps on how to enable this with AD FS will follow at a later stage.)
- An Active Directory to which you can join your VMs. For this, you have three options:
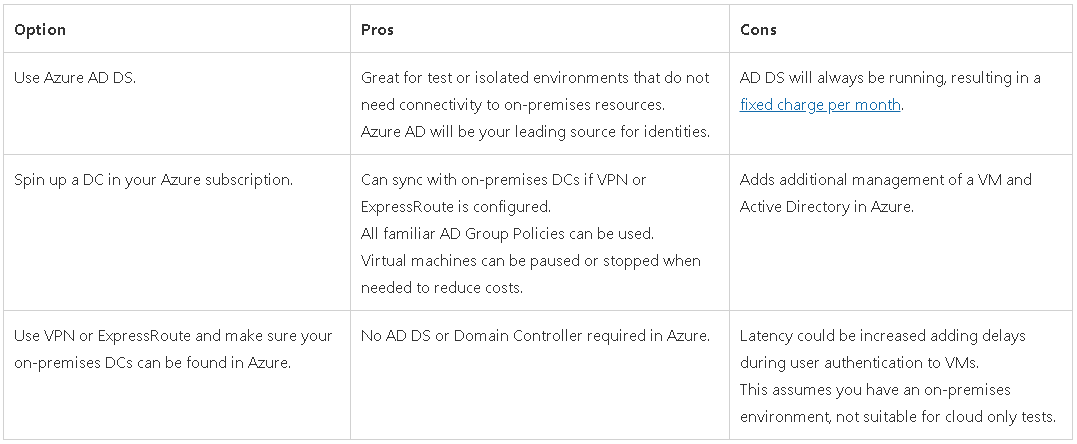
- Finally, you’ll also need to make sure you have the right credentials. Here’s an overview of the accounts being used throughout the deployment process:
Once the prerequisites have been met, you can move on to the initial setup of Windows Virtual Desktop. Once these steps have been completed, you will be ready to deploy your initial VMs:
- Allow the Windows Virtual Desktop service to access Azure AD.
- Assign the “TenantCreator” role to a user account.
- Create a Windows Virtual Desktop tenant.
- Deploy your first Windows Virtual Desktop host pool.
- Test if a user can access a full desktop session.
References:
- Getting started with Windows Virtual Desktop - https://techcommunity.microsoft.com/t5/Windows-IT-Pro-Blog/Getting-started-with-Windows-Virtual-Desktop/ba-p/391054
- Windows Virtual Desktop - https://aka.ms/wvd
- Windows Virtual Desktop Public Preview - https://aka.ms/wvdpreview