Tip of the Day: Creating a Bootable USB Device
Today’s Tip…
Interested in a faster method to install an Operating System that does not require booting from a DVD?
Using a bootable USB device is your answer. A properly prepared USB Boot Device loaded with Operating System boot files, will allow you to quickly go from bare machine -> New OS in no time.
Preparing your device is very easy if you follow the steps below: (We assume that you are using a Windows 7 / Windows Server 2008 or later Operating System to create a bootable USB Device)
Step 1: Insert the USB Flash Drive. We will use a 16GB USB Device for our example.
Note : Existing data will be lost. Backup any needed files now.
Step 2: Open elevated Command Prompt.
Step 3: After the Command Prompt opens, enter the following commands:
DISKPART <Enter>
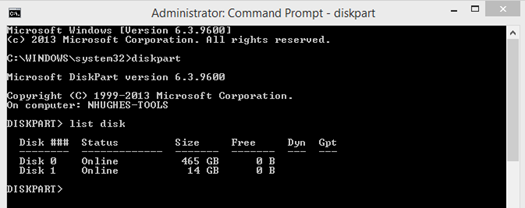
LIST DISK <Enter>
Locate the Disk ID associated with your USB Device. In our example, the USB Device is listed as Disk 1.
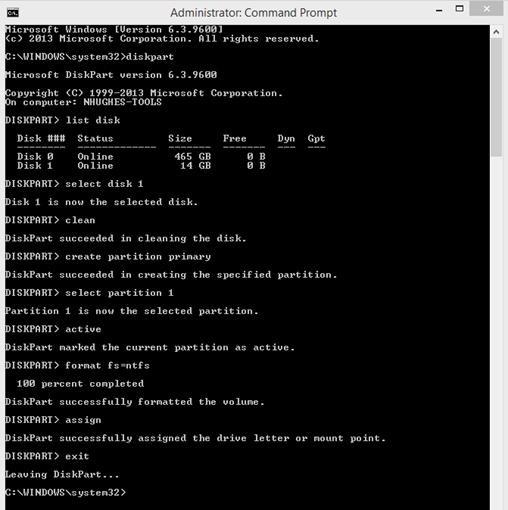
Step 4: Execute the following commands to establish a partition and file system on the USB Drive.
SELECT DISK 1 (Use Disk number provided in the List Disk output above.)
CLEAN <Enter>
CREATE PARTITION PRIMARY <Enter>
SELECT PARTITION 1 <Enter>
ACTIVE <Enter>
FORMAT FS=NTFS <Enter>
ASSIGN <Enter>
EXIT <Enter>
Don’t close the command prompt as we need to execute one more command at the next step. Just minimize it.
Step 5: Insert your Windows DVD in the optical drive and note down the drive letter of the optical drive and USB media. Alternatively, mount the ISO and note the assigned drive letter.
Note : Here I use F: representing the drive letter of the DVD or mounted ISO location), and E: as my USB device letter.
Step 6: From the administrative command prompt, execute the following commands:
F: <Enter>
CD BOOT <Enter>
BOOTSECT.EXE/NT60 E: <Enter>
(E: Represents the drive letter of the USB Device)
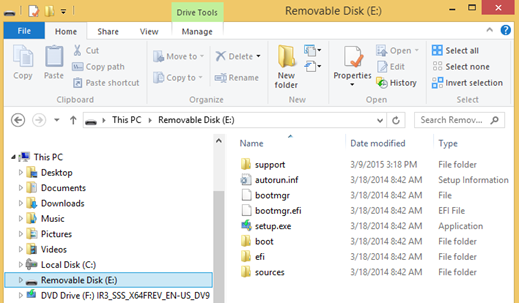
Step 7: Copy Windows DVD / ISO contents to USB Device.
Here we copy the contents of mounted of the ISO from the F: Drive over to the E: Drive (New Bootable USB Device).
You've just created a bootable USB device!
Now you are able to use this Bootable USB Device to Boot into the Latest Flavor of "Microsoft Operating System Goodness"!


