How to: Automatically format Excel's track changes to look like Microsoft Word's track changes feature
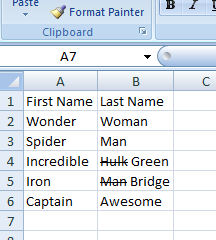
If you have ever used the "Track Changes" feature in Microsoft Word, then you know that the changes you make aren't deleted, but they are shown with a strikethrough and typically highlighted in red. If you have used the track changes feature of Excel, then you know that the Track Changes feature in Excel and Word function completely different. In Excel, the track changes feature highlights the cell where a change occured and makes a special comment box available that contains the data you changed and the new data. If you need to print the changes you can enable a history sheet to appear that contains your changes along with their cell references. But what do you do if you want Excel's track changes to mirror the way Word's Track Changes feature works as in the picture below? Read on.
First, you have to remember that when you enable Track Changes in Excel the workbook gets shared, and you cannot edit macros in a shared workbook. That means you will need a separate spreadsheet opened (XLSM) that contains the macro I'm about to give you. Let's say your workbook that contains this macro is called 'Book1.XLSM'. You will want to do the following:
1. Create a new workbook.
2. From the View menu, click Macros > View Macros. In the dialog that appears, click under 'Macro name' and give your macro any name you want. Then click the 'Create' button to the right. This will open the VBA editor, a new module and a subroutine with the name you supplied. The cursor is blinking between the beginning and end of the subroutine.
3. Add the following code:
Dim xLen As Integer
Dim x, y, z, addr As String
Worksheets("History").Activate
Range("G2").Select
While ActiveCell.Value <> ""
x = ActiveCell.Offset(0, -1).Value
y = ActiveCell.Offset(0, 1).Value
z = ActiveCell.Offset(0, 2).Value
addr = ActiveCell.Value
Worksheets(x).Activate
Range(addr).Select
xLen = Len(z)
ActiveCell.Value = z & " " & y
With ActiveCell.Characters(Start:=1, Length:=xLen).Font
.Strikethrough = True
End With
Worksheets("History").Activate
ActiveCell.Offset(1, 0).Select
Wend
4. Save your workbook as a macro-enabled spreadsheet. It will have the XLSM file extension.
5. With Book1.XLSM open, also open your workbook that has your tracked changes. Go to the Review menu > Track Changes > Highlight changes and check ‘List changes on a new sheet’ and click OK. This should create a ‘history’ sheet.
6. From the View menu click Macros (by default the last item on the ribbon) > View Macros
7. Click to highlight Book1.xlsm!<Name of your macro> and click Run