How to install and configure System Center Updates Publisher
~ Subbulakshmi Kumar | Support Engineer
 System Center Updates Publisher (SCUP) is an independent tool that enables us to import third party software update catalogues, create and modify software update definitions, export update definitions to catalogs and publish software updates information to a configured Windows Server Update Services (WSUS) server (the update server). By importing third party updates into SCUP and publishing them to WSUS, the software updates component in System Center 2012 Configuration Manager (ConfigMgr 2012) is able to synchronize the custom updates from the WSUS server database to the site server database.
Supported Operating Systems
System Center Updates Publisher 2011 is supported on the following operating systems:
• The Windows Vista operating system
• The 64-bit versions of the Windows Vista operating system
• The 64-bit versions of the Windows 7 operating system
• The 32-bit versions of the Windows 7 operating system
• The Windows Server 2008 operating system
• The Windows Server 2008 R2 operating system
• The Windows Server 2012 operating system
• The Windows Server 2012 R2 operating system
• The 64-bit versions of the Windows 8 operating system
• The 64-bit versions of the Windows 8.1 operating system
• The 32-bit versions of the Windows 8 operating system
• The 32-bit versions of the Windows 8.1 operating system
Please note that there are some additional steps that must be performed when installing SCUP with Windows Server 2012 and Windows Server 2012 R2 Operating systems. The articles below provide more information on this.
System Center Update Publisher 2011 and Windows Server 2012: https://blogs.msdn.com/b/minfangl/archive/2012/12/01/system-center-update-publisher-2011-and-windows-server-2012.aspx
System Center Updates Publisher 2011 and Windows Server 2012 R2: https://blogs.msdn.com/b/minfangl/archive/2014/01/29/system-center-updates-publisher-2011-and-windows-server-2012-r2.aspx
Installation
Download location: https://www.microsoft.com/en-us/download/details.aspx?displaylang=en&id=11940
After downloading the installation file, simply run it and follow the steps in the Setup Wizard.
Importing Update Catalogs
After installing SCUP, we first need to import the update catalogs. SCUP files are hosted on a vendors public server: For example, Adobe hosts their files at https://armmf.adobe.com/arm-manifests/win/SCUP/and we will be using that for our example. Note that there will be two types of files:
CAB files: CAB files such as Acrobat10_Catalog.cab are the actual catalog.
XML files: XML files such as Acrobat10_Catalog.xml are a hash that can be compared to the cab file to check if the catalog has changed since it was last downloaded without having to download the catalog itself. It is optionally provided by the vendor so if no XML file is there SCUP will simply download the catalog each time to see if it has changed.
Once you have located and downloaded the appropriate update catalogs, open the SCUP Import Software Updates Catalog Wizard and select the Import Type option. Specify the path to the CAB files you downloaded.

Once the path is specified, the import will progress and ask for a catalog validation which should be accepted (this is based on the signature of the cab file). After successful import, we should see Adobe Flash Player and Adobe Reader (per our example) as shown in the figure above.
When working with updates it is also useful to understand the differences between quarterly updates, out of cycle patches, and the possible file types. While SCUP catalogs provide a way to automate installs, you should understand what gets installed and why. For example, Acrobat updating always involves installing every MSP update in order. Reader updates may involve quarterly MSI files that don’t require installing previous updates. See your software vendor for more details on how their updates are intended to be deployed.
Configuring SCUP
To configure SCUP, go to Options by clicking the left corner icon, then under Options specify the Update Server (your WSUS computer). While SCUP can be used with a CA issued certificate supplied in this dialog, for our example we will configure SCUP to sign patches with the WSUS Self-Signed Certificate (WSSC).
Note that SCUP can also be used with a CA issued certificate. This requires additional configuration when used with newer operating systems. There is a WSUS registry key that may need to be enabled in order to use self-signed certs and you can find out more on this in the article below.
WSUS no longer issues self-signed certificates: https://blogs.technet.com/b/wsus/archive/2013/08/15/wsus-no-longer-issues-self-signed-certificates.aspx
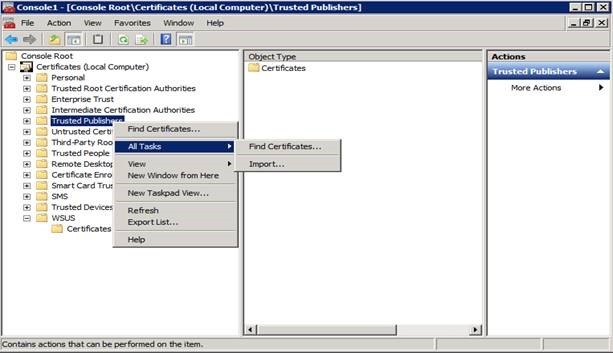
Since the certificate we’ll be using is self-signed, we need to add it to the Trusted Publishers and Trusted Root Certification Authority via the certificates mmc. Note that although we’re using a self-signed certificate in our example, non-self-signed certificates will also need to be added to Trusted Publishers.
Within the Certificates MMC you can simply copy and paste the certificate from one container to another, however if you’d rather go through the process of importing and exporting the certificate as a file then the steps to do so are below.
First, open the WSUS container and right-click to export the certificate.

Save it with a .CER extension.
Next, go to Trusted Publishers and Trusted Root Certification Authorities and import the certificate.
Now that our certificate is imported and our Update Server is configured, we need to configure the ConfigMgr server. Under Options, select ConfigMgr Server, then enable integration and specify the Central site server that syncs with the WSUS computer as demonstrated below. Note that this is optional and used primarily to support the Automaticoption during the publishing process.

Publishing Updates
Be aware that if no prerequisite rules are defined in an update, it will evaluate to true (or prerequisite rules passed) when scanned. However, if no applicability rule is defined it will evaluate to false, meaning the update will never be applicable. If an Installed Rule is not defined then the update cannot be published. While the WSUS generated MSP installable rule will be present, additional detection logic could be added by using AND/OR logic, and even a new rule could be created.

Next set up Installable Rules to check whether this device needs the update or not, then configure an Installed Rule to check whether this update is already installed.

Now to publish the updates to the WSUS server, complete the steps below.
1. Right-click on the update and select the Publishoption. Here we are publishing the Reader 11.0.08 Update.

2. In our example we will select the Full Content option to deploy this through Configuration Manager. Note that here is where we find the Automatic mode mentioned earlier. This Automatic mode requires ConfigMgr integration to work, however with the Full Content option no ConfigMgr integration or configuration is required from within SCUP tool.

3. Click Next and it will ask for content validation which should be accepted.

4. Once the wizard completes successfully, click Close.

If the wizard generates errors or fails, check the scup.log file for additional information. The scup.log is present in %Appdata\local\temp%.
Below is an example from a Scup.log during publishing of updates.

If you try to publish an update that is already published then it will skip the update and will not re-publish it again (unless it has been changed since it was last published). For example, here I re-published the Reader 11.0.01 Update:

Once published, make sure that you run a sync from the Configuration Manager console after selecting the right product and classification. You need to sync once to get the products into the SUP configuration, then you can select the 3rd party updates in the SUP configuration and sync again to have them show up in the console.


When the sync runs, you can track the progress in Wsyncmanager.log to verify the import of the updates into ConfigMgr.

To view the updates, select Add Criteria and select the corresponding vendor. Sometimes Adobe is listed multiple times because the name does not always conform to “Adobe Systems, Inc.

When the updates have been successfully imported into WSUS, you can see the location of the updates in C:\WSUS\WSUS content\ and the dependencies will be WSUS\Update services packages.
The following SQL query gives the list of locally published updates in WSUS. This could be useful to check whether the update is correctly published into the SUSDB.
SELECT [UpdateId] , [DefaultTitle] , [ArrivalDate]
FROM [SUSDB].[PUBLIC_VIEWS].[vUpdate]
WHERE UpdateId IN (select UpdateId from tbUpdate where IsLocallyPublished = '1')
If content is missing in the WSUS Content share (Update services packages folder) for an update that is previously published, simply republishing the update is insufficient as this will not re-download the content. Instead, get the update ID of the update from the query above as shown below.

Preparing the Clients
The next task is to configure the proper certificate on the clients so that they can receive and install the updates. Since we used a WSSC (WSUS self-signed certificate) on the update server, we need to transfer the WSSC to the client’s certificate store as well. This can be done manually by importing the certificate directly on the client via the MMC, or you can distribute and install the certificate on multiple clients using a software distribution package. You may also have to include the WSSC in the Trusted Root Certificate Authorities node as well, which can be done with easy adjustments to the package if needed. Be sure and test first to determine exactly what is needed for your environment.
Only the WSUS service needs the private key as it is the service that signs the content that will eventually be deployed to clients and the WUA must trust the signer. It would also be inadvisable for the certificate trusted by all of the clients in an organization to have the private key deployed since that could potentially allow administrative users to access the private key and sign content.
Once the clients have the proper certificates, we then only need to configure a group policy allowing the updates. To do this, open the Group Policy Object Editor MMC snap-in and select the domain or OU where you’d like the policy applied, then expand Computer Configuration –> Administrative Templates –> Windows Components and select Windows Update. In the results pane, right-click Allow signed content from intranet Microsoft update service location, click Properties, click Enabled and then click OK.

When complete, once Group Policy refreshes on the clients they will be ready to accept updates.
Deploying Updates
To deploy an update, open the ConfigMgr console and right-click on the update to download and create a deployment package, then distribute it to the required Distribution Points.

Next, specify the download location from which the contents should be downloaded.

In general, we can't choose a network location on this. When the update is imported into WSUS it has the "Internet" download location as the local WSUS server rather than the adobe website. We do this since we sign the package and place it into the WSUS content directory. The signing of the content is done with that certificate that was created for SCUP during the configuration, hence we choose download from Internet rather than the network location.
If you run into failures while downloading, you can check the patchdownloader.log file which will be present in user profile%\AppData\Local\Temp% for more details.

In most cases this is caused by proxy or firewall settings so be sure to check the LAN settings and configure your proxy/firewall accordingly.
Example from Patchdownloader.log:


After creating the package, deploy it to your ConfigMgr collections like you would any other normal update.
Additional Resources
The resources below blogs guides better to install and configure SCUP.
How to install SCUP and configure: https://blogs.technet.com/b/sudheesn/archive/2012/05/04/3474025.aspx
How to setup SCUP and ConfigMgr 2007 to deploy custom updates: https://blogs.technet.com/b/jasonlewis/archive/2007/11/30/how-to-setup-scup-and-configmgr-2007-to-deploy-custom-updates.aspx
Getting Started with System Center Updates Publisher 2011: https://technet.microsoft.com/en-us/library/hh134747.aspx#OSandSoftware
Updates Publisher 2011: https://technet.microsoft.com/en-us/library/hh134742.aspx
About System Center Updates Publisher: https://technet.microsoft.com/en-us/library/bb632895.aspx
System Center Updates Publisher 2011: https://technet.microsoft.com/en-us/library/hh134742.aspx
The following links will help in troubleshooting issues with SCUP
Custom catalogue in SCUP: https://blogs.msdn.com/b/minfangl/archive/2012/01/18/system-center-update-publisher-2011-troubleshoot-series-1-updates-cannot-be-synced-to-configuration-manager.aspx
Installable and applicability rules in SCUP: https://blogs.msdn.com/b/minfangl/archive/2011/10/26/troubleshoot-detection-logic-issue-for-updates-created-by-system-center-update-publisher-2011.aspx
What’s the difference between Prerequisite, Applicability and Installed Rules? https://blogs.technet.com/b/jasonlewis/archive/2007/08/02/what-s-the-difference-between-prerequisite-applicability-and-installed-rules.aspx
Adobe Updates on x64: https://sms-hints-tricks.blogspot.in/2010/07/adobe-updates-on-x64.html
Deploy Adobe Acrobat Updates: https://sms-hints-tricks.blogspot.in/2009/05/deploy-adobe-acrobat-updates.html
How to Expand WSUS Updates: System Center Update Publisher (SCUP): https://www.petri.com/expand-wsus-updates-system-center-updates-publisher-scup.htm#
Subbulakshmi Kumar | Support Engineer | Microsoft GBS Management and Security Division
Get the latest news and tech tips on Facebook and Twitter :
![]()
![]()
System Center All Up: https://blogs.technet.com/b/systemcenter/
Configuration Manager Support Team blog: https://blogs.technet.com/configurationmgr/
Data Protection Manager Team blog: https://blogs.technet.com/dpm/
Orchestrator Support Team blog: https://blogs.technet.com/b/orchestrator/
Operations Manager Team blog: https://blogs.technet.com/momteam/
Service Manager Team blog: https://blogs.technet.com/b/servicemanager
Virtual Machine Manager Team blog: https://blogs.technet.com/scvmm
Microsoft Intune: https://blogs.technet.com/b/microsoftintune/
WSUS Support Team blog: https://blogs.technet.com/sus/
The RMS blog: https://blogs.technet.com/b/rms/
App-V Team blog: https://blogs.technet.com/appv/
MED-V Team blog: https://blogs.technet.com/medv/
Server App-V Team blog: https://blogs.technet.com/b/serverappv
The Surface Team blog: https://blogs.technet.com/b/surface/
The Application Proxy blog: https://blogs.technet.com/b/applicationproxyblog/
The Forefront Endpoint Protection blog : https://blogs.technet.com/b/clientsecurity/
The Forefront Identity Manager blog : https://blogs.msdn.com/b/ms-identity-support/
The Forefront TMG blog: https://blogs.technet.com/b/isablog/
The Forefront UAG blog: https://blogs.technet.com/b/edgeaccessblog/