Vyatta Virtual Router on Hyper-V
I’m currently building a new demo/test environment on my Windows Server 2008 Hyper-V server. And I wanted to have a Virtual Router running on Hyper-V which should handle the routing between the virtual networks on Hyper-V.
First some background info on my network at home.

So I looked for a software router which could be installed as a guest on my Hyper-V host. I started with BrazilFW, but I had trouble to get the Gateway and DNS running (failed) although a colleague was able to get BrazilFW running on Hyper-V by upgrading the SYSLINUX (bootloader for Linux). Then I tried Freesco and m0n0wall, but both would not start on Hyper-V. So I finally found Vyatta via SourceForge.
Vyatta is a Linux-based, open network operating system that integrates advanced enterprise-class routing, security, bandwidth management and more. Vyatta runs on standard x86 hardware, VMWare & Xen and offers config via Linux-shell, CLI and web GUI.
It runs on VMWare & Xen so why would not it run on Hyper-V? And I was correct it runs great on Hyper-V ;-) These are steps I’ve taken to get it running on Hyper-V.
Downloading ISO image from Vyatta’s website
Vyatta Community Edition 4.0 (VC4)Create a new Virtual Machine in Hyper-V Manager
Attach the ISO downloaded in step 1 to the new Vyatta Virtual Machine so it can boot from the ISO.Configure the Vyatta Virtual Machine
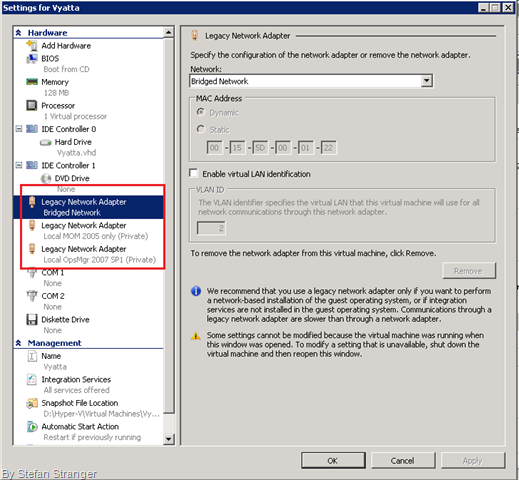
Add the Network Adapters for the Internet, and the needed subnets to Vyatta Virtual Machine.
Remark: Use Legacy Network Adapters!

I added a 1 GB harddisk and gave it 128 MB RAM.
Installing Vyatta
You can boot from the ISO you downloaded in step 1. because it’s also a “Live CD”
You’ll first need to login to Vyatta once it’s booted up. The default logins are (user: root pass: Vyatta) To install to the drive you will issue the command:
During the install you will be asked how much diskspace to allot to the different partitions. I went with the default. Once that’s complete, pop the CD out, and reboot to your installed Vyatta. Now we can start configuring the system.install-system Configuring Ethernet Interfaces
Log on the system.
Configure the first NIC (eth0) which is going to be used for Internet access.eht0:
vyatta@vyatta> configure [edit] vyatta@vyatta# set interfaces ethernet eth0 address 192.168.1.254/24 [edit] vyatta@vyatta# commit [edit] vyatta@vyatta# exit exit vyatta@vyatta>
eth1:
vyatta@vyatta> configure [edit] vyatta@vyatta# set interfaces ethernet eth1 address 192.168.2.254/24 [edit] vyatta@vyatta# commit [edit] vyatta@vyatta# exit exit vyatta@vyatta>
eth2:
Check interfaces configuration:vyatta@vyatta> configure [edit] vyatta@vyatta# set interfaces ethernet eth2 address 192.168.3.254/24 [edit] vyatta@vyatta# commit [edit] vyatta@vyatta# exit exit vyatta@vyatta>
vyatta@vyatta:~$ configure [edit] vyatta@vyatta# show interfaces ethernet eth0 { address 192.168.1.254/24 description Internet hw-id 00:15:5d:00:01:22 } eth1 { address 192.168.2.254/24 description "subnet1:MOM 2005" hw-id 00:15:5d:00:01:23 } eth2 { address 192.168.3.254/24 description "subnet2:OPSMGR 2007" }
Save Configuration
vyatta@vyatta# save Saving configuration to '/opt/vyatta/etc/config/config.boot'... Done [edit]
Configuring Access to a DNS Server
vyatta@vyatta# set system name-server 192.168.1.1 [edit] vyatta@vyatta# commit [edit] vyatta@vyatta#
Specifying the Default Gateway
vyatta@vyatta# set system gateway-address 192.168.1.1 [edit] vyatta@vyatta# commit [edit] vyatta@vyatta#
Configuring the Firewall
We want to block the traffic from subnet1 to subnet2 and visa-versa.
Firewall block-subnet1 rules:
Do the same for subnet2.vyatta@vyatta# set firewall name block-subnet1 [edit] vyatta@vyatta# set firewall name block-subnet1 rule 1 [edit] vyatta@vyatta# set firewall name block-subnet1 rule 1 source address 192.168.2.0/24 [edit] vyatta@vyatta# set firewall name block-subnet1 rule 1 action drop [edit] vyatta@vyatta# set firewall name block-subnet1 rule 2 [edit] vyatta@vyatta# set firewall name block-subnet1 rule 2 action accept vyatta@vyatta# commit [edit] vyatta@vyatta#
vyatta@vyatta# set firewall name block-subnet2 [edit] vyatta@vyatta# set firewall name block-subnet2 rule 1 [edit] vyatta@vyatta# set firewall name block-subnet2 rule 1 source address 192.168.3.0/24 [edit] vyatta@vyatta# set firewall name block-subnet2 rule 1 action drop [edit] vyatta@vyatta# set firewall name block-subnet2 rule 2 [edit] vyatta@vyatta# set firewall name block-subnet2 rule 2 action accept vyatta@vyatta# commit [edit] vyatta@vyatta#
Apply the rule set to an interfaces
vyatta@vyatta# set interfaces ethernet eth1 firewall out name block-subnet2 [edit] vyatta@vyatta# set interfaces ethernet eth2 firewall out name block-subnet1 [edit] vyatta@vyatta# commit [edit] vyatta@vyatta#
Final configuration:
vyatta@vyatta:~$ show configuration firewall { name block-subnet1 { rule 1 { action drop source { address 192.168.2.0/24 } } rule 2 { action accept } } name block-subnet2 { rule 1 { action drop source { address 192.168.3.0/24 } } rule 2 { action accept } } name block-subnet3 { rule 1 { action drop source { address 192.168.2.0/24 } } rule 2 { action accept } rule 3 { action drop source { address 192.168.3.0/24 } } } } interfaces { ethernet eth0 { address 192.168.1.254/24 description Internet hw-id 00:15:5d:00:01:22 } ethernet eth1 { address 192.168.2.254/24 description "subnet1:MOM 2005" firewall { out { name block-subnet2 } } hw-id 00:15:5d:00:01:23 } ethernet eth2 { address 192.168.3.254/24 description "subnet2:OPSMGR 2007" firewall { out { name block-subnet1 } } hw-id 00:15:5d:00:01:24 } loopback lo { } } service { nat { rule 1 { outbound-interface eth0 source { address 192.168.2.0/24 } type masquerade } rule 2 { outbound-interface eth0 source { address 192.168.3.0/24 } type masquerade } } ssh { } } system { gateway-address 192.168.1.1 login { user root { authentication { encrypted-password **************** } } user vyatta { authentication { encrypted-password **************** } } } name-server 192.168.1.1 ntp-server 69.59.150.135 package { repository community { components main distribution stable url https://packages.vyatta.com/vyatta } } } vyatta@vyatta:~$ |
Don’t forget to save your configuration!
Now you are done! Check out the documentation for Vyatta before starting. I used the QuickStart and the Command Reference.