Hidden Gems #15: Add some whiz to your PowerPoint Presentations

PowerPoint is the number one Presentation tool across the globe. Everyone knows it can add a dash of professionalism to even the most basic sales pitch, but it also brings clarity to complicated issues; say, explaining strategy to staff, or making sense of financials.
But familiarity is the price of success: everyone has sat through PowerPoint presentations with endless slides of bland lists of bullets. In this Hidden Gem, we’re hot on the scent of animations – the easy way to add some pizzazz to any presentation – and a technique which in PowerPoint 2010 has lots of new features.
Case Notes...
The Target: Animations are available in PowerPoint 2010, 2007, 2003 and even earlier editions; although the best and most satisfying functionality is found in 2010 and 2007.
Whereabouts: Included in Office 2010 “Home and Business” or “Professional” Editions, or available standalone from the Microsoft
Store.
Modus Operandi: Jazz up the appearance of presentation elements with simple and elegant animations.
Appearance:
Case History...
Let’s start with some first principles – get the concepts right, and you’ll soon be an animation guru.
What to animate
Animations used to be applied to single objects; but that often wasn’t particularly effective. If you have three bullets on screen – a
pretty typical slide, after all – you really want to apply the animation to each bullet relative to the next one; perhaps swooshing in one after the other. Similarly, a pie chart has several elements (the background, plus each slice of pie); and you will want each to be animated, or highlighted, one after the other. Many shapes, headers, and other typical page elements are all composed of several components.
So it will often help to think about an animation as being an effect which applies to several different parts. When you select a container on the page which has several bullets; PowerPoint will consider each bullet separately. Similarly, when you select a chart, or a group of shapes, again PowerPoint will work out the most effective animation to apply to each element.
To get started, simply select an item which you wish to animate on the screen.
Applying the animation
Once you know what to animate, you can decide how to animate it. This is a two-part process: firstly the animation, and then, optionally, the additional effects – appropriate to that animation – which you want to apply.
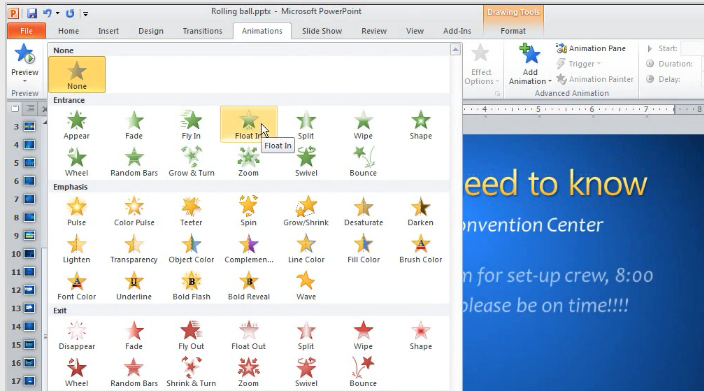
To select an animation, hit the Animations Tab and then the extender arrow to view the whole Animations gallery.

The actual list of available animations is huge – and growing, thanks to third party developers; but they fall broadly into four categories:
- Entrance: Animations when an element appears on-screen
- Emphasis: Glows, highlights, and colour changes designed to highlight an element while it is on screen
- Exit: Animations when an element disappears off-screen
- Motion Paths: A range of custom animations by which to move elements around on screen in interesting ways (e.g. circle,
figure of eight)
Simply select the animation you require, and in will be applied.
In many cases, this is all you’ll have to do – press Shift-F5 (a universal command which runs a slide-show from the current slide) to see your handiwork in action.
Customisation and effects
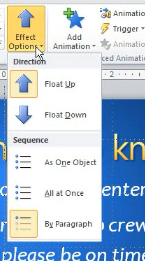
Each animation, however, has a further set of effects to allow for additional customisation. Select Effect Options to see them. The available effects depend on the specific animation chosen. Typically, though, these consist of:
- Direction of travel (do you want bullets coming in from the left, right, top or bottom, for example)
- Relative elements: as discussed above, do you want all elements to animate together, or to operate one at a time in sequence
There are further options, too:
- Select Trigger to tell PowerPoint how the animation will be started: this can be with a click (keyboard or mouse), immediate, or after a pre-defined length of time (ideal if you want to speak to your audience between each scene change).
- There is also a Duration setting, which will allow you to speed up or slow down the transition. PowerPoint makes a pretty good guess at the ideal animation speed; but you may wish to make changes for ease of reading or your own presentation
style as appropriate.
What’s in, what’s out?
Remember, we said above that the majority of animations of an object on screen actually consist of several elements in sync? You can also choose which of those elements you animate.
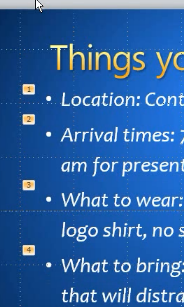
Each element in your animation will have a tiny number in a box next to it. Select the box to switch it in or out of the animation sequence.
In the example shown here, if you deselected the ‘1’ box, then the first bullet would be shown on screen as soon as the slide was
activated; and only bullets two, three and four would animate in.
Getting it right
Once you get to this level of complexity, it can take a few shots and a bit of tweaking to get something visually appealing. You can always change the animation from the Animation Gallery at any time, or indeed select None if you want to remove the animation altogether.
Under the magnifying glass...
Remember that, in the world of animation, you should be looking stylistically for two features:
- Simplicity: ten different animation styles, multiple overlaid animations, countless colours and endless visuals will make your audience wish they had dark glasses. Keep it simple; use short movements and relatively slow speeds. Gentle movement is much easier to follow.
- Clarity: and remember that you’re aiming to help your audience think, learn and understand. Generally therefore, have text uncovered from the left – it’s how we read. Similarly, flow from the top down. Don’t animate elements where it would be impossible to understand one visible element without seeing the one not yet shown. Don’t complicate users’ comprehension style for animation’s sake alone.
The target exposed
Find out more: