How to turn your SharePoint site into a native app with 5 lines of code
The web has changed and things have moved on, not really a shock, but the evolution of the latest web browsers is changing things. In particular Internet Explorer 9 allows you to take any site you see on the web and turn it into a native application by simply dragging a tab down to the task bar. If you think that pinning a site isn’t overly useful consider some of the stats that the process drives, Huffington post drove views by users visiting their site through pinning up by 11%…now translate that to your SharePoint site, your intranet. Your users could be finding more stuff through the intranet, saving them some time. The cost? a few lines of simple code.
What you need to do
Rather obviously I’m only going to describe the steps for SharePoint 2010, you can probably work them out for other versions just fine.
Open your SharePoint site using SharePoint designer (you’ll need to get SharePoint designer from here if you don’t already have it) and open your site. Then you’ll need to:
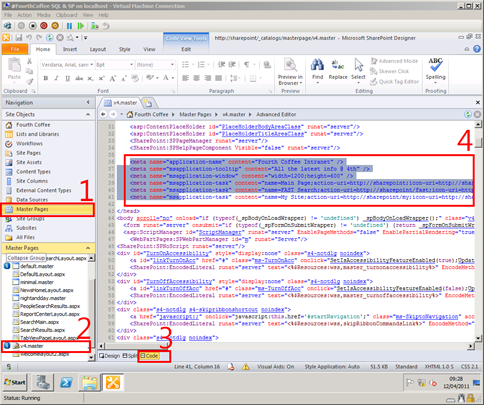
- Select Master Pages from the left Site Object pane
- Select the v4.master document and check it out to change it
- Select the code view
- Enter the code, which you’ll see listed below the picture.
So this is the code you need to enter and it needs to go within the <head> and </head> tags, I’d suggest placing this code towards the end of the HTML header.
- <meta name="application-name" content="Fourth Coffee Intranet" />
- <meta name="msapplication-tooltip" content="All the latest info @ 4th" />
- <meta name="msapplication-window" content="width=1200;height=600" />
- <meta name="msapplication-task" content="name=Main Page;action-uri=https://sharepoint;icon-uri=https://sharepoint/SiteAssets/SitePages/Home/4th.ico"" /
- <meta name="msapplication-task" content="name=FAST Search;action-uri=https://sharepoint/fast;icon-uri=https://sharepoint/SiteAssets/SitePages/Home/4th.ico"" />
- <meta name="msapplication-task" content="name=My Site;action-uri=https://sharepoint/my;icon-uri=https://sharepoint/SiteAssets/SitePages/Home/4th.ico" />
Now that you know where it goes, lets walk through the code, line by line to understand what it does.
- We provide a name for the application, all Windows apps need something to identify them after all
- We configure a tool tip that will appear when hovering over the pinned icon before it’s launched
- We setup the size of the window when it initially opens
- Now for the meat, lines 1 to 3 are enough to be able to pin the app, but it’s time to do something more… Jump lists! that increased page usage involves having fast access to pages from jump lists, so in lines 4-6 we configure the Jump lists. Lets break down the line:
- meta name="msapplication-task" tells IE that we’re defining a jump list item.
- content="name=Main Page; tells IE what to name the jump list item, the user sees this.
- action-uri=https://sharepoint; tells IE what address the jump list points to.
- icon-uri=https://sharepoint/SiteAssets/SitePages/Home/4th.ico tells IE what icon to use for the jump list item….ahh we’re into favicons…
You will also need to create a favicon, I use icoFX which is free and can take a normal image and turn it into an ico file. You’ll also want to do the same thing to create a nice custom icon for the SharePoint site, so simply do that and ensure you save it with a 256x256 pixel size. Finally to make this icon the favicon for your site you’ll need to edit one more line…
<SharePoint:SPShortcutIcon runat=”server” IconUrl=”xxxx”>
Here you need to change the IconUrl value to be the location of the new favicon on your SharePoint server, this will be the same icon that is used on the toolbar and in the top left of the browser window.
Going further
In a future post I’ll show you how to take this simple code and do more with it, isolate it from browsers that don’t support it and create overlays of the icon on the task bar to show you there new things.
