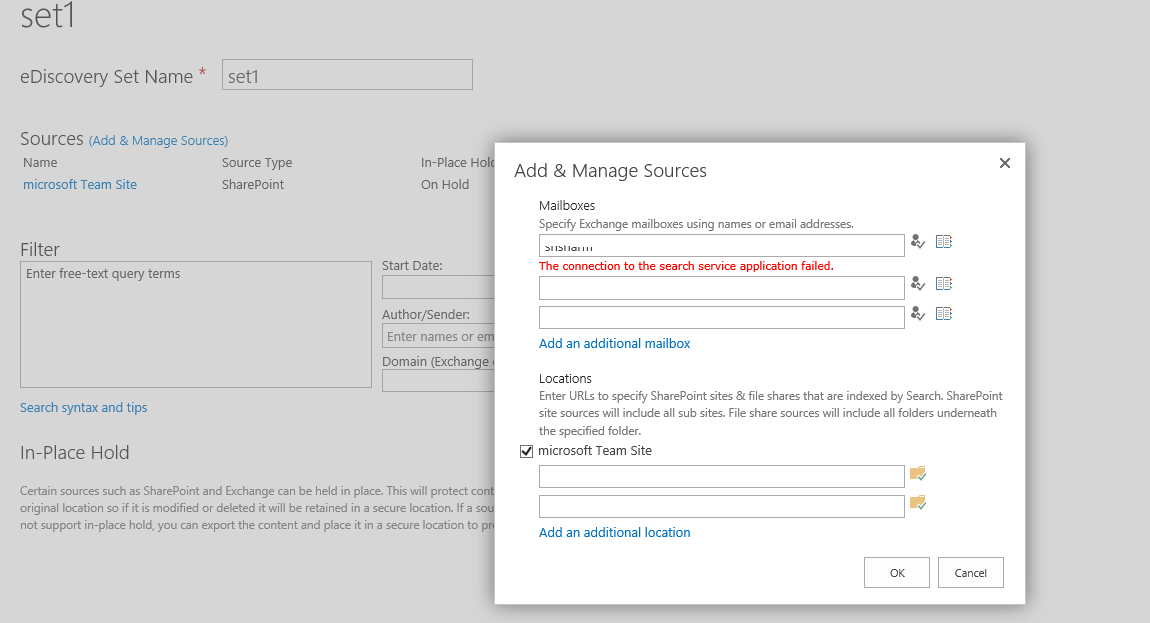
SharePoint Online E-discovery: When selecting a source you see error message "The connection to the search service application failed"
Another form of error you might see could be something like "No exact match was found. The url may be invalid, you don't have permission to access the location, or the location is not indexed by Search"
Whenever I see this above error I run by Step 4 and Step 5 of below article:
Reposting below from the article:
Step 4: Assign eDiscovery permissions in SharePoint Online
Follow these steps to make the members of a security group the site collection owners of the eDiscovery Center.
In the eDiscovery Center, go to Settings > Site settings.
On the Site Settings page, under Users and Permissions, click Site permissions.
Click the <name of site collection> Owners group for the site collection.
In the New drop-down list, click Add Users.
In the Invite people box, type the name of the eDiscovery managers security group, and then click Share.
Follow these steps to make members of the eDiscovery managers security group site collection administrators for a site collection. Repeat these steps for each site collection in your SharePoint Online organization.
Go to the top-level site in the site collection, and then click Settings > Site settings.
On the Site Settings page, under Users and Permissions, click Site Collection Administrators.
Type the name of the eDiscovery managers security group in the Site collection administrators box and then click OK.
Follow these steps to give members of the eDiscovery managers security group read permissions to crawl log information for your organization.
In the Office 365 admin center, choose Admin > SharePoint.
In the SharePoint admin center, click Search.
On the Search administration page, click Crawl Log Permissions.
In the Crawl Log Permissions box, type the name of the eDiscovery managers security group, and then click OK.
Step 5: Assign eDiscovery permissions in Exchange Online
Follow these steps to assign eDiscovery permissions in Exchange Online to the eDiscovery managers security group.
In the Office 365 admin center, choose Admin > Exchange.
In the EAC, go to Permissions > Admin roles.
Click Discovery Management, and then click Edit.
Under Members, click Add.
Select the security group that you created for eDiscovery managers, click Add, and then click OK.
Click Save.
The eDiscovery managers security group is listed under Members in the details pane.