Creating a Custom Identity Provider and integrating with SharePoint to achieve single sign on with FBA across multiple web applications
This post is a contribution from Sohail Sayed, an engineer with the SharePoint Developer Support team
We had a scenario where we needed to use Forms Based Authentication with SharePoint and at the same time have single sign on across multiple web applications. Configuring FBA with SharePoint can be easily achieved through membership and role provider and the steps are well documented. However, this will not work as a single sign-on scenario across multiple web applications.
You will need to use a Trusted Identity Provider (also referred as Custom Security Token Service) to achieve single sign-on in SharePoint for FBA. It is very easy to create a custom identity provider and configure it with FBA. This blog demonstrates creation of a custom identity provider with FBA. In a subsequent blog we will demonstrate integrating the single sign on with an asp.net site and with Provider Hosted add-ins.
The below steps have been done on Windows Server 2012 R2 Standard and Visual Studio 2013. Same steps will apply for Visual Studio 2015 or later just the location of the folders will change as per the version of Visual Studio. In addition we will use the ASP.NET SqlMembership provider for authentication.
Please refer to the below link for more information on SqlMembership provider
https://msdn.microsoft.com/en-us/library/6e9y4s5t.aspx
Enable STS templates
Visual studio has a Project Template that will have most of the functionality for the custom identity provider. Follow the below steps to get the template in your Visual Studio.
- Go to Control Panel -> Programs -> Programs and Features -> Turn Windows features on or off
You need to enable:- Windows Identity Foundation 3.5 - to be able to install WIF SDK
- .NET Framework 3.5 (includes .NET 2.0 and 3.0) - the wif-sdk templates have a 3.5 dependency
- Download and install WIF SDK
https://www.microsoft.com/en-us/download/details.aspx?id=4451 - Copy the templates
Copy the templates from C:\Program Files (x86)\Windows Identity Foundation SDK\v4.0\Visual Studio Extensions\10.0 to C:\Users\<<USERNAME>>\Documents\Visual Studio 2013\Templates\ProjectTemplates\Visual C#. - Create a site from a template
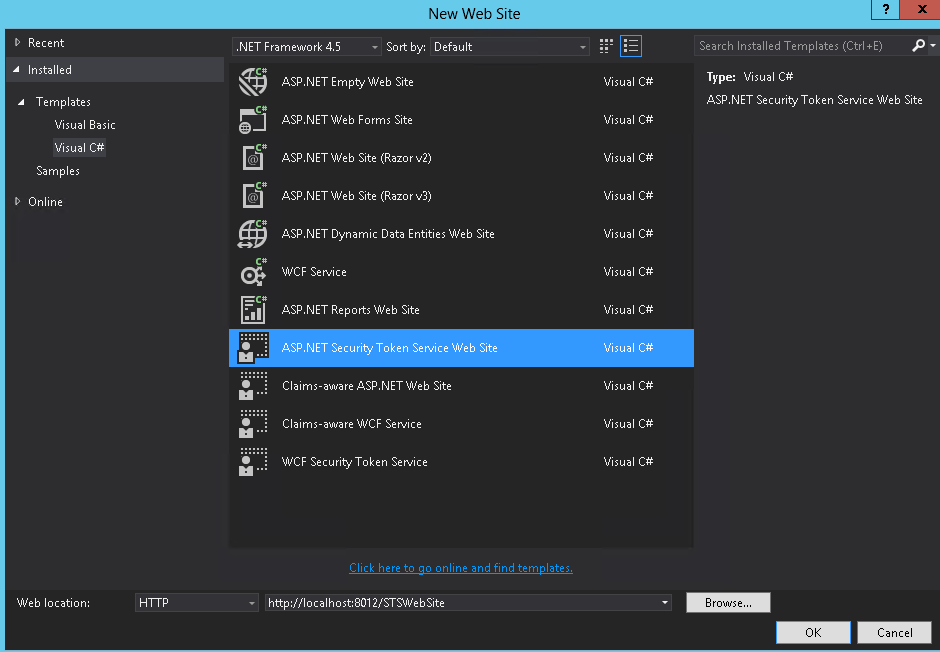
Now you should be able to use the templates: File -> New -> Web Site -> Installed -> Templates -> Visual C#.
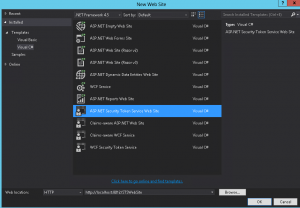
Use the Asp.net Security Token Service Web Site
Structure of the Project
The Project structure is shown in the below image.
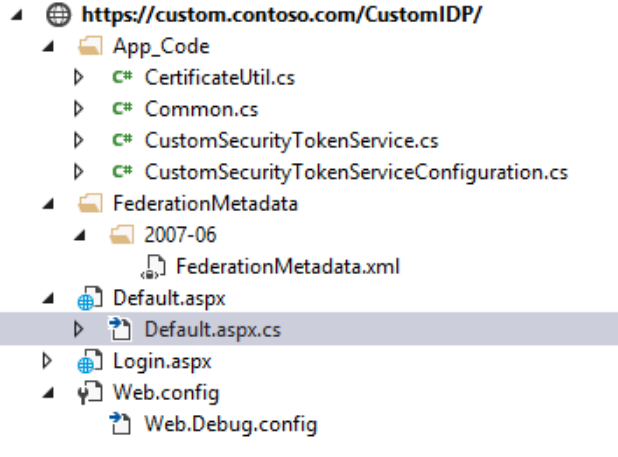
App_Code - This folder contains most of the classes related to Security Token Service functionality. The CustomSecurityTokenService class defines most of the processing logic for our custom STS. This class contains the method GetOutputClaimsIdentity where we define the claims to be passed to the client applications. The CustomSecurityTokenServiceConfiguration represents the configuration for the custom STS defined in the Web.Config. In addition there are a couple of utility classes.
FederationMetadata - As the name suggests this folder contains the file that defines the Federation Metadata. This will be later consumed in an asp.net application.
Default.aspx is the entry point for client applications requesting authentication to our custom STS. The default.aspx expects wa, wtrealm and wctx parameters which are passed by the client application. Default.aspx will redirect to the Login.aspx if the user is not already logged in else will post the saml token for an authenticated user back to the client application.
The Web.Config file contains the certificate details used by our custom STS. This is specified in the appSetting SigningCertificateName. The value for the SigningCertificateName will be the Subject property of the certificate.
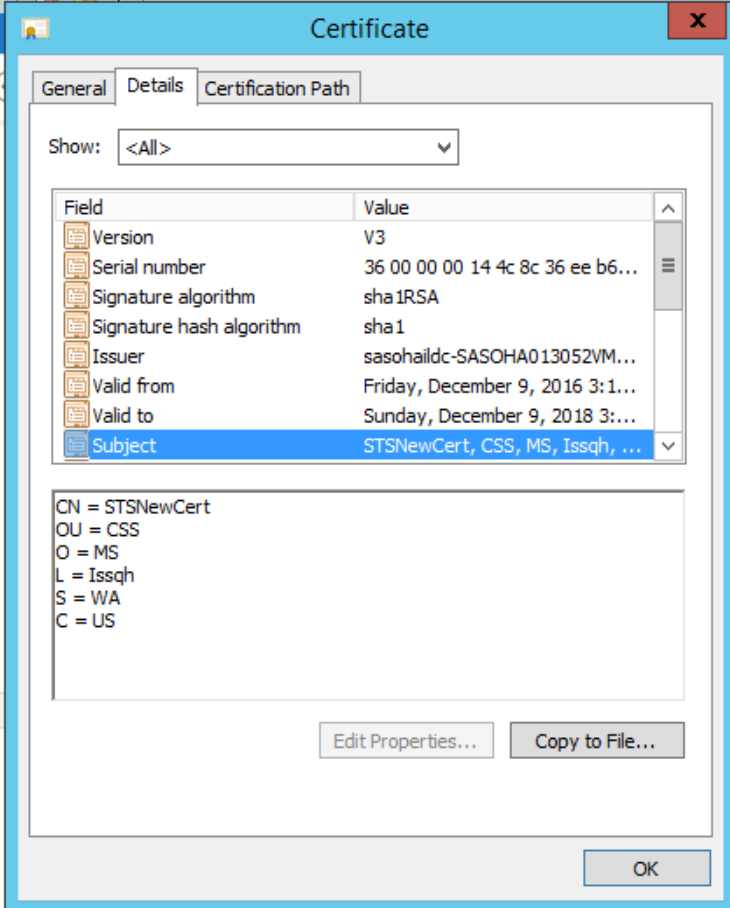
For the above certificate we will have the SigningCertificateName appSetting defined as below
<add key="SigningCertificateName" value="CN=STSNewCert, OU=CSS, O=MS, L=Issqh, S=WA, C=US"/>
Update Login.aspx page
We need to implement the authentication logic in Login.aspx. Since we are using the SQLMembership provider we can use the asp.net login control. Comment rest of the controls as we only need the login control
 <%@ Page Language="C#" AutoEventWireup="true" CodeFile="Login.aspx.cs" Inherits="Login" %>

<!DOCTYPE html PUBLIC "-//W3C//DTD XHTML 1.0 Transitional//EN" "https://www.w3.org/TR/xhtml1/DTD/xhtml1-transitional.dtd">

<html xmlns="https://www.w3.org/1999/xhtml">
 <head id="Head1" runat="server">
 <title>Login to the security token service (STS)</title>
 <style type="text/css">
 .style1
 {
 width: 100%;
 }
 .style2
 {
 width: 125px;
 }
 .style3
 {
 font-size: large;
 font-weight: bold;
 }
 </style>
 </head>
 <body>
 <form id="form1" runat="server">
 <asp:Login ID="Login1" runat="server"></asp:Login>
 </form>
 <p>
 Note: You can enter any non-empty user name. The password field
 is optional. To modify claims issued by this STS, make changes to
CustomSecurityTokenService.GetOutputClaimsIdentity.</p>
 </body>
 </html>
Comment all code in Login.aspx.cs as the authentication will be taken care by membership provider configured in next step
Web.config Changes in STS
Membership provider
To configure the STS to use custom membership provide add the <membership> element
 <membership defaultProvider="aspnetmembership">
 <providers>
 <add name="aspnetmembership" connectionStringName="MyLocalSQLServer" applicationName="MyAppName" type="System.Web.Security.SqlMembershipProvider, System.Web, Version=2.0.0.0, Culture=neutral,            PublicKeyToken=b03f5f7f11d50a3a" />
 </providers>
 </membership>
 Also need to add the connection string for the membership provider in the above case
 <connectionStrings>
 <add name="MyLocalSQLServer" connectionString="Initial Catalog=aspnetdb_claim;data source=SQL;Integrated Security=SSPI;" />
 </connectionStrings>
Edit the App_code/CustomSecurityTokenService.cs file
Update the GetOutputClaimsIdentity method to add custom claims.
 protected override IClaimsIdentity GetOutputClaimsIdentity( IClaimsPrincipal principal, RequestSecurityToken request, Scope scope )
 {
 if ( null == principal )
 {
 throw new ArgumentNullException( "principal" );
 }

ClaimsIdentity outputIdentity = new ClaimsIdentity();

// Issue custom claims.
 // TODO: Change the claims below to issue custom claims required by your application.
 // Update the application's configuration file too to reflect new claims requirement.

outputIdentity.Claims.Add( new Claim( System.IdentityModel.Claims.ClaimTypes.Email, principal.Identity.Name ) ); //https://msdn.microsoft.com/en-us/library/system.identitymodel.claims.claimtypes(v=vs.110).aspx
 outputIdentity.Claims.Add( new Claim( ClaimTypes.Role, "Manager" ) );

return outputIdentity;
 }
Certificate
By default when you create a new ASP.NET Custom STS site, the certificate is specified in the web.config in app settings as below. In the earlier section of this blog I have provided more details on the SigningCertificateName appSetting.
Note - In production scenario we need to use domain signed certificate.
<add key="SigningCertificateName" value="CN=STSTestCert"/>
Publish the STS to a location accessible by the SharePoint application
Copy Certificates
Creating a new Asp.net Security token site will add a new certificate to the certificate store. You can find the certificate referenced in the Web.Config of the custom STS site. We need to add certificate to trusted store.
- Go to Central Admin --> Security -->Manage Trust.
- Add the certificate (.cer) file here
Created Trusted Identity Provider
Run the below PowerShell to create the trusted identity provider
 $cert = New-Object System.Security.Cryptography.X509Certificates.X509Certificate2("c:\cert\STSTestCert.cer")

$map1 = New-SPClaimTypeMapping -IncomingClaimType "https://schemas.xmlsoap.org/ws/2005/05/identity/claims/emailaddress" -IncomingClaimTypeDisplayName "EmailAddress" –SameAsIncoming

$map2=New-SPClaimTypeMapping -IncomingClaimType "https://schemas.microsoft.com/ws/2008/06/identity/claims/role" -IncomingClaimTypeDisplayName "Role" –SameAsIncoming

$realm="https://sp/_trust/default.aspx"

$ap=New-SPTrustedIdentityTokenIssuer -Name "SimplePassiveSTS" -Description "A simple Asp.Net STS on DevBox." –Realm $realm -ClaimsMappings $map1,$map2 -ImportTrustCertificate $cert -SignInUrl "https://localhost:8013/STSWebSite/default.aspx" -IdentifierClaim $map1.InputClaimType
Update "SimplePassiveSTS" in the above command with the desired name of the Trusted Identity Provider
Replace the value of $realm variable in the above command with the url of one of your SharePoint web applications. There will be additional steps for other web applications which is mentioned in the next section. In addition replace the SignInUrl parameter in the New-SPTrustedIdentityTokenIssuer command with the url of the custom STS web site.
After the identity provider has been created go the Central Admin --> Application Management --> Manage web applications. Select the desired Web application and click the Authentication Providers from Ribbon. Edit the desired zone and select the newly created Trusted Identity Provider. Repeat this for the other SharePoint web applications as required.
Configuring the ProviderRealms
In PowerShell code to register the Trusted Identity Provider in the previous section we specified url of one of the web applications in the $realm parameter. This value is passed as wctx and wtrealm parameters to the Custom STS. For those familiar with ADFS this is similar to the Relying Party Identifier in ADFS. ADFS automatically maps this to the Relying Party Endpoint and return back the SAML Token to this endpoint after authentication. In case of the Custom STS the redirection will happen to the value passed in wctx parameter. There is an additional step required for other web applications to work with the custom STS else the url of the web application specified in $realm in the previous section will always be passed in wctx parameter to the custom STS by SharePoint for all the web applications configured to authenticate with the Custom STS.
Run the following script for other web applications that are using the Custom STS for authentication.
 $ap = Get-SPTrustedIdentityTokenIssuer -Identity "SimplePassiveSTS"
$ap.ProviderRealms.Add((new-object System.Uri("https://sp:8787")),"https://sp:8787/_trust/default.aspx")
$ap.ProviderRealms.Add((new-object System.Uri("https://sp:8888")),"https://sp:8888/_trust/default.aspx")
$ap.Update()
iisreset
Provide appropriate access to the required users and you should be able to login to your SharePoint web application using FBA and experience single sign on across multiple web applications. One thing you will notice is that when adding users, anything you type in the People Picker control will get resolved. To fix this you will need to implement a custom claims provider. I will cover this in a subsequent blog.
Update - The second blog which demonstrates integrating the custom identity provider with asp.net web site and provider hosted apps has been published at https://blogs.technet.microsoft.com/sharepointdevelopersupport/2017/07/26/integrating-custom-identity-provider-with-asp-net-and-provider-hosted-apps-to-achieve-single-sign-on-with-forms-based-authentication/