Zero Downtime Patching with SharePoint Server 2016 Start to Finish
Recently a question came up of how Zero Downtime Patching with SharePoint Server 2016 works. Myself and colleagues Neil Hodgkinson (PG CAT) and Karl Reigel (SR Premier Field Engineer), decided to show that this does indeed work, and to be fair, in earlier versions of SharePoint it was possible to install patches with zero downtime, however the following upgrade sequence always resulted in an outage. It was possible to mitigate the extent of the outage using SQL snapshots to support read only access but this was a complex operation. In SharePoint 2016 the patching and upgrade process supports full read/write capability throughout the entire sequence with only minor operational considerations. The key to this is configuring your farm with highly available (HA) services
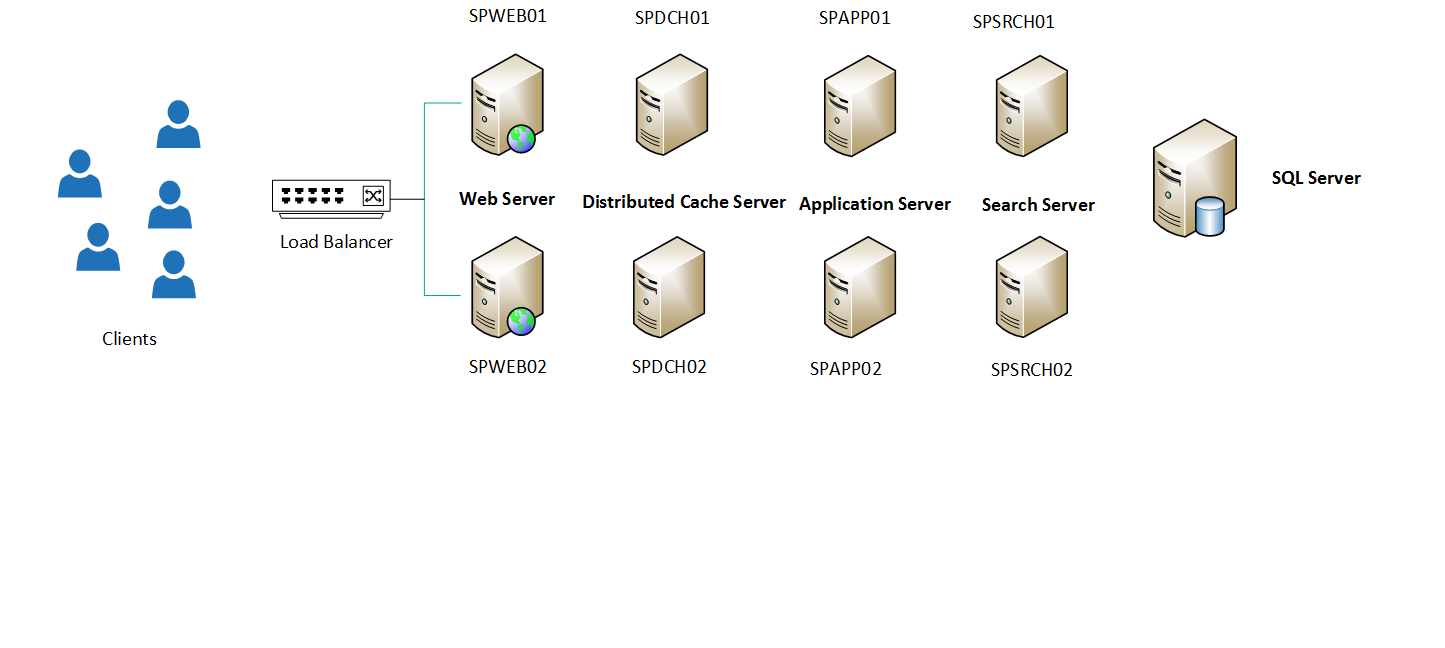
As mentioned in order to take advantage of zero downtime patching your farm must have a High Availability, HA, topology.
The farm used in our video demo is the new topology service MinRole and for this to be highly available I need to double up on my servers so the count would be:
2 Web Front Ends (Load balanced using Azure load balancer in our case)
2 APP Servers
2 Distributed Cache
2 Search Servers
Image 1: This image depicts the MinRole, HA topology used in our demo. (Please click Image for larger view)
This is a simple example and the most basic HA, MinRole farm that is possible. Since Zero Downtime Patching is a new concept we wanted to keep it simple. A more complex topology will have a more complex patching strategy, but it will still build from this basic strategy.
I do want to make special mention use of Custom Role. Early on around general availability there was some misinformation out on the internet that unless you had a MinRole Farm with HA topology you could not achieve zero downtime patching. I want to stress that MinRole is not a requirement to achieve zero downtime patching, but a high availability architecture is.
One of the other improvements are patch sizes which are much smaller with SharePoint Server 2016 than they had been in SharePoint Server 2010 and SharePoint Server 2013. We have released the following video and the hope is that customers see that zero downtime patching in action and gain insights to begin building a zero downtime patching plan for their SharePoint Server 2016 Farms. Hopefully this demonstration helps build confidence to apply SharePoint Server 2016 Product Updates, PU's.
I am including the steps I took during this process below
Steps Taken during Demo
1. Remove SPWEB01 from Loadbalancer
2. Patch SPWEB01 STS & WSS Packages
3. Reboot SPWEB01
4. Add SPWEB01 back into Loadbalancer
5. Remove SPWEB02 from Loadbalancer
6. Patch SPWEB02 and Reboot
7. SPWEB02 remains out of Load balancer until Upgrade process begins (Personal Preference)
8. Patch SPAPP01, SPDCH01 and SPSRCH01 in parallel and Reboot boxes
9. Patch SPAPP02 SPDCH02 and SPSRCH02 in parallel and Reboot Boxes
10. With SPWEB02 out of Loadbalancer (See step 8) Run following command
a. PSConfig.exe -cmd upgrade -inplace b2b -wait -cmd applicationcontent -install -cmd installfeatures -cmd secureresources -cmd services -install
(Note that I ran a condensed version of this command during presentation but this is the preferred method to run upgrade)
11. Once complete add SPWEB02 back into Loadbalancer and once complete remove SPWEB01
12. Run step 10a on SPWEB01
13. Add SPWEB01 back into loadbalancer
14. On SPAPP01 run Step 10a
15. On SPDCH01 run Step 10a
16. On SPSRCH01 run Step10a
17. Once complete run same steps (14-16) on 02 series servers (SPAPP02, SPDCH02, SPSRCH02)
This concludes the upgrade portion of the SharePoint Server Farm
Post Upgrade Testing
We recommend to Test pages throughout to ensure patching and upgrading of servers is complete. We also recommend to do post upgrade testing on environment. Many environments are different so testing will vary. Some examples of post testing may include following:
- Test 1 - Create Site Collection
- Test 2 - Add a Site Collection Administrator
- Test 3 - Create a Web
- Test 4 - Create a SharePoint Group
- Test 5 - Add User/AD Group to SharePoint Group
- Test 6 - Create a Site Column
- Test 7 - Add a Content Type
- Test 8 - Add an Audit Policy to the Content Type
- Test 9 - Create a List
- Test 10 - Create a Document Library
- Test 11 - Add a Document to the Document Library
- Test 12 - Open a document
- Test 13 - Add Content Type to List
- Test 14 - Add Fields to List
- Test 15 - Add an Item to the List
- Test 16 - Delete an Item from the List
- Test 17 - Delete an Item from the Document Library
- Test 18 - Add a Page
- Test 19 - Add a Web Part to the Page
- Test 20 - Perform Search Query
- Test 21 - Perform People Search Query
- Test 22 - Test Word Automation Services
- Test 23 - Retrieve a User Profile from the UPS
- Test 24 - Test access to a Site Collection in each Web App and VIP Site Collections to confirm availability
Additional Info:
Load balancer script
During the video the following Windows PowerShell script was used to take Servers out of the Azure Service Management Internal LoadBalancer.
Example Script for working with an Azure Loadbalancer
#Remove SPweb01 Azure LoadBalanced EndPoint
$svc=<"NameYourLBService">
$vmname=<"NameofYourVM">
$epname="TCP-80-80"
Get-AzureVM -ServiceName $svc -Name $vmname | Remove-AzureEndpoint -Name $epname | Update-AzureVM
#Add SPWEB01 AzureEndpoint back
$ilb="minroleilb"
$prot="tcp"
$locport=80
$pubport=80
$epname="TCP-80-80"
$lbsetname=<"NameYourLB">
$vmname=<"NameofYourVM">
Get-AzureVM –ServiceName $svc –Name $vmname | Add-AzureEndpoint -Name $epname -LbSetName $lbsetname -Protocol $prot -LocalPort $locport -PublicPort $pubport –DefaultProbe -InternalLoadBalancerName $ilb | Update-AzureVM
# Remove SPweb02 Azure LoadBalanced EndPoint for patch install and B2B phase
$vmname=<"NameofYourVM">
$epname="TCP-80-80-2"
Get-AzureVM -ServiceName $svc -Name $vmname | Remove-AzureEndpoint -Name $epname | Update-AzureVM
#Add for B2B spweb02 AzureEndPoint to ILB
$prot="tcp"
$locport=80
$pubport=80
$epname="TCP-80-80-2"
$lbsetname=<"NameYourLB">
$vmname=<"NameofYourVM">
Get-AzureVM –ServiceName $svc –Name $vmname | Add-AzureEndpoint -Name $epname -LbSetName $lbsetname -Protocol $prot -LocalPort $locport -PublicPort $pubport –DefaultProbe -InternalLoadBalancerName $ilb | Update-AzureVM
# B2b for SPWEB01::::: Phase Remove SPweb01 Azure LoadBalanced EndPoint
$svc=<"NameYourLBService">
$vmname=<"NameofYourVM">
$epname="TCP-80-80"
Get-AzureVM -ServiceName $svc -Name $vmname | Remove-AzureEndpoint -Name $epname | Update-AzureVM
#Add SPWEB01 AzureEndpoint back
$ilb="minroleilb"
$prot="tcp"
$locport=80
$pubport=80
$epname="TCP-80-80"
$lbsetname=<"NameYourLB">
$vmname=<"NameofYourVM">
Get-AzureVM –ServiceName $svc –Name $vmname | Add-AzureEndpoint -Name $epname -LbSetName $lbsetname -Protocol $prot -LocalPort $locport -PublicPort $pubport –DefaultProbe -InternalLoadBalancerName $ilb | Update-AzureVM