SBS 2008: Introducing the POP3 Connector
[Today's post comes to us courtesy of Shawn Sullivan and Edwin Joseph]
SBS 2008 includes a brand new version of the POP3 connector. This post will introduce key elements in understanding how this version differs from previous versions and how to implement it properly. Like its predecessors, the POP3 connector in SBS 2008 is meant to be a migration solution to allow companies to transition from hosting their email at the ISP to hosting their email in-house on Exchange server. It is highly recommended to retire the POP3 Connector once your migration is complete and allow Exchange 2007 to directly host email for your domain.
On a high level, the POP3 Connector performs the following steps during its mail-flow lifecycle:
- A connection is established to external POP3 Server.
- Each user’s mailbox is accessed with the credentials stored in the POP3 Connector’s configuration.
- Email is downloaded and deleted from the source mailbox and then submitted to the Exchange Transport service via SMTP.
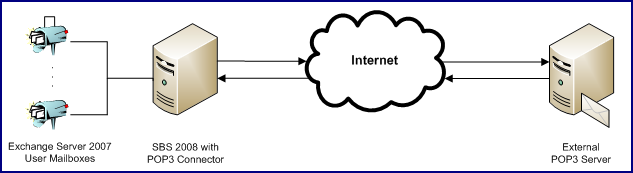
High-level mail flow process using a POP3 Connector
Key differences between this and the previous versions are:
- The POP3 Connector in SBS 2003 bypassed Exchange message filtering by using the Collaborative Data Objects (CDO) process to move downloaded email to the “pickup” directory. In SBS 2008, the POP3 Connector submits email directly to the Exchange Transport service via SMTP. The email is filtered just like any other message received from the internet, which allows Exchange 2007 anti-spam agents and Forefront to protect your environment.
- The minimum retrieval time has been reduced to 5 minutes from 15 minutes
- Only individual mailboxes can be configured. There is no longer support for Global Mailboxes.
- Diagnostics and troubleshooting is now done through the Pop3Connector.exe located in “C:\Program Files\Windows Small Business Server\Bin”.
In order to configure the POP3 Connector, you must meet the following requirements:
- Exchange must be installed and running
- You must complete the Internet Address Management Wizard (IAMW)
- You must be logged in as a domain administrator
- Gather the following information for each POP3 account:
- The name or IP address of the POP3 server that you will download from
- The TCP port that the POP3 server requires for POP3 connections (usually 110)
- The authentication method required by the POP3 server (Basic, SPA, APOP) to login to each mailbox
- Username and password for each POP3 email account
Configuring the POP3 Connector
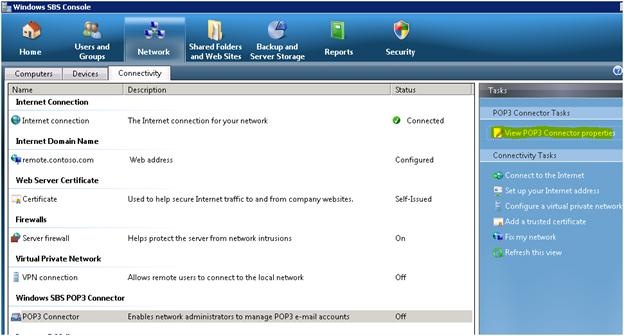
The POP3 Connector is accessed in the SBS Console under Network > Connectivity > POP3 Connector. Click on “View POP3 Connector properties”
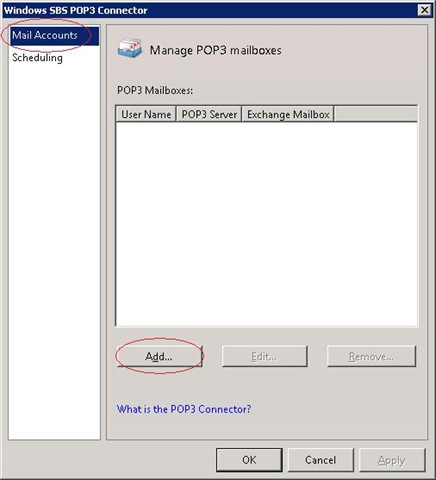
To add a new POP3 mailbox, highlight “Mail Accounts” and click “Add”
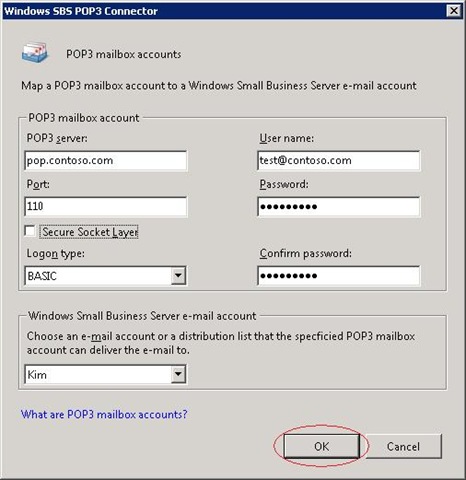
Provide all required POP3 mailbox account information as listed above in the requirements section. Select the destination Windows Small Business Server e-mail account from the drop‑down menu and click “OK” to confirm the POP3 mailbox account.
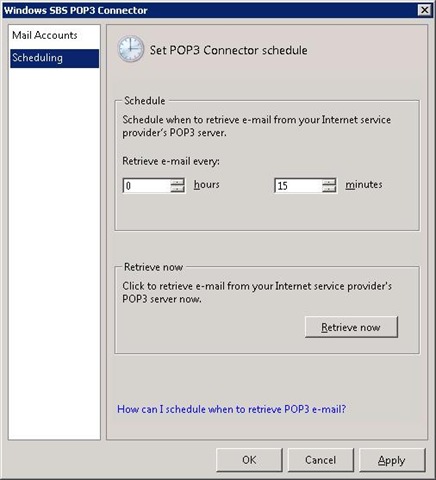
The Scheduling option allows you to adjust the e-mail retrieval interval, which is 15 minutes by default. You can set this between every 24 hours to every 5 minutes. You can also “Retrieve now” to trigger an immediate download attempt.
Logging
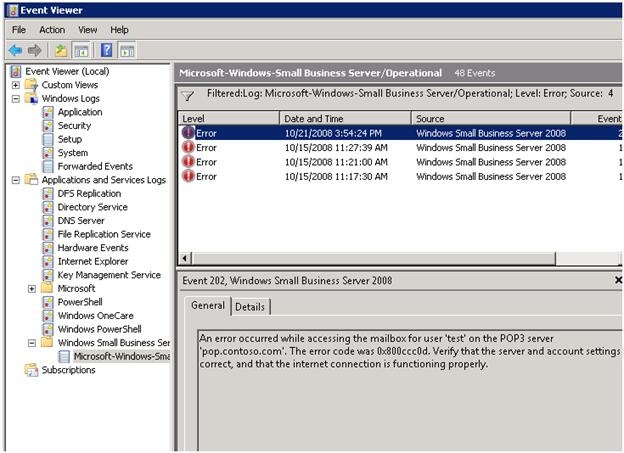
POP3 Connector related errors and events are recorded in Event Viewer under the Microsoft Windows Small Business Server/Operational log, see below:
“C:\Program Files\Windows Small Business Server\Bin\POP3Connector.exe” can be launched from the command prompt with the logVerbose switch to enable diagnostics logging.

To return to normal logging mode, run Pop3Connector.exe /lognormal
Events are written in the pop3service.log located in “C:\Program Files\Windows Small Business server\Logs\pop3connector” when you enable diagnostics logging or when you click “Retrieve Now”
Message Size Limit [Updated Content]
Messages exceeding 10MB will not be downloaded by the POP3 Connector; no event will be logged for this. By default, messages exceeding 10 MB will not be downloaded by the POP3 Connector. An event will be logged in both the pop3service.log (if verbose logging is enabled or if you used “Retrieve Now”) and the Operational log in Event Viewer. The POP3 Connector is not hard coded with this limit, it reads this directly from the max message size setting on the Windows SBS Fax Sharepoint Receive connector. You can increase this as needed, however you must make sure that the global and mailbox size limits in Exchange 2007 are set properly as well. If not, the POP3 Connector will remove the message from the POP3 server, but Exchange will reject it. The following examples illustrate configurations where this will happen:
Pop email= 20 MB, Global Receive Size= 10 MB, “SBS Fax Sharepoint Receive” connector receive size= 50 MB, User mailbox receive size= unlimited
Pop email= 20 MB, Global Receive Size limit= 50 MB, “SBS Fax Sharepoint Receive” connector receive size limit= 50 MB, User mailbox receive size limit=10MB
To understand how and where to configure message size limits in Exchange 2007, read:
Note: Internet SMTP servers connect to the Windows SBS Internet Receive connector, which has a default message size limit of 10MB. This allows you to maintain separate receive size limits between POP3 Connector email and internet email. Even if you set the Global receive size to 50 MB, nothing above 10MB will be accepted from an internet SMTP server.
To verify the message sizes on the POP3 server, install the telnet client on SBS 2008. To install the telnet client, open an administrator command prompt and enter servermanagercmd –install telnet-client. You can then follow https://support.microsoft.com/kb/196748 as a guide for testing POP3 with telnet. Once you enter “list”, you will see a list of messages including size in bytes:

Message Hygiene Agents
Email that is rejected by Exchange 2007 anti-spam agents will be placed in to “C:\Program Files\Windows Small Business Server\Data\Badmail”. You can review messages in this directory, and if you determine that they are legitimate, you can manually drop them in the pickup directory for submission (make sure the file name ends with .eml or they will not be processed). Review your anti-spam agent configuration in Exchange to make necessary adjustments. If email is being quarantined by Forefront Security for Exchange, please review: https://blogs.technet.com/sbs/archive/2008/11/03/how-to-view-emails-quarantined-by-forefront-security-for-exchange.aspx
Email Rejected Due to Protocol Errors (Invalid Headers)
Exchange will close an SMTP connection after a certain number of protocol errors (5 by default). (see the MaxProtocolErrors property of the ReceiveConnector object at: https://technet.microsoft.com/en-us/library/aa998618.aspx)
When the SBS 2008 pop3connector downloads a message from a POP3 mailbox, it needs to figure out what the "return path" for the mail should be, which it does by reading the email's headers. The pop3connector does not do validation of the header value--it lets Exchange take care of that. If the header value that the pop3connector chooses is malformed, when it is sent to the Exchange server (as part of the "MAIL FROM" command), Exchange will reject it with a 501 error. That counts as a "protocol error", and therefore is counted against the MaxProtocolErrors limit. Since the pop3connector was not able to deliver the mail, and does not know if the mail is safe to delete, it leaves the mail on the POP3 server.
If there are 5 of these messages in your POP3 mailbox, then there will be 5 "protocol errors" in the pop3connector's SMTP session, which hits the limit, and Exchange will end the session with a transient error (4xx). When this happens, the pop3connector recognizes that the error is transient, and will retry again at the next scheduled download period. But since those 5 malformed messages are still in the POP3 mailbox, the same thing will continue to happen, with no "forward progress" being made.
[Updated Content: 2/22/2010]
In most occasions, as a resolution, you can configure the "DefaultDomain" property to match your local domain name on the "Sharepoint Fax Receive Connector". This will append the SMTP domain name on email with an incomplete return path as described above. To accomplish this, run the following command :
Set-ReceiveConnector -Identity ($Env:computername + "\Windows SBS Fax Sharepoint Receive " + $Env:computername) -DefaultDomain $Env:UserDNSDomain
However, this might not help with all the situations leading up to this situation. Sometimes the invalid header found on the e-mail is not recoverable. Follow the alternate workaround to get mail flowing again if that is the case.
[Previous Content and alternate workaround courtesy of Dan Thompson]
The workaround is to increase the “MaxProtocolErrors” property of the Windows SBS Fax Sharepoint Receive connector, and then restart the Exchange Transport service for the change to take effect (and you’ll have to restart the pop3connector service, too, since it depends on the Exchange Transport service). Unfortunately, you can’t set that property from the Exchange management GUI, so you have to do it from an (elevated) Exchange Powershell prompt. Here are the instructions:
From an elevated Exchange Management Shell (Exchange Powershell window) (right click on “Start-->Microsoft Exchange Server 2007-->Exchange Management Shell” and then choose “Run as administrator”) run the following Powershell commands:
Set-ReceiveConnector -Identity ($Env:computername + "\Windows SBS Fax Sharepoint Receive " + $Env:computername) -MaxProtocolErrors 500
Stop-Service pop3connector
Restart-Service -force MSExchangeTransportStart-Service pop3connector
That will increase the MaxProtocol errors (of the internal receive connector only) to match the pop3connector’s max emails downloaded per session. Once you get 500 messages with malformed headers stacked up in the POP3 mailbox, though, you’ll still have to delete them manually.