SBS 2003 Server May Hand Out Incorrect Default Gateway to Clients at a Remote Site
[Today's post comes to us courtesy of Rod White]
We have noticed an issue that occurs with remote users receiving the wrong default gateway. Instead of receiving their local router as the default gateway they receive the SBS server’s IP as their default gateway. This happens once they log onto the domain and the SBS_Login_Script.bat file runs. Users will then notice that the workstation has an invalid default gateway. As a temporary resolution, the administrator can statically assign an IP address and default gateway to the workstation; however, the issue resurfaces when the user logs off and back on again.
You may also see the same behavior on servers (member and domain controller) that have been joined to the domain using the SBS “Add Server" Wizard.
There are 2 scenarios in which customers are seeing the incorrect Default Gateway from the server being handed to the workstations.
Scenario one: Customer joins the workstations to the domain by using the https://<servername>/connectcomputer wizard. Later, they ship the workstations to a remote site that is on a different subnet.
Scenario two: Client workstations at a remote site use the https://<servername>/connectcomputer to join the domain.
This occurs because ConnectComputer wizard only supports joining local clients to the domain.
To resolve this issue:
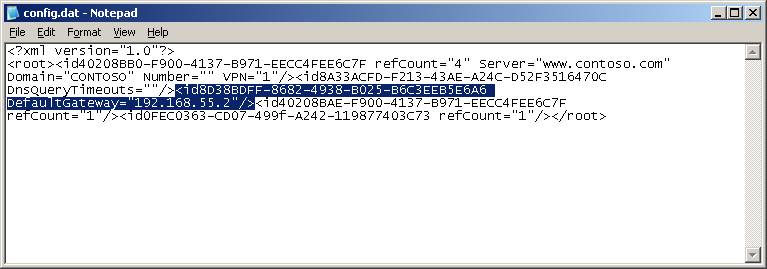
1. Open My Computer and navigate to the config.dat file. The file can be found at the following default location: “C:\Program Files\Microsoft Windows Small Business Server\ClientSetup\Clients\Setup\config.dat”. Open the Config.dat file with Notepad.
2) Highlight the brackets that encloses < > the Default Gateway configuration. Hit delete to delete the Gateway information. Save the file and log back onto the domain from a workstation. Confirm that you’re no longer getting the Old Default Gateway from the server. After you make this change make sure DHCP is configured to give the clients the correct Default Gateway.
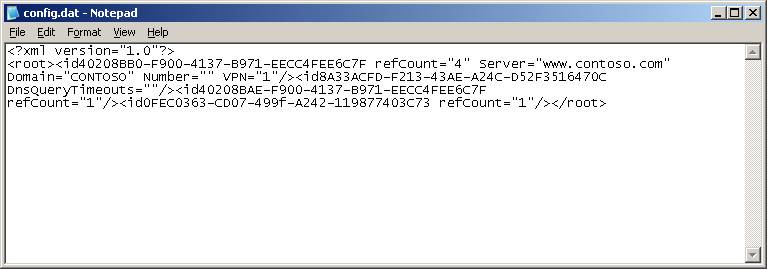
The file should look similar to this after the change has been made:
Note: This issue will reoccur if you run the CEICW (Configure E-mail and Internet Connection Wizard) after you have implemented the fix above. Reimplement the above steps after running the CEICW.