Using SharePoint Database Explorer on SBS
[Today's tip comes to us courtesy of Ed Walters.]
Administrators often need to extract a small number of files or even a single file from a SharePoint database, and may not necessarily want to go through the process of an entire disaster recovery to retrieve them. SharePoint Database Explorer can be useful in cases where you have the database files, but it is inconvenient (or impossible) to restore them to a SharePoint site. Common scenarios we've seen are:
- A customer has overwritten an important document in SharePoint and no local copy is available; document versioning has not been enabled for the library. The customer does not want to force users to log off the server during normal business hours. In this case, you would simply restore the database files from backup, mount them, and retrieve the documents.
- During disaster recovery, if no backups other than the database files exist, we may manually extract the files from the database as a "belt and suspenders" approach to disaster recovery. This is also useful if there are any concerns about ACLs moving documents to a server in a new domain. This method is not recommended for extensive disaster recovery procedures where a large number of document libraries must be exported, but we've found it to be sufficient for many SBS deployments.
- A critical change has been made to a document, and the author(s) is not sure of the date the document should be restored back to. Again, no versioning is in place. Multiple copies of the document must be recovered for comparison. It's easier to restore 3 databases and extract the document than it is to restore, mount, and extend 3 SharePoint sites.
SharePoint Database Explorer can be used with either OSQL or SQL. This tool is not supported by Microsoft.
Program Download location: https://mindsharpblogs.com/james/archive/2005/01/20/189.aspx
Database Files needed: STS_Servername_1.mdf and the STS_Servername _1_log.ldf.
Using SharePoint Database Explorer with OSQL
1. Download the SharePoint Database Explorer files
2. Extract the the files to a folder on the desktop.
3. Copy the STS_Servername_1.mdf and the STS_Servername _1_log.ldf C:\Microsoft SQL
Server\MSSQL$SHAREPOINT\Data\.
4. Attach the databases using OSQL:
osql -S servername\sharepoint –E
EXEC sp_attach_db @dbname = 'STS_SERVERNAME_1', @filename1 = 'C:\Program Files\Microsoft SQL
Server\MSSQL$SHAREPOINT\Data\STS_SERVERNAME_1.mdf', @filename2 = 'C:\Microsoft SQL
Server\MSSQL$SHAREPOINT\Data\STS_SERVERNAME_1_log.LDF'
Go
5. Open Database Explorer
6. Enter the server\instance name
For example, if you copied the database to the MSSQL$SHAREPOINT\data your instance name would be sharepoint:
7. Select the "+" sign
8. Select the library on the left
9. It will then show you documents on the right you can export.
10. Select the different libraries to view the documents available for restore.
11. Highlight the file you would like to restore - select the save button.

12. Save the file to a location on your Hard drive.
13. Send the users the files.
14. Once the new SharePoint site has been created they can then upload the files back to the site.
Using SharePoint Database Explorer with SQL Server
Installation
1. Download the SharePoint Database Explorer files
2. Extract the files to a folder on the desktop.
3. Copy the STS_Servername_1.mdf and the STS_Servername _1_log.ldf to a common location.
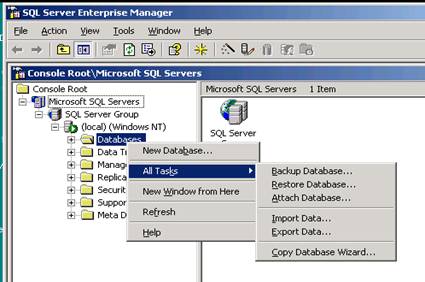
4. Open SQL Server Enterprise Manager
a. Start - All Programs - Microsoft SQL Server - SQL Server Enterprise Manager
5. Select Attach Database
6. 
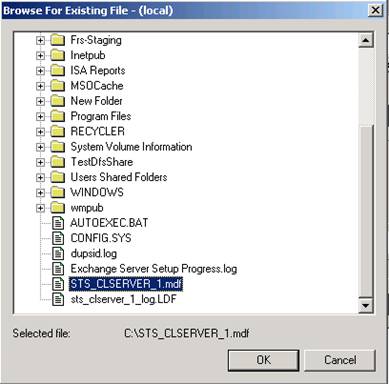
7. Browse to the .MDF you need to export files from
8. 
9. Select the Database to attach.
10. 
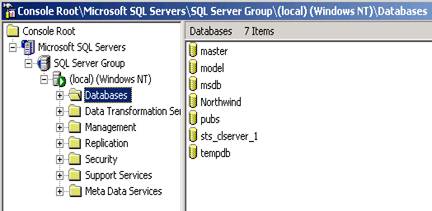
11. The database should now be attached.
a. You can check this by viewing the Databases Folder in SQL.
12. 
13. Open SharePoint Database Explorer
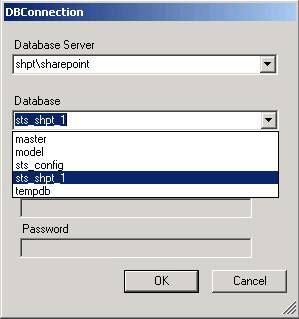
a. Select File - Set Database Connection.
b. The Database should appear in the drop down list.
14. 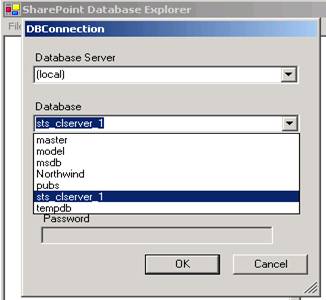
15. Select the data base - Leave the permissions set to Windows Authentication - Select OK
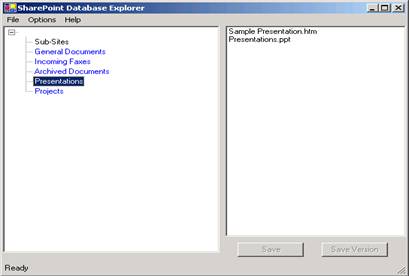
16. You will now see a list of Libraries
17. 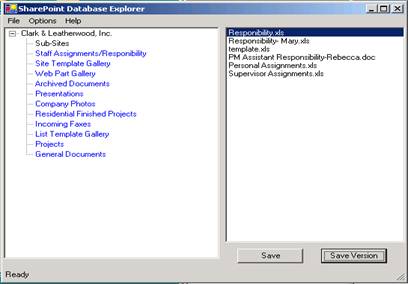
18. Select the different libraries to view the documents available for restore.
19. Highlight the file you would like to restore - select the save button.
20. 
21. Save the file to a location on your Hard drive.
22. Send the users the files.
23. Once the new SharePoint site has been created they can then upload the files back to the site.
Thanks,
edwalt