Internet Headers and Outlook
In the world of SMTP mail there is the notion of "Internet Headers". This data which is considered a separate part of the email message contains information on "how the mail got here". Here is a mock up of a sample "Internet Header":
Received: from someserver.somedomain.com (999.99.99.99) by
myserver.mail.com (999.99.99.99) with Someone's SMTP Server (TLS) id
1.2.3.4; Tue, 30 Oct 2012 10:29:16 +0000
Received: from pereviousserver.somedomain.com (999.99.99.99) by
anotherserver.mail.com (999.99.99.99) with DifferentSMTP Server
id 5.6.7.8; Tue, 30 Oct 2012 10:28:49 +0000
Received: from moreprevious.somedomain.com (999.99.99.99) by
yetanother.mail.com (999.99.99.99) with Thirdparty SMTP
Server id 9.10.11.12 via my transport; Tue, 30 Oct 2012 10:28:48 +0000
Received: from originalserver.somedomain.com ([999.99.99.99) by
senderserver.mai.com (-); Tue, 30 Oct 2012 03:16:17 -0700
X-MailingID: 9999999::9999999::999999::299999::999999::999999
Content-Transfer-Encoding: quoted-printable
Content-Disposition: inline
Content-Type: text/html; charset="UTF-8"
Reply-To: <replytome@exampledomain.com>
MIME-Version: 1.0
Message-ID: <123456789@exampledomain.com>
Subject: The subject of the message
Date: Tue, 30 Oct 2012 03:18:51 -0700
To: <recipient@exampledomain.com>
From: Sender@exampledomain.com
Return-Path: bounce@exampledomain.com
"Internet Headers" are a specific part of SMTP messages. On the other hand, Outlook is a MAPI client, and does not store messages in their native SMTP format. Any message that is read in Outlook has been converted to MAPI, and the data is stored in a set of MAPI properties. In almost all current mail server scenarios, if internet headers are available at the time that the message is converted to MAPI, they are converted and stored in a special MAPI property named PR_TRANSPORT_MESSAGE_HEADERS.
In the outlook UI, you can view the headers using the options dialog for an opened message:
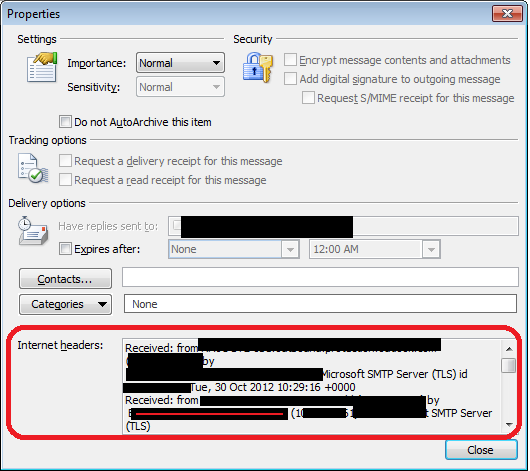
Unfortunately, viewing the internet headers is the extent of the User Interface feature set. There is no built in way to view the headers in the same pane as the message, and there is no feature set to print the headers along with the message.
The outlook object model provides a feature called the "propertyaccessor" that allows for an extensible method to retreive MAPI properties. This feature can be used therefore to retrieve the internet headers and then present them in a way that adds additional features to the UI.
To demonstrate this concept, consider a scenario where we want this feature set:
1. The ability to print the internet headers and the message they came from in a "set" together.
2. A button on the ribbon of the original message to initiate this task.
To achieve this goal, we can take these steps:
1. Create an outlook macro that retrieves the headers, creates a new item to display and print them, and then prints the original item as well.
2. Create a toolbar button to start the macro
3. Ensure that macros are allowed to execute in Outlook.
Step 1: Create the macro that does the work
1. Starting from Outlook, press Alt-F11 to bring up the VBA editing window.
2. In the project window, expand the Project to 'Microsoft Outlook Objects', then double-click the 'ThisOutlookSession" to have a place to add the macro
3. Add the macro code to this area
Sub BetterHeaders()
Dim oneitem As Object ' This is the currently selected outlook item
Dim newitem As Object ' This will be the new postitem we create to hold the headers
Dim onepa As PropertyAccessor ' This is part of outlook macros that lets you retrieve mapi props
Dim onefield As String ' This holds the headers that we get back from MAPI
' Initialize to blank
onefield = ""
On Error GoTo reportit:
Set oneitem = Application.ActiveInspector.CurrentItem 'Setup the currently opened item as our base item
Set newitem = Application.CreateItem(olPostItem) 'Create the new post item
' Set the subject for the new post item
newitem.Subject = "Message and Headers for: " & oneitem.Subject
' Add the original item to the new post item as an attachment
Set oneattach = newitem.Attachments.Add(oneitem, Outlook.OlAttachmentType.olEmbeddeditem)
' Retrieve the message headers and store them in the onefield string variable
' https://schemas.microsoft.com/mapi/proptag/0x007D001E is the code for PR_MESSAGE_TRANSPORT_HEADERS
Set onepa = oneitem.PropertyAccessor
onefield = onepa.GetProperty("https://schemas.microsoft.com/mapi/proptag/0x007D001E")
' If we got headers, then build up the data for the body of the new post item
If onefield <> "" Then
hdata = "Message Headers For:" & vbCrLf
hdata = hdata & "Subject: " & oneitem.Subject & vbCrLf
hdata = hdata & "Received: " & oneitem.ReceivedTime & vbCrLf
hdata = hdata & "========================" & vbCrLf
hdata = hdata & vbCrLf
newitem.Body = hdata & vbCrLf & onefield ' Set the body of the new postitem to this data
newitem.Display ' Display the new post on the screen
Else
' There were no message headers for this item, so report that fact
MsgBox "There are no transport headers available for this item.", vbInformation, "Transport Headers"
End If
' Tell outlook to print the new post item and the original item. By specifically printing both items from the macro
' we dont have to worry about 'include attachments' being turned on in the print options.
rtg = MsgBox("Ready to print the headers and original message?", vbYesNoCancel, "Transport Headers")
If rtg = 6 Then
newitem.PrintOut
oneitem.PrintOut
End If
' Clean up memory used by the macros
Set oneitem = Nothing
Set newitem = Nothing
Exit Sub
reportit:
Select Case Err.Number
Case 91:
MsgBox "Cannot find a 'current' item. Make sure the item is open and active.", vbExclamation, "Transport Headers"
Case Else:
MsgBox "Error retreiving transport headers: " & Err.Number & " - " & Err.Description, vbCritical, "Transport Headers"
End Select
End Sub
4. Chose File-Save from the VBA screen to save the macro.
Step 2: Make a ribbon button to launch the macro
5. Open an existing mail item. Do not open a new item. The goal is to have a ribbon button on the toolbar of EXISTING items that would have some internet headers.
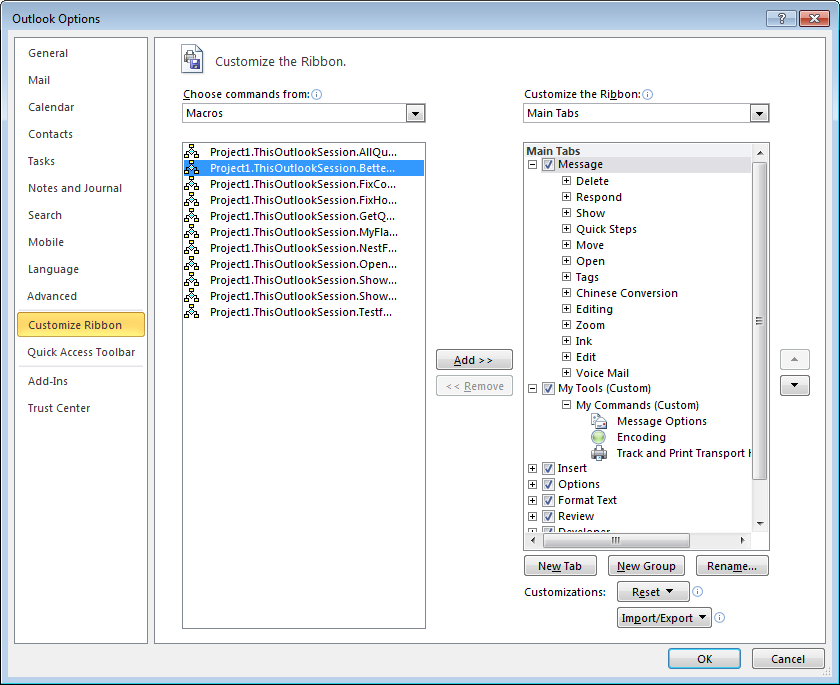
6. Right click in the ribbon and choose customize.
7. At the ribbon customization screen, create a new Toolbar called 'Mytools' or something similar. Then create a section named 'My Commands'.
8. In the left hand commands window, change the scope to Macros. Then drag the 'BetterHeaders' macro over to the 'My Commands' section of the ribbon.
9. Use the rename button to change the name to something meaningful like 'Track and Print Message Headers', and choose an appropriate icon.
10. Press 'OK' to close the customization screen. The end result is that when you open any existing email, you should see this on your ribbon:
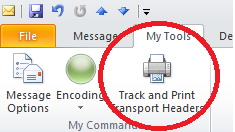
Pressing this button should run the macro which
a. Creates a new postitem in your inbox
b. Tries to retrieve the internet message headers from the original message and store them in the body of the new post item.
c. Adds the subject and received time so that you can visually "see" that these headers go with the original item.
d. Attaches the original item to the new post.
e. Asks if you are ready to print both the new post item and the original together
f. After confirmation, sends both the new post item and the original to the printer.
g. You can now optionally SAVE the new post item to create a permanent item that shows you have done this work.
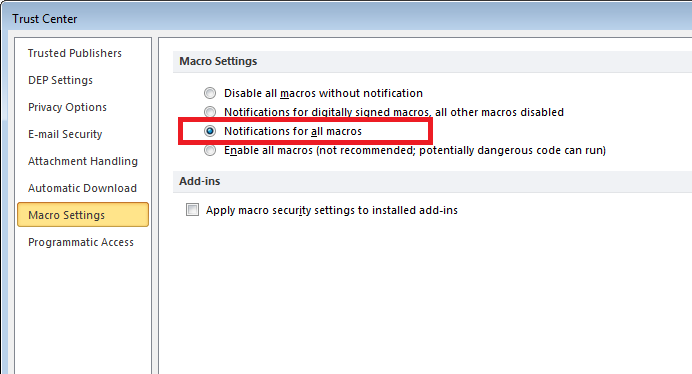
Step 3 - Make sure Macros are allowed to Run in Outlook
If your trust settings do not allow for macros to run in Outlook, then when you press the toolbar button, nothing will happen. To adjust the macro settings and test the sample, navigate to the trust center. In Outlook 2010 that is through File-Options-Trust Center (on the left) - Trust Center Settings (button) - Macro Settings (on the left). Set the macro settings to "Notifications for all macros" or if you understand the risk and are comfortable with the risk, change the setting to 'Enable all macros'.
Summary and Extra Information
The macro can be edited and adjusted to a variety of needs. For example, adding the original item as an attachment is just a convenient way to "link" the header item to the original. If the goal is only to print them out together once, you do not need to add the original as an attachment, and you could skip that step just by commenting out the one line in the macro that adds the attachment. Likewise if you want to add more information in the body of the new postitem that adds context to the work, just add that into the macro where the body text is built.
There are a couple of points to make about using and manipulating the PR_TRANSPORT_MESSAGE_HEADERS property. As explained earlier, it was data copied to the MAPI property during conversion from the SMTP message. It can be edited and changed without affecting the outlook message in any way. So just having a method to get and display/print the headers does *NOT* mean they were not manipulated or changed since the message was received. Secondly, it is important to understand that when Outlook is used with Microsoft Exchange Server, the Exchange Server converts the internet headers to PR_TRANSPORT_MESSAGE_HEADERS, not the outlook client. In scenarios where you are not using Microsoft Exchange, the outlook client DOES convert the data. In this scearnio, where the outlook client does the conversion, there is a registry value that will tell outlook to convert the ENTIRE MESSAGE, and not just the headers. So instead of just having a small bit of header information, the PR_TRANSPORT_MESSAGE_HEADERS will contain the entire original SMTP message including encoded attachments and different body parts, etc. This setting is described in detail in https://www.outlook-tips.net/beginner-user/view-internet-headers/. Be advised that if that registry option is enabled, your PR_TRANSPORT_MESSAGE_HEADERS data will potentially be large and likely break the macro.
This code is provided as an example of how to retrieve and manipulate the PR_TRANSPORT_MESSAGE_HEADERS data. There is no support for it beyond just comments and self-help on this blog and it is intended as a sample to show the possibilities of using outlook macros to solve special property needs.