Implementing Effects & Adding Elements to DOM in JQuery
In previous article, we looked into events of JQuery. We will cover Effects and its implementation. JQuery provides lot of effects to improve the look and feel of the page. It supports fade in, fade out, slide etc. JQuery provide built-in functions to support these effects. Before looking into these methods, we will cover simple way to add effects to the page using css() , addClass() and removeClass() functions in below HTML:
<html>
<head>
<title>JQuery Sample HTML Page</title>
<script src="jquery-1.4.2.min.js" temp_src="jquery-1.4.2.min.js" type="text/javascript">
</script>
<style>
.highlight
{
color:blue;
}
</style>
<script language="javascript" type="text/javascript">
$(document).ready(function() {
$('#myButton').toggle(
function(){$(this).addClass('highlight');},
function(){$(this).removeClass('highlight');}
);
$('#myButton').click(function() {$(this).css('height','200');});
});
</script>
</head>
<body>
<input type="button" value="Click Me" id="myButton"/>
</body>
</html>
We are using addClass() and removeClass() for adding and removing css class. In the same way, we are using css() function to change height property. To get a css property value, we can use below syntax:
$(this).css('prop-name');
To set multiple properties in single line:
$(this).css(prop-name1 : 'val1', prop-name2: 'val2',....);
By using above functions, we can create basic animation effects. Now, we will look into JQuery Effects functions. The basic functions are hide() and show() and accepts two parameters. One is to control speed of hiding/showing and other is callback to be called on finishing hide/show. Speed can be slow, normal or fast as shown below:
$('#myButton').click(function(){$(this).hide('slow',function(){alert('hide complete.');});});
Slow completes hide/show in 0.6 seconds, Fast in 0.2 seconds and Normal in 0.4 seconds.
In the same way, we can use fadeIn() and fadeOut() functions to hide/show elements by managing opacity of it as shown below:
$('#myButton').click(function(){$(this).fadeOut('fast',function(){alert('Fading complete.');});});
We can use fadeTo(duration to run animation, opacity[0-1],callback to be called) for fading to certain opacity. Use slideUp() and slideDown() for sliding effect.
We will end up the session with custom animation using .animate(). This function will work using css properties. It accepts four parameters and it does:
- 1st parameter to set CSS properties for animation.
- 2nd parameter to set duration of animation. It can be slow, fast.
- 3rd parameter to provide easing function for animation. It can be 'swing' or 'linear'
- 4th parameter to provide callback on animation complete.
An example of it is:
$(function(){$('#myButton').click(function() {
$(this).animate({left: 650, height: 380}, 'slow','linear',function(){alert('animation completed.');});
});
});
We can apply multiple effects using .animate() function.
For complete list of effects, refer https://api.jquery.com/category/effects/.
Now, we will cover functions to insert elements dynamically into the DOM. JQuery provides functions to insert/remove/copy elements into DOM dynamically. We can insert an element before or after a particular element. We can use .insertBefore() or .before() and .insertAfter() or .after() functions to insert a element before/after an element as shown below:
<html>
<head>
<title>JQuery Sample HTML Page</title>
<script src="jquery-1.4.2.min.js" temp_src="jquery-1.4.2.min.js" type="text/javascript">
</script>
<script language="javascript" type="text/javascript">
$(function(){$('#myButton').click(function(){
$('#myDiv').after('<input type="button" value="My Text"/>');//Functionality wise same as .insertAfter().
$('#myDiv').before('<input type="button" value="My Text"/>');//Functionality wise same as .insertBefore().
$('<input type="button" value="My Text"/>').insertAfter('#myDiv');//Here, selector expression comes in the end of statement.
$('<input type="button" value="My Text"/>').insertBefore('#myDiv');
//$('#myDiv').remove();//Removes everything inside myDiv along with it.
$('input[type="button"]').filter(function(){return $(this).attr('value') != 'Click Me';}).each(function(index){$(this).val(index);});
});
});
</script>
</head>
<body>
<div id="myDiv" style='background:red;'>
<input type="button" value="Click Me" id="myButton" style="height:100px"/>
</div>
</body>
</html>
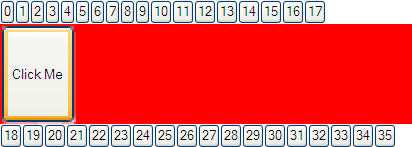
In last statement, we are using .each() function to loop through the elements returned by selector one by one. Index parameter will give the index of the element in the list. We can use filter() to reduce set of matched elements [all buttons] using function or selector criteria. The output will be as shown below:
We can use clone() for creating a copy of an element as shown below:
$('#myDiv').after($('#myButton').clone());
It will create a copy of myButton and inserts it after myDiv. We can use html() to replace the html content of a element with new one for an element like div as shown below:
$('#myDiv').html('<input type="button" value="Click Me More" id="myButton" style="height:100px"/>');
We can use .append() to insert HTML content or JQuery object to the end of each element in the matched set as shown below:
Calling $('#myDiv').append('my new Text'); on
<div> <div id="myDiv"></div> <div>Another Div</div> </div> will make output as
<div> <div id="myDiv">my new Text</div> <div>Another Div</div> </div>.
We will finally cover wrap() function and end the things. wrap() allows us to wrap the list of elements within specified html. We can use wrap elements using JQuery objects or HTML tag or calling wrapping callback function. Wrapping function will return the structure for wrapping around the elements of the matched list. It can be done in either of the two ways shown below:
$('#myButton').wrap('<div style=background:"blue"/>');
(or)
$('#myButton').wrap(function(){return '<div style="background:' +"yellow" +'"/>';});
For list of DOM manipulation functions, refer https://api.jquery.com/category/manipulation/.