CPAO: Editing a Daily Template - Part 1
I have had several customers request a Daily Template that fits data on a 3x5 index card sized printout.
I have done a few different iterations of this layout to customize things for each particular customer - but I wanted to give an example of this since it seems to be a popular request.
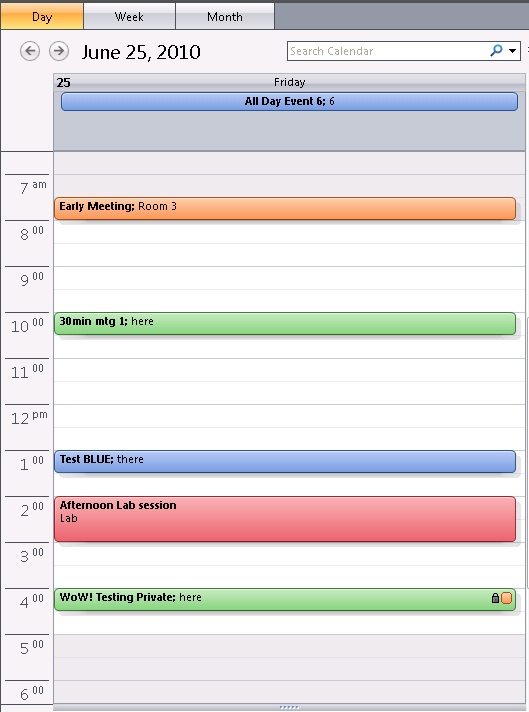
Here is the calendar data as seen in Outlook 2007:
Here is what the 3x5 template I have modified/created in Calendar Printing Assistant (CPAO) looks like:

I started with the "Standard Day 03 Letter" (Day_StandardDay03.catx) and modified it to make this new template. I actually really just removed a lot from the original template, made some things smaller, etc. so that items would fit in a 3x5 printout.
You could change the size of the paper to use on the Standard Day 3 template to an Index Card 3x5" - but the printout is difficult to read when it is set to 3x5:

As you can see - the Standard Day 3 template is really designed to be printed out on a standard 8.5" x 11" sheet of paper, and not an index card.
I will go through some of the details of what was changed - and I encourage you to also go through the material covered in the series I did on modifying the Monthly template. It covers things that I will not go over again here. In general - I removed all the month thumbnails, set the main header to be smaller and to print out the Day information, removed the "Appointments" header, removed the timeline, and set the appointments to print with the Category (signified with a colored dot), start and end time, subject, and location.
You could leave the timeline in there on the 3x5 template, and I will show a sample of that in a future post.
Here is a listing of the Content.xml for this template:
<?xml version="1.0" encoding="utf-8"?>
<!-- Copyright (c) 2007, Microsoft Corporation. All rights reserved. -->
<!-- Daily 3x5 -->
<Template xmlns="https://schemas.microsoft.com/2005/xcal" Version="1.0.0">
<Display>
<Page RowSetting="0.15in,0.30in,0.0in,*,0.30in"
ColumnSetting="0.20in,*,0.20in" Style="StandardText">
<!-- Background -->
<Rectangle Row="0" Column="0" RowSpan="5" ColumnSpan="3"
Style="PageBackground"/>
<!-- Day Header A-->
<Grid Row="1" Column="1" RowSetting="Auto" ColumnSetting="*,*,*"
Style="LevelOneTitle" Padding=".04in">
<!-- Day/Date -->
<CalendarText Row="0" Column="0" Text="#[@TemplateDate_MonthName]
#[@TemplateDate_DayNumber], #[@TemplateDate_YearNumber]"
Margin="2" FontSize="8pt" Style="AccentText"/>
<CalendarText Row="0" Column="2" Text="#[@TemplateDate_DayName]"
FontSize="7pt" HorizontalAlignment="Right"/>
</Grid>
<!--Day Slot-->
<DayCalendar Row="3" Column="1">
<DayFormat>
<DockPanel Style="LevelOneParent">
<Grid Orientation="Fill" Style="LevelOneBody" RowSetting="*,Auto"
ColumnSetting="*">
<DockPanel Row="0" Column="0">
<SingleAllDayArea Orientation="Top" MinSize="20" MaxSize="92"
Padding="2">
<AllDayAppointment Height="14" Margin="5,0,5,1"
Style="SingleAppointment">
<Bar Visibility="Collapsed" Orientation="Left" Width="3"
BorderThickness="0,0,1,0">
<ConditionalFormat Condition="BusyStatus eq 'Free'"
Visibility="Visible"
Style="SingleAppointmentBarFree"/>
<ConditionalFormat Condition="BusyStatus eq 'Tentative'"
Visibility="Visible"
Style="SingleAppointmentBarTentative"/>
<ConditionalFormat Condition="BusyStatus eq 'OutOfOffice'"
Visibility="Visible"
Style="SingleAppointmentBarOOF"/>
</Bar>
<Content Orientation="Fill" Margin="2,0,2,0"
HorizontalAlignment="Center" Separator="116"
SeparatorFontFamily="WingDings" FontSize="6pt"
TextWrapping="NoWrap">
<ContentElement Source="CategorySymbols"/>
<ContentElement Source="Subject" FontSize="6pt"
FontWeight="Bold"/>
<ContentElement Source="Location" FontSize="6pt"/>
<ContentElement Source="CategorySymbols"/>
</Content>
</AllDayAppointment>
</SingleAllDayArea>
<List Orientation="Fill" FontSize="8pt" ShowEmptyRow="true"
MaxRowWrap="5" RowSize="16" TypeFilter="AppointmentsTasks">
<Columns>
<Column Width="*" ShowDuplicates="True" Left="1" Top="2"
Right="1" Bottom="3" >
<Sources>
<Source Name="CategorySymbols"/>
<Source Name="StartTime" Format="t" StartSeparator=""/>
<Source Name="EndTime" Format="t" StartSeparator="-"/>
<Source Name="Subject" StartSeparator=": "/>
<Source Name="Location" StartSeparator=" ("
EndSeparator=")"/>
<Source Name="CategorySymbols"/>
</Sources>
</Column>
</Columns>
</List>
</DockPanel>
</Grid>
</DockPanel>
</DayFormat>
</DayCalendar>
<!--Standard Footer-->
<Grid Row="4" Column="1" VerticalAlignment="Top" Margin="0,4,0,0"
RowSetting="Auto" ColumnSetting="*,*,*">
<CalendarText Row="0" Column="0" Date="#[Now]"
Text="#[@TemplateDocInfo_PrintTime]"HorizontalAlignment="Left"
FontSize="6pt"/>
<CalendarText Row="0" Column="1" Text="#[@TemplateDocInfo_Page]"
HorizontalAlignment="Center" FontSize="6pt"/>
<CalendarText Row="0" Column="2" Text="#[@TemplateDocInfo_UserName]"
HorizontalAlignment="Right" FontSize="6pt"/>
</Grid>
</Page>
</Display>
</Template>
Moving down through this listing - things I changed are in green. I also removed a bunch of code from the original Standard Day 3 template. It would be a good exercise to expand out that template (Day_StandardDay03.catx) and compare the Content.xml from that template with my modifications here.
Starting from the top - I modified the page to have a bit smaller margins, and made the header size .30in instead of "Auto":
<Page RowSetting="0.15in,0.30in,0.0in,*,0.30in" ColumnSetting="0.20in,*,0.20in"
Style="StandardText">
Then in the header itself - I set the day and date to display using:
<CalendarText Row="0" Column="0" Text="#[@TemplateDate_MonthName]
#[@TemplateDate_DayNumber], #[@TemplateDate_YearNumber]"
Margin="2" FontSize="8pt" Style="AccentText"/>
<CalendarText Row="0" Column="2" Text="#[@TemplateDate_DayName]"
FontSize="7pt" HorizontalAlignment="Right"/>

The variables used in red above - like #[@TemplateDate_MonthName] - can be used to display data as needed - like the month name, day number, year number, and day name. I actually went and opened other templates to find some of the variables I used here, so if there is something you are wanting, it might pay to look at other templates to see if one has what you want, then crack open that template and see what variable is used.
In the AllDayAppointments area I set a smaller height for each all day appointment, I set the mininmum size to just over the size of one appointment - and made room for about 6 all day appointments using the MaxSize setting:
<SingleAllDayArea Orientation="Top" MinSize="20" MaxSize="92" Padding="2">
<AllDayAppointment Height="14" Margin="5,0,5,1" Style="SingleAppointment">
I also added a colored dot to show the color category using the CategorySymbols source element. So if a category is selected for the all day event - and that shows before and after the appointment:
<ContentElement Source="CategorySymbols"/>
<ContentElement Source="Subject" FontSize="6pt" FontWeight="Bold"/>
<ContentElement Source="Location" FontSize="6pt"/>
<ContentElement Source="CategorySymbols"/>

In this particular case - a category with a blue color was selected. I also set all the font sizes to be smaller so that the text would fit in the appointment area.
Then for the rest of the appointments I changed out the CompactList for a plain regular List. You can read more about using a List in place of a CompactList and some differences, etc. in a previous post.
In the original template I changed out:
<CompactList Row="1" Column="0" Padding="2" MinHeight=".5in" MaxHeight="1.2in"
StartHour="8" EndHour="18" TimeWindow="Exclude" TypeFilter="Appointments"
FontSize="8pt" BorderThickness="0,1,0,0"
BorderBrush="style!SingleLineStroke"/>
And put the following in its place:
<List Orientation="Fill" FontSize="8pt" ShowEmptyRow="true" MaxRowWrap="5"
RowSize="16" TypeFilter="AppointmentsTasks">
<Columns>
<Column Width="*" ShowDuplicates="True" Left="1" Top="2" Right="1"
Bottom="3" >
<Sources>
<Source Name="CategorySymbols"/>
<Source Name="StartTime" Format="t" StartSeparator=""/>
<Source Name="EndTime" Format="t" StartSeparator="-"/>
<Source Name="Subject" StartSeparator=": "/>
<Source Name="Location" StartSeparator=" (" EndSeparator=")"/>
<Source Name="CategorySymbols"/>
</Sources>
</Column>
</Columns>
</List>
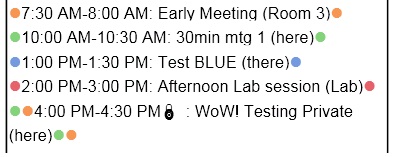
This displays the appointments with the categories signified on them with the colored dots. It has the start and end times listed on them since there is no time line, and the subject and location. The "StartSeparator" and "EndSeparator" is used to put - well - separators between these elements, and you just put in the text and/or spaces that you want for these separators.
Please note here that the last appointment does have 2 categories assigned to it - and so both categories are signified with the orange and green dots. It is a private appointment - and CPAO will place the "lock" symbol next to it automatically when it is a private appointment.
Lastly - I also modified the Metadata.xml file for this template. More info on why to do this is in a previous post.
Here is the listing for that file:
<Metadata xmlns="https://schemas.microsoft.com/2005/xcal" Version="1.0.0">
<Name>Daily 3x5</Name>
<TimeUnit>Day</TimeUnit>
<PageSizeSelectionIndex>Index Card</PageSizeSelectionIndex>
<PageHeight>5in</PageHeight>
<PageWidth>3in</PageWidth>
<PageOrientationSelectionIndex>Portrait</PageOrientationSelectionIndex>
<PageRow>1</PageRow>
<PageColumn>1</PageColumn>
<Thumbnail>DefaultPreview.gif</Thumbnail>
<Tasks>false</Tasks>
<Appointments>true</Appointments>
<SideBySide>false</SideBySide>
<PageCount>1</PageCount>
<TemplateId>75</TemplateId>
<CompanyId>1</CompanyId>
</Metadata>
The changes here will allow this template to show in CPAO as "Daily 3x5 Index Card". And by default the page size will be set to 3x5" when loading the template.
I attached the Content.xml for this modified template so that you can use it / compare it / etc.