CPAO: Editing the Calendar Grid (Part 2)
This section moves into the Day Format area:
<DayFormat>
<Grid RowSetting="*" ColumnSetting="*" Height="Auto"
Style="LevelLeafParent">
<CalendarText Row="0" Column="0" FontSize="46pt" FontWeight="Bold"
Text="#[%d]" FontFamily="style!FontMajor">
<Foreground>
<SolidColorBrush Color="style!mainDark1" Tint=".7"/>
</Foreground>
<ConditionalFormat Condition="DayOfWeek eq 'sun'">
<Foreground>
<SolidColorBrush Color="style!WeekendColor" Tint=".7"/>
</Foreground>
</ConditionalFormat>
<ConditionalFormat Condition="DayOfWeek eq 'sat'">
<Foreground>
<SolidColorBrush Color="style!WeekendColor" Tint=".7"/>
</Foreground>
</ConditionalFormat>
</CalendarText>
<DockPanel Row="0" Column="0" Style="LevelLeafBody" >
<SpanningAllDayAreaPlaceholder Orientation="Top" />
<CompactList Padding="2" Orientation="Fill" FontSize="8pt"
TypeFilter="AppointmentsTasks"/>
</DockPanel>
</Grid>
</DayFormat>
Here we have formatting for each individual day in the grid.
<Grid RowSetting="*" ColumnSetting="*" Height="Auto" Style="LevelLeafParent">
Each day has a single row and a single column to place items in. The height is set to Auto - meaning that they will be set by the amount of room available on the page.
<CalendarText Row="0" Column="0" FontSize="46pt" FontWeight="Bold"
Text="#[%d]" FontFamily="style!FontMajor">
<Foreground>
<SolidColorBrush Color="style!mainDark1" Tint=".7"/>
</Foreground>
<ConditionalFormat Condition="DayOfWeek eq 'sun'">
<Foreground>
<SolidColorBrush Color="style!WeekendColor" Tint=".7"/>
</Foreground>
</ConditionalFormat>
<ConditionalFormat Condition="DayOfWeek eq 'sat'">
<Foreground>
<SolidColorBrush Color="style!WeekendColor" Tint=".7"/>
</Foreground>
</ConditionalFormat>
</CalendarText>
These lines describe the day numbers - what size they are, what color they are, and where they are located. The "Text="#[%d]" means to display the day number. Additional settings can be put on the CalendarText line, like "HorizontalAlignment=" and "VerticalAlignment=" to place the number where you wish. Here is an example:
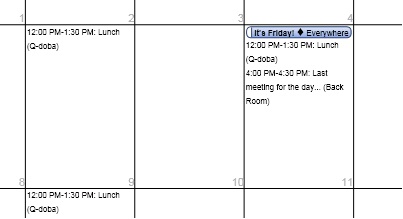
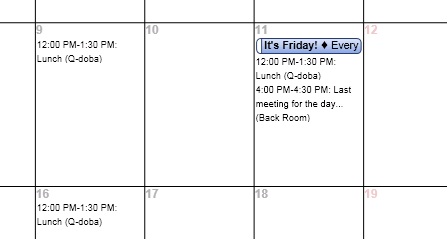
Here is the code in this area for moving the day numbers to the lower right and making them smaller:
<CalendarText Row="0" Column="0" FontSize="8pt"
HorizontalAlignment="Right" VerticalAlignment="Bottom"
Text="#[%d]" FontFamily="style!FontMajor">
<Foreground>
<SolidColorBrush Color="style!mainDark1" Tint=".7"/>
</Foreground>
<ConditionalFormat Condition="DayOfWeek eq 'sun'">
<Foreground>
<SolidColorBrush Color="style!WeekendColor" Tint=".7"/>
</Foreground>
</ConditionalFormat>
<ConditionalFormat Condition="DayOfWeek eq 'sat'">
<Foreground>
<SolidColorBrush Color="style!WeekendColor" Tint=".7"/>
</Foreground>
</ConditionalFormat>
</CalendarText>
It is generally best to move the number to the lower left or right, and not the top left or right, as the all day events will then be dropped down a line, and so less space is useable in each day in the grid. Like this:
But if having the numbers on top works better - then you can do that as well.
The conditional formatting here tests for weekend days, and then applies a different font color or foreground color for the weekend days. If you want all the days to show the same color you can remove the ConditionalFormat lines, and all the day numbers will be the same color.
<DockPanel Row="0" Column="0" Style="LevelLeafBody" >
<SpanningAllDayAreaPlaceholder Orientation="Top" />
<CompactList Padding="2" Orientation="Fill" FontSize="8pt"
TypeFilter="AppointmentsTasks"/>
</DockPanel>
This section tells the program to put the All Day Events at the top (Orientation="Top") and then the CompactList line fills each day with the appointments for the corresponding day. The CompactList line is easy - you just give a font size and a filter, and it just does it. It prints a blue dot for the default calendar - and other shapes/colors for additional calendars' appointments if they are present, then the time, then the subject, then the location for each appointment.
The "TypeFilter" setting can be set to:
"AppointmentsTasks" - all appointments and tasks
"Appointments" - all appointments, no tasks
"AppointmentsTasksAllDayAppointments" - All appointments, tasks, and all day events
Here is an example of the CompactList output:
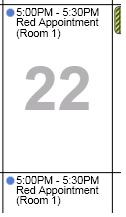
It shows the blue dot for every appointment regardless of category since this is the default Calendar open in Outlook, then the times, then the subject, then the location in parentheses.
Now, if you do not like the formatting of the CompactList, or it does not meet your needs, you can remove that line and create a more manual list. Here is code that shows this:
<DockPanel Row="0" Column="0" Style="LevelLeafBody" >
<SpanningAllDayAreaPlaceholder Orientation="Top" />
<!-- <CompactList Padding="2" Orientation="Fill" FontSize="8pt"
TypeFilter="AppointmentsTasks"/> -->
<List Orientation="Fill" FontSize="7pt" ShowEmptyRow="true"
MaxRowWrap="5" RowSize="14"
TypeFilter="AppointmentsTasks">
<Columns>
<Column Width="*" ShowDuplicates="True" Left="1" Top="2"
Right="1" Bottom="2" >
<Sources>
<Source Name="CategorySymbols"/>
<Source Name="CategorySymbols"/>
<Source Name="StartTime" Format="t" StartSeparator=""/>
<Source Name="EndTime" Format="t" StartSeparator="-"/>
<Source Name="Subject" StartSeparator=": "/>
<Source Name="Location"
StartSeparator="(" EndSeparator=")"/>
</Sources>
</Column>
</Columns>
</List>
</DockPanel>
So instead of using the "CompactList" line here, it has been commented out and in its place is a "List" line instead along with some additional formatting lines. This gives more control over what is displayed for each appointment. In the example above, various formatting options are set - like the font size to be used, how many lines to wrap if there is a long subject and/or location line on the appointment (MaxRowWrap), the height of the row (RowSize) and what will be shown using the "TypeFilter".
The Columns/Column/Sources and Source lines format what will be seen for each appointment. The CategorySymbols source is for showing the category color of the appointment if categories are used in Outlook. It does this using a colored dot.
Here is an example of what the above code will display:
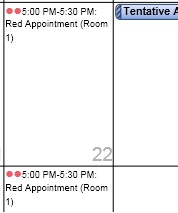
The two red dots are there because I set this appointment to have the Red Category in Outlook, and here in the template there are two "CategorySymbols" lines. There is one dot for each line. If you only want one dot - then only use one line. If you want one dot at the beginning and then another at the end, then put a "CategorySymbols" line after the "Location" line.
After the category dots is the start time, and then the end time with a hyphen separator. The subject is next with a colon separator, and then the location is after that and has parentheses separating it.
You can use this more manual method of displaying the appointments so that you can format things the way you would like them to be seen.
There is more that can be done in the Calendar Grid area - and this is only covering a particular Monthly print layout. There are additional options to look at in the Week and Day Templates for other various formatting options. I will not cover all of that now - but I will post things later ot cover Day and Week templates to show some things that can be done with those templates. Those other templates are pretty similar - but there are some differences that can be seen by doing comparison.
Something I have learned is that you can look at other templates to see if something you want to do is already done in another template. Then just extract that template and look at the Content.xml file to see how it differs from the one you are working on, and a lot of times you can just sort of figure things out - particularly after working with the templates for a little while.