How to clone a virtual Domain Controller
Hello my name is Paulo Viralhadas and I'm a Premier Field Engineer at Microsoft.
On one of my previous posts I wrote about vDC cloning which is my preferred feature in Windows Server 2012 "https://blogs.technet.com/b/reference_point/archive/2012/12/11/so-you-wanted-to-deploy-domain-controllers-faster-now-you-can.aspx".
VDC cloning gives you the ability to scale up your production forest and to recover from disasters faster, or simply to build a lab in a blink of the eye.
In this post you may watch a number of videos that show how to clone a vDC.
Note: I tried to keep the videos as simple as possible for quick reference.
HOW TO CLONE A vDC
The Requirements are:
Hypervisor must have support for VMGID (VM-Generation ID).
ADDS schema version 56
Windows Server 2003 Forest Functional Level.
Source DC must be running Windows Server 2012.
PDCe must be running on a Windows Server 2012 DC.
PDCe and RID master online and available.
The video contents are:
Video 1 - Pre-requisit check.
Step 1 - Verify that the source VDC is running on a supported hypervisor.
Step 2 - Verify Schema version.
Step 3 - Verify Forest Functional Level.
Step 4 - Check if the VDC source Operating System.
Step 5 - Verify that the PDCe FSMO role is running on a Windows Server 2012 DC
Step 6 - Ensure that PDC and RID master are available during cloning process.
Video 2 - Getting the Clone ready.
Step 7 - Create DCCloneConfig.xml file.
Step 8 - Add the source VDC to the "Cloneable Domain Controllers" security group.
Step 9 - Shutdown the source VDC.
Video 3 - Cloning...
Step 10 - Export the source VM (Virtual Machine).
Step 11 - Import the VM with the option "Copy the virtual machine (create a new unique ID)".
Step 12 - Start the new VM.
Detailed steps:
Step 1 - Verify that the source VDC is running on a supported hypervisor.
On the source vDC:
open [Device Manager]
expand [System Devices]
open properties of [Microsoft Hyper-V Generation Counter]
select the "Driver" tab
click "Driver details"
verify that the driver is "vmgencounter.sys"
This is the driver that makes vDC cloning and snapshot restore possible in Windows Server 2012.
Step 2 - Verify Schema version.
On any DC in the forest:
run [regedit]
browse to HKLM\System\CCS\Services\NTDS\Parameters
verify that "Schema Version" REG_DWORD value is 56.
This is the Windows Server 2012 version of the schema.
Step 3 - Verify Forest Functional Level.
On any DC in the forest:
open [Powershell]
run [Get-ADForest]
verify that "ForestMode" value is "Windows2003Forest" or higher.
Step 4 - Check the vDC source Operating System.
On the source vDC:
run [winver]
verify that source vDC is a Windows Server 2012.
Step 5 - Verify that the PDCe FSMO role is running on a Windows Server 2012 DC
On any DC in the domain:
open [cmd]
run [netdom query fsmo]
copy the PDC FQDN
open [Powershell]
run [Get-ADDomainController -server <paste the PDC FQDN here>
verify that OperatingSystemVersion value is 6.2 (9200) or higher
Step 6 - Ensure that PDC and RID master are available during cloning process.
Step 7 - Create DCCloneConfig.xml file.
open [Powershell]
run [New-ADDCCloneconfigFile]
(this will create an empty configuration file, you might want to have a look on the table below before you add
configuration information to this file)
Note: If you get a failure for applications not cloneable you have 2 options add them to the excluded application list or uninstall them from the DC
To see the list of unsupported applications run:
Get-ADDCCloningExcludedApplicationList
and to generate the XML file (thus adding the application(s) to the excluded list run:
Get-ADDCCloningExcludedApplicationList -GenerateXML
Step 8 - Add the source VDC to the "Cloneable Domain Controllers" security group.
open [ADAC]
browse your domain to the "Users" container
double-click "Cloneable Domain Controllers" security group
Select "Members" tab and click "Add" button to add the source domain controller account
Step 9 - Shutdown the source VDC.
Step 10 - Export the source VM (Virtual Machine).
open [Hyper-V Manager]
Right-click the source vDC VM
Select Export
Specify where you want to save the files
Step 11 - Import the VM with the option "Copy the virtual machine (create a new unique ID)".
open [Hyper-V Manager]
click on "Import Virtual Machine"
Locate Folder
Select Virtual Machine
Choose import type: "Copy the virtual machine (create a new unique ID)"
Step 12 - Start the new VM.
(Refer to the diagram below in order to understand the cloning/snapshot restore decision process)
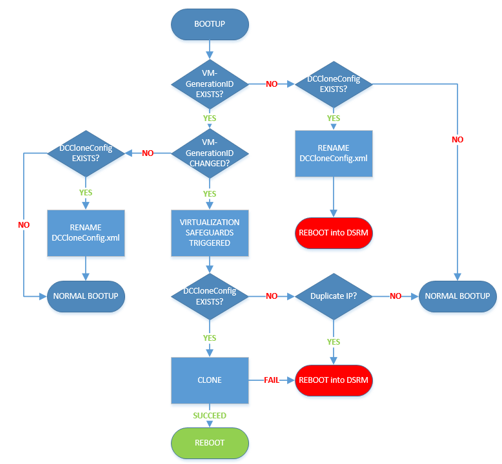
The Cloning/Snapshot safeguards are:
•DC resets the Invocation ID
•Discards the RID pool
•Updates Up-to-Dateness-vector table
•Replicates AD object differences
•Replicates SYSVOL differences
•Updates msDS-GenerationID
The following table puts together the outcomes of the diagram above:

By the way you may find a playlist of all 3 videos above at:
https://www.youtube.com/playlist?list=PLRiiq9ROPBOtJhPx2SciZcMfhJ4PN4K7y
Hope it helps!
Best regards
Paulo