Configuring Exchange 2010 with Project Server 2010
Before going ahead and configure Exchange with Project Server 2010 make sure that you have the latest Cumulative Updates installed for the Project Server.
As always before applying an Update please do a Full Backup of the Project Databases (Archive, Draft, Published, Reporting) before upgrading to the 2011 April Cumulative Update.
Install the WSS and afterwards the Office Servers(Project Server) and Project Client Updates if the Project Server is not at least August Cumulative update 2010 as there have been some issues with the exchange integration in certain scenarios.
x86 und x64 Version:
WSS: https://support.microsoft.com/kb/2512783
Office Servers: https://support.microsoft.com/kb/2512782
Optional : The project Client should also be at the same Cumulative Update as the Server
Project Client: https://support.microsoft.com/kb/2534046
Is the Exchange Server 2007 at least at Sp2 ? If not you have to upgrade it to Sp2 in order to use the Project –Exchange integration.
Find below some steps to follow to get the Exchange and Project Server working:
To correct one of the error messages validate the email address
Project Server -> Server Settings-> Alerts and reminders -> "From
Address "
Afterwards
1. Open the Exchange Management Shell.
2. Run the New-ManagementRoleAssignment cmdlet to add the permission to impersonate to the specified user. The Following example shows how to configure Exchange Impersonation to enable the all service account to impersonate other users in an organization.
New ManagementRoleAssignment-Name: impersonationAssignmentName -
Role: User-ApplicationImpersonation: ServiceAccount
It is also described in this blog:
To configure Exchange Impersonation for all users in an
organization
https://blogs.msdn.com/b/mohits/archive/2010/05/29/integration-of-project-server-2010-and-exchange-2010-2007.aspx
If you still encounter problems with the configuration go through the following steps :
Certificate transfer
In the TechNet procedure when configuring Project Server 2010 with Exchange 2010/2007, it mentions the following at the start of the article (sometimes overlooked by customers!)
NOTE: Project Server uses Secure Sockets Layer (SSL) to access Exchange Server and must trust the SSL certificate that was used by the Exchange farm. If you have a certificate issued by a trusted authority such as VeriSign, Project Server will trust the certificate. If your SSL certificate has not been issued by a trusted authority, you should export the certificate from the Exchange farm and import it as a trusted certificate on the computer that is running Project Server.
First up, with the below links you can confirm if the certificate provider is considered a trusted provider for an Exchange system and the other article details the entities that generate valid certificates for Microsoft Exchange.
Windows root certificate program members
https://support.microsoft.com/kb/931125/en-us
Unified Communications Certificate Partners for Exchange Server and for Communications Server
https://support.microsoft.com/kb/929395/en-us
However, if the customer doesn´t have a certificate issued by a trusted provided, you´ll need to move the certificate from the exchange system to the project server. Here is the procedure to move a copy of the certificate. Also, running the following command on the Exchange system will return what certificates you have on your system. Worth confirm what certificates are actually installed before continuing.
>get-exchangecertificate | fl > certificates.txt
Here is the process to move the certificate from the Exchange system to the Project system.
-Go to _https://Exchangeservername
- You will receive a certificate warning
- Continue
- Click on view certificate
- Click to a file (.CER)
- Copy the file to the project server and install it ( when I say install it, it will prompt you with a dialog where to install it and offer you an option) -
- When asked where say “trusted root CA”
Or
- On the project server - run _https://Exchangeservername
- You will get a warning to say continue
- say show certificate etc.. (follow the above process)
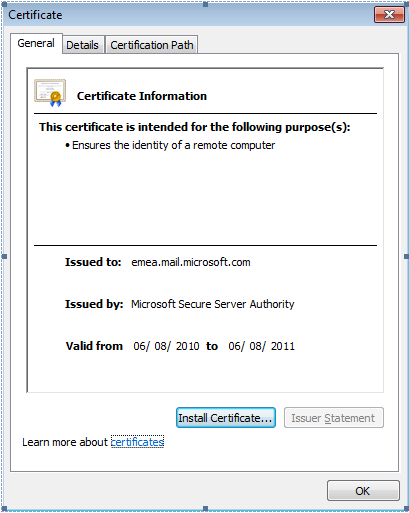
Here are also some screenshoots of the process just in case my instructions are unclear. Here I´m connecting to our OWA server, right click on the padlock symbol to the right of the URL panel, and click the “view Certificates” link,

At the bottom of the pop up on the “General tab” you´ll see “install Certificate”
As an added procedure , on the “Certification Path” tab you can select each level and install these separately also, to be completely sure, but generally this isn´t necessary,

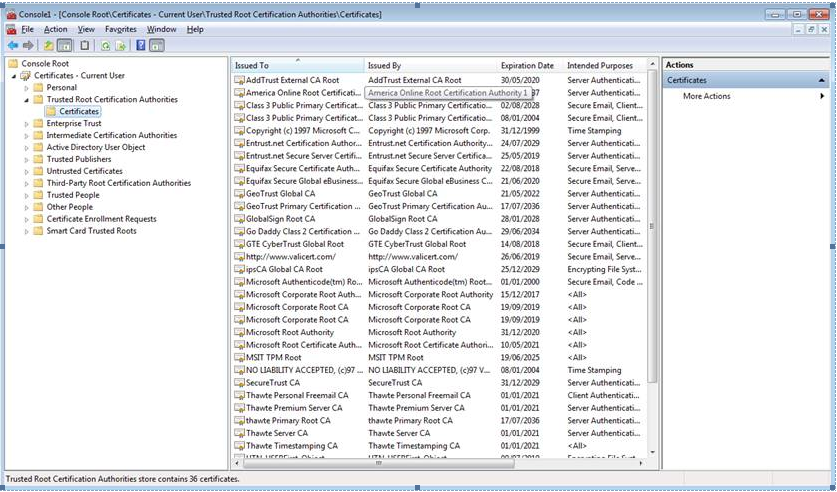
To confirm what you have installed , you can from the MMC, add the certificates snap-in and confirm the certificates have been added to the Trusted Root certification authority
Configure Exchange Server settings
The last part of the configuration process is to configure the Exchange Server and follow the procedure to grant impersonation permission to the PWA application pool account. This works well in a basic scenario but if you have multiple client access servers you can run into issues. The following blog covers this theme really well,
To configure Exchange Impersonation for all users in an organization
- Open the Exchange Management Shell.
- Run the New-ManagementRoleAssignment cmdlet to add the permission to impersonate to the specified user. The following example shows how to configure Exchange Impersonation to enable a service account to impersonate all other users in an organization.
New-ManagementRoleAssignment -Name:impersonationAssignmentName -Role:ApplicationImpersonation -User:serviceAccount
To configure Exchange Impersonation for specific users or groups of users
- Open the Exchange Management Shell.
- Run the New-ManagementScope cmdlet to create a scope to which the impersonation role can be assigned. If an existing scope is available, you can skip this step. The following example shows how to create a management scope for a specific group.
New-ManagementScope -Name:scopeName -RecipientRestrictionFilter:recipientFilter
- Run the New-ManagementRoleAssignment cmdlet to add the permission to impersonate the members of the specified scope. The following example shows how to configure Exchange Impersonation to enable a service account to impersonate all users in a scope.
New-ManagementRoleAssignment -Name:impersonationAssignmentName -Role:ApplicationImpersonation -User:serviceAccount -CustomRecipientWriteScope:scopeName
The RecipientRestrictionFilter parameter of the New-ManagementScope cmdlet defines the members of the scope. You can use properties of the Identity object to create the filter. The following example is a filter that restricts the result to a single user with the user name "John."
Name -eq 'John'
Taken from Configuring Exchange Impersonation -
Once it is done then we followed our Configure Project Server 2010 to work with Exchange Server 2010 article but according to above document..
At the prompt, type the following command:
Add-ADPermission -Identity (get-exchangeserver).DistinguishedName -User (Get-User -Identity <AppPoolAccount> | select-object).identity -extendedRights ms-Exch-EPI-Impersonation
<AppPoolAccount> is the application pool account for the Project Server service application noted in the previous procedure.
This would probably work fine in an environment with one Exchange server, but in the event you have more than one Exchange server the “Get-ExchangeServer” cmdlet would return an array of servers, causing the command to fail with “Cannot bind argument to parameter ‘Identity’ because it is null.”
To fix this the command will have to be run against every server running the Client Access Role. One way of doing this is to use the following PowerShell commands in the EMS:
$CAS = get-exchangeserver | where { $_.ServerRole -match "ClientAccess" }
$CAS | foreach-object {Add-ADPermission -Identity $_.DistinguishedName -User (Get-User -Identity DOMAIN\AppPoolAccount | select-object).identity -extendedRights ms-Exch-EPI-Impersonation}
Then we executed second command to configure exchange user
At the prompt, type the following command:
Add-ADPermission -Identity "<ProjUser>" -User <FarmAdministrator> -extendedRights ms-Exch-EPI-May-Impersonate
<ProjUser> is the name of the Project Server user whom you are configuring, and <FarmAdministrator> is the SharePoint Server farm administrator account.
Then we are successfully able to integrate Project Server 2010 with Exchange Server 2010/2007 without any errors and we are able to pull tasks in Outlook and update the assignments from Outlook to Project Server 2010
So in a nutshell just remember to use the New-ManagementRoleAssignment Exchange Management Shell cmdlet to assign the ApplicationImpersonation role to users in the organization. (Only in the case of Exchange 2010)
And in the case of multiple exchange CAS servers use above script to bypass the “Cannot bind argument to parameter ‘Identity’ because it is null.” Error.