Extending Remote Desktop Services using PowerShell
(Post courtesy Manoj Ravikumar Nair, who you can follow on his excellent blog at https://www.powershell.ms)
What? Are you kidding me? I never knew we could automate Remote Desktop Services using PowerShell. But, yes we can. You can almost automate everything within your Remote Desktop Services Infrastructure using Windows PowerShell.
So the burning question is, when should I use PowerShell and when should I prefer using a GUI?
To explain this, let’s discuss common scenario. You have about 10 Remote Desktop Session Host Servers in your Farm. You would like to do an inventory of the RemoteApps running on each of these servers. Now ideally, it is recommended to run the same RemoteApps on RDSH Servers running in a Farm. But let’s take an exception here. What would be your approach in this case?
One way to tackle this is to use the RemoteApp Manager, connect to each RDS Server and check the RemoteApps running on it. Well, nothing very complex about this approach. But imagine the amount of time you’d spend on doing this! Consider there are more than 10 Servers participating in a Farm. You’d be just:
- clicking around,
- connecting to remote servers,
- taking a note of the RemoteApps and then
- drafting a report from the data collected from it.
The other way to deal with this scenario is, yes, you guessed it right, use PowerShell.
Ask yourself a question: If you were in charge of a team of IT administrators, which ones would you want in your team?
The ones who need several minutes to click their way through a GUI for each task?
OR
The ones who can perform tasks in a few seconds after automating them?
It’s an obvious choice. PowerShell has given the term “administration” a new definition and very soon who will see the Microsoft IT Administration world split into two worlds:
Ones who would continue to ignore PowerShell, use GUI and continue to use GUI even if it results in skipping their meals to get the tasks done.
Ones who already are comfortable with the GUI and use it to perform one time tasks while harness PowerShell to automate bulk operations.
Now that I have set the background on “Why to use PowerShell?”, let me on take you to a seven part journey to automate your existing RDS Environment using PowerShell.
Milestone 1 – Installing Remote Desktop Role Services
Milestone 2 – Configuring Remote Desktop Session Host using the RDS Provider for PowerShell
Milestone 3 – Configuring Remote Desktop Connection Broker
Milestone 4 – Configuring Remote Desktop Farms
Milestone 5 – Configuring Remote Desktop Gateway
Milestone 6 – Configuring Network Load Balancing for RD Gateway using PowerShell
Milestone 7 – Using Best Practices Analyzer to review our RDS Infrastructure
Milestone 8 – Using additional resources
Alright, so let’s dive straight into the first part, i.e. Installing RDS Roles using PowerShell. Let’s be immediately effective.
Milestone 1 – Installing Remote Desktop Role Services
To install any role or feature on a Windows Server 2008 R2 Server, we will leverage the Add-WindowsFeature command of the ServerManager Module. This Command is not installed by default but we can import the ServerManager module in the current PowerShell RunSpace.
To import the ServerManager module, use the following command
Import-Module ServerManager
To see what all commands are being loaded as a part of the import process, you can use the –verbose parameter
Import-module ServerManager –verbose

Because the names of the Roles, Role Services and Features are case sensitive, we will first get the names of the Roles Services, the way PowerShell understands them by using the command below
Get-WindowsFeature –Name *RDS*

The names are case-sensitive, so while using the Add-WindowsFeature, ensure that you use the correct case as shown above.
If you used the Server Manager module to install a Role, you will notice that while installing a Role, if there are any dependent features, the Server Manager automatically prompts you for installing them as well. In PowerShell, we can achieve this by using the –IncludeAllSubFeature parameter of the Add-WindowsFeature.
The best part about PowerShell is the –whatif parameter. When you use this parameter with any command that attempts to make changes to your system, PowerShell will notify you of the changes the command will make but actually doesn’t implement them. In this way, you can validate the changes being made even before making them. Let’s see this in action by running the following command
Add-WindowsFeature –Name RDS-RD-Server –IncludeAllSubFeature -WhatIf

Note that, PowerShell tells you that performing this action would install the Remote Desktop Session Host Role on the server and a restart would be required.
Let’s run the same command again but this time we will omit the –whatif parameter so that the role is actually installed.
To restart the server after the role is installed, you can append the –Restart parameter to automatically restart the server once the role is installed.

Once the Server has rebooted, run the Get-Module –ListAvailable command to see the RDS PowerShell Module installed as part of the RD Session Host Role installation.

Let’s import the module of RDS PowerShell and see what all commands are available within it.
Import-Module RemoteDesktopServices
Get-Command –Module RemoteDesktopServices

What!! Just 7 commands? How can you automate my RDS Infrastructure using just seven commands? Also note that I am using Windows Server 2008 R2 SP1, so I get additional commands that work with Virtual GPUs (RemoteFX is only available with Server 2008 R2 SP1)
RDS PowerShell adds a PS Provider (RDS:) that allows you to access your Remote Desktop Services Configuration like a file system. This is a known fact. To access the RDS Provider, run the following command:
Get-PSProvider

Oops! the name got chopped off. Let’s pipeline Get-PSProvider to Format-Table to auto fit the contents within the PowerShell Runspace.

To access the RDS PS Drive, we will change directory to it.
cd RDS:

To view the subdirectories with the RDS drive, run the dir or the Get-ChildItem (note that dir is an alias for Get-ChildItem)

We will tackle the RDSConfiguration and the RemoteApp Containers one by one.
RDSConfiguration
To access the RDSConfiguration container, change directory to it. You just need to type in the first few characters of the container name that makes it unique and hit the tab key to auto complete the name for you and as well as provide its absolute path.

The command commands you would use with the RDS Provider are as follows
Dir
Get-ChildItem {which is same as dir}
Get-item
Set-Item
Remove-Item
New-Item
To access the sub contents of the RDSConfiguration, let’s do a dir on RDSConfiguration

Let’s analyze this content a bit.
The first column displays the name of the container or setting. You can determine whether a particular item is a container or an individual setting by looking at the Type Column (the second column). Containers will have further subdirectories whereas the settings are leaf objects and will not have any further hierarchy below it.
The third column is the CurrentValue which as the name suggests indicates the current value of the setting. As you can see in the screenshot above, UserLogonMode is currently set to 0. What does 0 mean? Park that question for a moment and we will figure that out once we get into configuring settings.
The fourth column is GP which stands for Group Policy. This indicates whether the current setting is configured via RDS Group Policies or not.
The Fifth column is PermissibleValues which as the name suggests, indicates the permissible values that the configuration item can accept.
The Last column is PermissibleOperations that indicates current PowerShell cmdlets that are permitted to be used in the Configuration Item.
Note that this information is similar to what you see in the Remote Desktop Session Host Configuration Console under edit settings.

Let’s browse Connections and further drill down RDP-TCP.


Now, it’s time to set a particular configuration item.
To get more information about any leaf or configuration setting, just use the following syntax
Dir <setting name> | Format-List *
For example, dir .\ConnectionStatus | Format-List *

From the screenshot above, we can see that ConnectionStatus defines the “status of the connection” as given in the description. Setting it as 0 disables the setting and setting it as 1 enables it. By default, it is enabled.
We will take a step further and access the content of the LogonSettings Directory. Here, we will set the ClientLogonInfoPolicy to 0, which will ensure that the server’s connection will override the user’s connection settings
By default, it is set to 1 which means that the User’s Connection Settings will override Server’s connection setting. We can verify it via the GUI as well.

Let’s see the complete information of the ClientLogonInfoPolicy by running the command below:
dir .\ClientLogonInfoPolicy | fl *

Now, let’s set the value to 0 by using the command below:
Set-Item .\ClientLogonInfoPolicy 0
Note that I am running this from the Path RDS:\RDSConfiguration\Connections\RDP-Tcp\LogonSettings
If you running this from any other drive, you can use the –Path parameter and you need to explicitly provide the entire path. I have used this approach to revert the value back to 1.
Set-Item –Path RDS:\RDSConfiguration\Connections\RDP-Tcp\LogonSettings\ClientLogonInfoPolicy 0

To verify, let’s fire up the GUI for the same setting. Wow!, we see that the configuration change has been made. Huraaaaaaaaaaaaaay ! J

To revert it back, we will set the value back to 1. This will ensure that the client settings override the server’s setting


Do not forget to refresh the console. The setting will be in effect only if you refresh the console and explore the properties again
So let me reiterate, you should use the following commands to work your way out with RDS PowerShell
Dir
Get-item
Set-item
New-item
Remove-item
Use the Dir <setting Name> | Format-List * to get information about a particular setting
Installing Role Services Remotely:
How do you install a Role Service, let’s say RD Web Access Remotely. Unfortunately, the Add-WindowsFeature does not have the –ComputerName parameter wherein we can specify the name of the Remote Computer.
However, we do have a workaround in the form of PowerShell Remoting. To enable PowerShell remoting, you need to run the following command
Enable-PSRemoting
I am going to run this command on a remote server named FUJI

This will automatically configure the firewall exceptions and the WinRM (Windows Remote Management) service to allow the server to accept remote commands. Server 2008 R2 has GPOs to configure PowerShell Remoting which I will cover in a different blog post. You can use GPOs to automatically enable PS Remoting on all your server machines so that they can be remotely managed.
Now that I have enabled PS Remoting on FUJI, we will remotely install the RD Web Access Role Component on it.
For the time being, I will use 1:1 Remoting.
New-PSSession –Name FUJIRemote –ComputerName FUJI

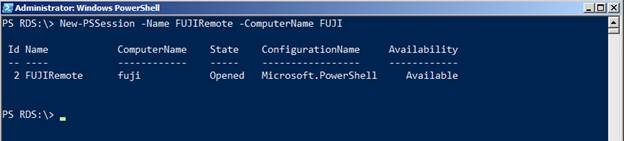
Next we will enter the session that was just opened
Enter-PSSession –Name FUJIRemote
If you are able to connect to the session, you should now see the PowerShell to display the name of the computer before the PS Prompt
[fuji]: PS C:\Users\Administrator.POWERSHELL\Documents>
This indicates that you are now connected to the remote session and whatever you do at this prompt will be now performed on the remote server which is FUJI in our case.
The rest is simple. We will follow the same steps that we did to install the RD Session Host Role.

As you can see we were able to install the RD Web Access role on the Remote Server FUJI and PowerShell tells you that the server does not require a reboot after the installation of the RD Web Access. I knew that beforehand and hence didn’t specify the –Restart parameter J

We will verify the same by taking a look the Server Manager on the Fuji Server

This is just one example of PowerShell Remoting. You can also do a 1:Many Remoting wherein you can specify a bunch of computer names in a text file or so and then perform actions on each of those computers.
With this we conclude the first milestone of our Project, i.e. Installing Role Services using PowerShell. We also touch based upon some of the configuration settings.
Next Post: Extending Remote Desktop Services via PowerShell – Part 2