PowerShell Blog Series, Part 4 - How-To use PowerShell DSC from your workstation to test PowerShell JEA, in Azure.
Yesterday I published a little bit of a teaser with screenshots demonstrating the ability to automate publishing VM’s in Azure as a method of testing PowerShell Just Enough Administration. Today I am publishing a technical write-up on how you can setup your workstation to very easily spin up and tear down test virtual machines in Azure, and in this case how you would use the scenario for testing JEA.
MSDN Subscribers – don’t forget you have Azure credit available from your subscription!
After you walk through this, you will be able to “spin up and tear down” virtual machines in Azure using DSC from your workstation, using very simple techniques. I know this is a LONG write-up. To see the outcome, checkout the post from yesterday. This technique is not all that complicated, I am just including detailed explanation of the concepts.
Here is a screenshot of the actual declarative language that will build out the Azure test VM.

Setup
There are three steps to setting up your machine.
- Install the latest WMF 5.0 Preview
- Install the Windows Azure Powershell cmdlets
- Download your .publishsettings file
Just like with JEA, you need to have the latest version of Windows Management Framework 5 Preview installed.
Windows Management Framework 5 Preview – September 2014
https://www.microsoft.com/en-us/download/details.aspx?id=44070
Obviously, you need to have an account in Azure but as I mentioned before, this could include the credit you receive with your MSDN subscription or a trial account, if you do not have access to a paid account.
You will need the Windows Azure PowerShell cmdlets available from WebPI. The item is named “Windows Azure PowerShell” and includes a number of dependency package installs.
Microsoft Web Platform Installer
https://go.microsoft.com/fwlink/?LinkId=255386
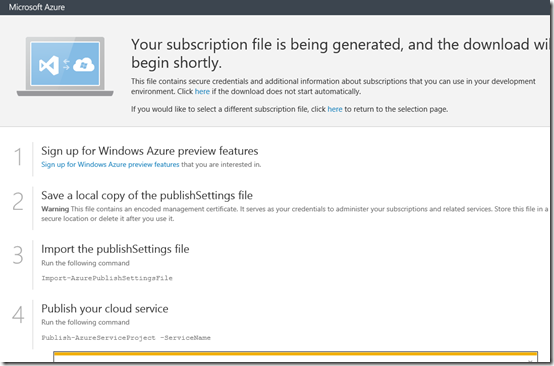
Once these cmdlets are installed, you will need to download your “publish settings” file from Azure. This is easy!
Open Windows PowerShell and run Get-AzurePublishSettingsFile. This will automatically open a browser window and take you to the download page.
If your Microsoft account is associated with multiple directories you will be prompted to select one. Download the file to someplace convenient. We will copy to the correct folder later in the walk-through. Just one tip, open the file and if you have more than one subscription, remove all but what you intend to use for test. While the script is designed to select the correct subscription by name, there is no reason to introduce the chance of confusion.
Once you have WMF5, the Azure cmdlets, and your .publishsettings file, you have completed this section and are ready to download and install the xAzure module.
Download and Install the xAzure module
There are three steps to installing the xAzure module.
- Run the Install-Module command
- Copy example scripts to a convenient location
- Set the files to use your .publishsettings file and subscription name
The script will apply a configuration to your local computer that runs a Get function to determine what exists in your Azure environment, Test the results against a description of what should be in Azure, and if the test fails it will provision the environment during Set.
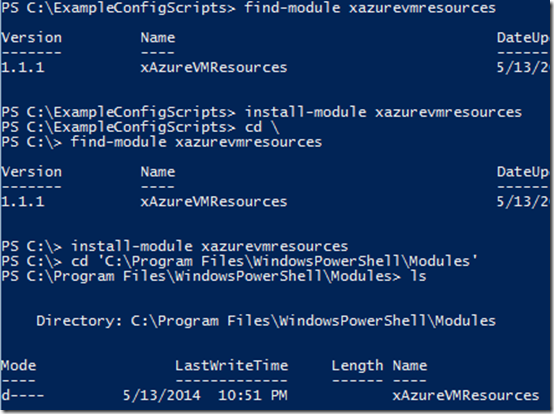
From the computer you will use to provision the VM, right click on the Windows PowerShell icon and select Run As Administrator. In the new window, run Find-Module xAzure. You should see the latest version returned. I run a ‘'Find” first because it verifies you are able to reach the Internet and the resource is available for download.
Next, run Install-Module –Name xAzure. You can verify the module has been downloaded by changing your directory to C:\Program Files\WindowsPowerShell\Modules and looking for the xAzure folder.
If you open the new folder you will find the module also contains example scripts. They are easier to work with in a location that requires less typing to navigate. For the purpose of this walk-through I am assuming the three following steps have been taken.
- Copy the ReadMe.txt file in to the ExampleConfigScripts folder
- Copy your .publishsettings file in to the ExampleConfigScripts folder
- Copy the ExampleConfigScripts folder in to the root of C:\
Finally, we need to modify two of the example scripts so that they will work with your subscription. From a Windows PowerShell console navigate to C:\ExampleConfigScripts and type ISE .\Create.ps1. Just after line 50 you will see the section in the image below. You need to modify these values.
The AzurePublishSettingsFile should point to your .publishsettings file, which would have a unique name. You just need to update the file name inside the quotes.
The AzureSubscriptionName can be found by opening your .publishsettings file in Notepad. Make sure you choose the correct name if you have more than one! Type the name inside the single quotes.
When you have made this change, copy the section to the clipboard and run ISE .\SetupSubscription.ps1. Paste the text over the same section in the new file.

Recommended – from the Windows PowerShell console in the ExampleConfigScripts folder you can run the script .\LCMApplyOnly.ps1. This will set your local computer’s DSC to just apply configurations and not verify the configuration going forward. For this workload, that is a nice setting to have in place. Your machine will not be checking in on Azure or re-creating a VM if you delete it.
Once you have downloaded and installed the xAzure module, copied the appropriate files, modified the two example scripts, and set your LCM to ApplyOnly,, you have completed this section and are ready to provision a test VM.
Provision a Test VM
There is only one step to provisioning a test VM. Even better, now that you have made it this far you will be able to use this process in the future to provision additional test VM’s with just one step!
Open Windows PowerShell and run c:\ExampleConfigScripts\Create.ps1.
The script will prompt for credentials. This is the username and password for an account that will be created inside the virtual machine. The account will become a member of the local Administrators group and will be used for your first log on. When the script has completed, it will return an Instance ID to the pipeline.
Details of what occurs when you run the Create script
Several steps actually occur when you run the Create script.
- The target subscription must be set as “Current” on your computer. Each command that performs action needs to know which subscription to use. The xAzureSubscription resource handles this.
- An Azure Affinity Group is created. This is basically a way of establishing a relationship between cloud compute and cloud storage, so that the resources are provisioned in proximity to each other. In the Azure portal this is located in Settings – Affinity Group. The xAzureAffinityGroup resource handles this.
- An Azure Storage Account is created. This is a logical definition of where you will be storing blobs (binary large object) in the cloud, such as the VHD file for your VM or the scripts you would like to run inside the VM after it is provisioned. A new container is created named “scriptextensionfiles” and the “InstallJEA.ps1” file is uploaded. The xAzureStorageAccount resource handles this.
- An Azure Cloud Service is created. This is the context for your compute resources, or in this case your virtual machines. The xAzureService resource handles this.
- Finally, a virtual machine is provisioned to the storage you created, using the compute resource you created. VM templates are readily available from Azure and in the Create example script, the April image for Windows Server 2012 R2 Datacenter is selected. The VM Guest Agent allows you to copy scripts from blob storage in to the VM and execute them as payload. The xAzureVM resource handles all of this.
The credentials you enter are captured in to the MOF file for DSC. Note that the password is stored in the MOF file in plain text. This is typically OK for a temporary test virtual machine but for any other scenario, the MOF file should be guarded closely.
When the script has finished running, an InstanceID is returned to the pipeline, in addition to the DSC script output.
Instance ID
The resources created in Azure, specifically the storage and compute resources, are given public DNS names at creation. For this reason, the test environment needs an identifier that is unique globally across all Azure customers, not just for your subscription. The Instance ID is a 10 digit string of numbers based on a .NET time object, to ensure your environment does not conflict with someone else’s. This identifier can be used when repeating the Create script, or by the remaining example scripts to take further action such as getting status, deprovisioning VM’s, or the cleaning up the entire test environment.
To capture the Instance ID from the pipeline automatically, you would run $ID = .\Create.ps1 and then return the value by calling $ID[1] .
Check Deployment Status, Connect, and Test JEA
So now you can create a VM in the cloud by typing one word in to a Windows PowerShell console, but you want to connect to it just as easily. This is where you will use the Instance ID for the first time.
From the same PowerShell console, highlight the Instance ID text and press Enter to copy it to the clipboard. Type .\Status.ps1, hit space, then right click to paste from the clipboard in to the console. Run the command to get the current status of the VM.


If you ever lose the Instance ID and need to get it quickly, run Get-AzureService with your subscription selected and you will see a list of every service you have provisioned.
If you have just provisioned the VM you will notice the status messages return values that indicate the VM is still in the process of provisioning.
- Virtual Machine Status – the status of the virtual machine in Azure. When the VM is online and ready the status will be “ReadyRole”.
- Guest Agent Status – after the VM is online, the guest agent inside the VM starts up to accept commands. The status of the guest agent can be monitored remotely, so it is available here.
- Resource Extensions Status – when you transfer payload in to the VM from blob storage and indicate that it should be executed, the status messages can be monitored remotely, so that is also available here. “Success” means that the script did not return any errors during transfer or execution.
Generating Connection Files
Now that you have provisioned a VM, checked status, and the status indicates the VM is fully provisioned, you can connect to the VM. Run the same command with a parameter, .\Status <ID> –ConnectionFiles. This will return the status again but this time it will also take three actions on your local machine.
- Download the .rdp file for you to remote desktop in to the VM, and store it as Connect.rdp in the working directory.
- Download the certificate for the virtual machine and ask if you would like to install it.
- Generate 2 new PowerShell scripts, one that helps you connect as an administrator in a session with full access and one that helps you connect in to a JEA session.
The certificate is required because the VM is using a self signed certificate for an SSL connection when you connect via Windows PowerShell remoting. Your machine will not trust it unless it gets downloaded and installed. Note that it prompts you to install the certificate. This is a decision point for you. The script does not also go in a delete certificates, so if you do this a lot you will occasionally want to open your personal certificate store and clean out certificates for all the test VM’s you connected to.

At this point, start typing “Connect” and then tab auto complete to .\ConnectTo-FullAdmin.ps1. This script already contains everything you need to make the connection. You will be prompted for credentials and then you should see the console change to include square brackets and the DNS name of the VM. This indicates you are connected to the remote VM.

Run the Demo Scripts
The provisioning script does everything to setup the VM. The xJEA resource is installed using NuGet, the VM is configured for remote access, and Windows Management Framework 5.0 May Preview is installed, then the VM is rebooted. However it does not run the demo scripts for you. This is because that content could change and the automation would break. This also gives you an opportunity to experience Windows PowerShell remoting without being in a constrained endpoint.
Using the remote session on the VM, navigate to C:\Program Files\WindowsPowerShell\Modules\xJEA\Examples\ and one by one run the following scripts.
- SetupJEA.ps1
- Demo1.ps1
- Demo2.ps1
- Demo3.ps1
The Setup script will configure your machine to apply configurations and auto-correct every 30 minutes. It will also remove any existing endpoints but for a new VM, there is nothing to remove.
Each of the Demo scripts create a new toolkit and endpoint. The Demo#.ps1 files will probably write error messages a the end. That’s OK. They have some interactive commands at the end that don’t make sense in this context but they won’t hurt anything.
Pause for a moment to think about that you are applying Windows PowerShell Desired State Configurations interactively using remote Windows PowerShell in to a virtual machine running in Azure. 
When you have completed these steps type Exit and press Enter to return to your local Windows PowerShell console.
Experience JEA
From the local console, start typing “Connect” again but this time use tab auto-complete to enumerate .\ConnectTo-Demo.ps1. You actually have three endpoints available but the script by default is only connecting you to the session named “Demo1EP”. You can modify the script to point to the other sessions if you wish.
After running the script and entering your credentials once more, you should see the console change. You are now in a JEA session!

You can experiment however you want. I typically begin with Get-Command to discover what I can (and can’t) do.
To return to your local machine console, type Exit and press Enter.
Additional Example Scripts
This is already a very long blog post so I am going to be brief here. Within the “ExampleConfigScripts” folder you will find several additional scripts. The ReadMe file has detailed information.
- Destroy – this script requires the Instance ID and will remove everything that is created by the Create script. IT IS DESTRUCTIVE. There will not be a way to bring the virtual machine or VHD files back.
- RemoveVMs – this script requries the Instance ID and will remove the VM in Azure and their VHD files, but it will leave the Affinity Group, Storage Account, and Service. Nice way to speed up the process if you just want to re-create a test VM. THIS SCRIPT IS ALSO DESTRUCTIVE. You will not have a way to get the VM back if you delete it.
- LCMApplyOnly – this script will configure your computer so that DSC is set to “ApplyOnly”. This prevents DSC from checking in with Azure to verify whether the configuration has changed.
- SetupSubscription – This DSC configuration only registers the Azure subscription with your LocalSystem account. The Destroy and RemoveVM scripts run this script before starting, to verify everything is in place.
If you delete a VM and you want to provision a new one, the Create script accepts an Instance ID. This will allow you to provision in to existing environments.
I have tested adding additional VM sections to the scripts to create more than 1 VM, including Linux VM’s, and everything is working. The component I did not have time to create is creating virtual networks. Feel free to make that addition.
Troubleshooting
Here are a few scenarios I ran in to while testing that I wanted to share.
Get-DSCResource might not return all modules after installing Windows Azure PowerShell
This would also show up as an error that “xAzure is not a known…” error when running the example scripts. If you run in to this, look at the PSModulePath environment variable. If you see %PSModulePath%; at the beginning, you can remove it. This should correct the issue.
UPDATE 6/17/2014 - if you run in to this issue, you can use the following script to remove the %PSModulePath% string, https://gist.github.com/markcowl/95324d3e68947dddf801. The next release will include a fix and I will remove this item from the troubleshooting section. Thanks!
If the script errors and the verbose output is not showing your subscription ID
The verbose output returns the Azure subscription ID before with every module. This is just so at a glance you can be absolutely sure that work is being performed in the correct subscription. If no subscription ID’s are showing up, your local computer is not registering the subscription for some reason.
First, I would check that the Create and SetupSubscription scripts are pointing to the correct names and file name for your .publishsettings file. If you made changes in Notepad, make sure the file did not get saved as a .txt extension.
Second, you can remove subscriptions registered to your local computer manually and start over. I’ve only had to do this once, ever, but just in case.
-
- Open Windows PowerShell As An Administrator
- Navigate to the ExampleConfigScripts folder
- Run Start-BitsTransfer https://live.sysinternals.com/psexec.exe ,\
- Run .\Psexec.exe –s PowerShell.exe Remove-AzureSubscription –SubscriptionName “Your SubscriptionName”
-
- You may have to run this more than once if you have multiple subscriptions in your publish settings file
At that point try running Create again.
That is it for this week. Thank you for reading, and stay tuned to Building Clouds!