Just Enough Administration, Step by Step
It is a special honor for the Building Clouds Blog to showcase a new solution announced today at TechEd North America 2014, Windows PowerShell Just Enough Administration, or JEA.
JitJea: A Windows PowerShell Toolkit to Secure a Post-Snowden World
https://channel9.msdn.com/Events/TechEd/NorthAmerica/2014/DCIM-B362
This technology enables organizations to present operators with only the amount of access required to perform specific tasks. For additional information, see the JEA whitepaper.
Just Enough Administration Whitepaper
https://aka.ms/JEA
We plan to have additional posts on this topic in the future but for today, here is a step by step for anyone who would like to reproduce the demonstration environment.
Setup
We’re using a new VM running Windows Server 2012 R2. In the screenshots below the VM was provisioned in Azure, but this could be any virtual machine. During the walk-through we will be downloading content from the public Internet. If you choose, you could download this to some other machine such as your workstation and then copy the ‘xJEA’ folder in to your VM as long as it is copied in to the same directory structure under Program Files.
The only prerequisite installation is Windows Management Framework 5.0 Preview. Note that just today a new release was published. It has May 2014 in the name. If you are running a previous version, you will need to update in order to test.
Windows Management Framework 5 Preview – May 2014
https://www.microsoft.com/en-us/download/details.aspx?id=42936
Download and Install the xJEA module
After installing WMF 5.0 Preview, right click the Windows PowerShell icon on the taskbar and select Run As Administrator. In the new Windows PowerShell window, run Get-Command *Module. Take a moment to review the new cmdlets available in the PowerShellGet module.

Optionally include Verbose output throughout the next few steps, by adding the –Verbose or –v parameter.
Identify the xJEA resource and verify your Internet connection by running the command Find-Module –Name ‘xJEA’ .

You are prompted to download and install NuGet. If you approve, type Y and hit Enter to proceed.

The results should return the current available version of the xJEA module.

Next run the command Install-Module –Name ‘xJEA’ .

Finally, change your current directory to C:\Program Files\WindowsPowerShell\Modules and verify that the ‘xJEA’ folder is there, indicating the resource is now installed.

You have completed this section and are ready to setup JEA.
Setup JEA
The xJEA resource provides automation so that you can very easily setup JEA endpoints and toolkits. For more details on these terms, see the documentation at the top of this post. This walk-through will help you setup each configuration and test the operator experience.
Begin by changing your directory to C:\Program Files\WindowsPowerShell\Modules\xJEA\Examples.
Before applying the configuration, make sure WinRM is configured and ready by running the command WinRM QuickConfig. Review the changes this command will make and if you accept, type Y and then hit Enter.

The remaining steps assume you are still in the directory C:\Program Files\WindowsPowerShell\Modules\xJEA\Example.
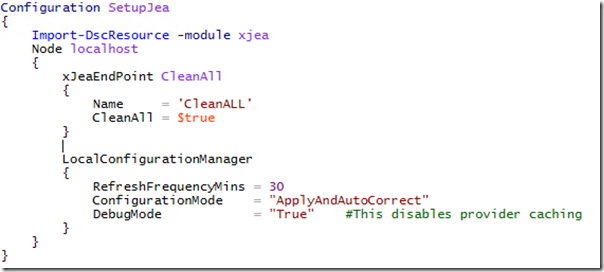
Next type ISE .\SetupJEA.ps1. Review the Windows PowerShell Desired State Configuration (DSC) script. This script removes all existing endpoints from the computer if any exist. and sets the DSC Local Configuration Manager to apply changes, then checks every 30 minutes to make sure the configuration has not changed, and enables Debug mode.
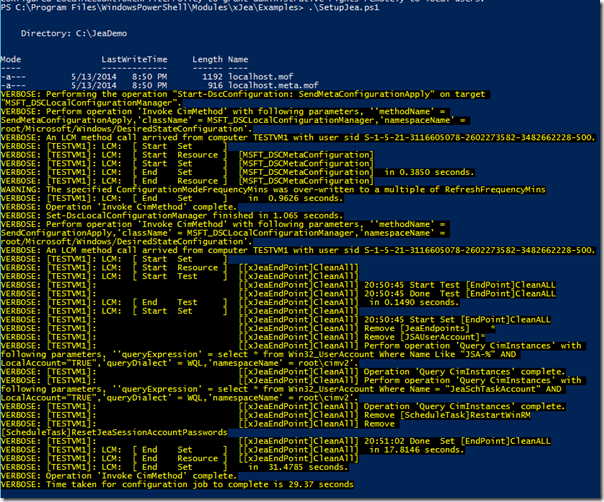
Close the ISE window and apply the configuration by running .\SetupJea.ps1. Review the verbose output to gain a better understanding of how DSC has applied the changes.
You have completed this section and are ready to test the demo endpoints and toolkits.
Test the Demo1 Endpoint and Toolkit
There are three configurations provided for the demonstration. The following steps will help you to review the details of the Demo1 toolkit and test out the operator experience. Note that in a real world environment the operator would connect to the machine remotely. We are simulating the experience here from the local console.
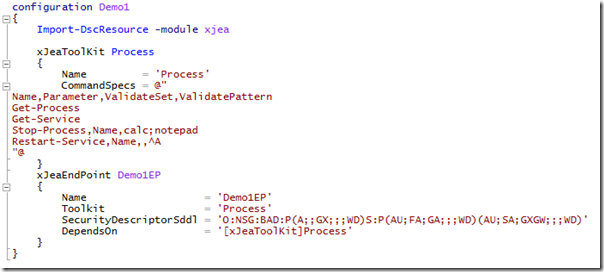
First, run ISE .\demo1.ps1. Note that you can accelerate this by typing “demo1” and hitting the tab key. Review the toolkit for the first demo. Notice that only the default JEA command configuration and Get-Process, Get-Service, Stop-Process, and Restart-Service are available, and the last two commands have restricted parameters and arguments.
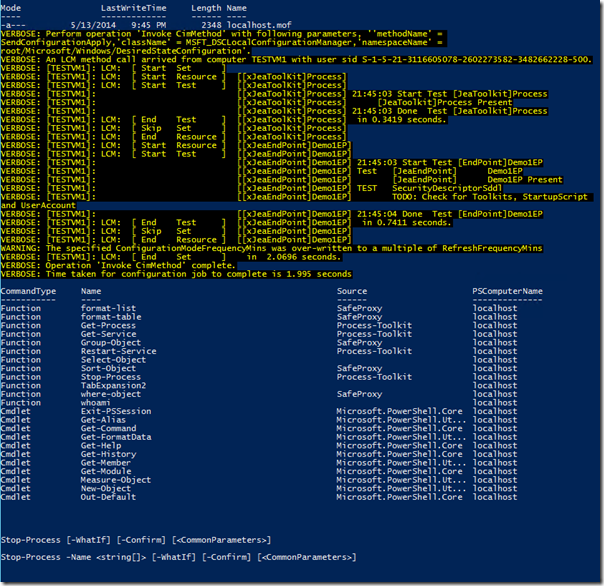
Run the script .\demo1.ps1 and review the DSC verbose output as before. Notice that the script returns the list of commands that are available within the session.
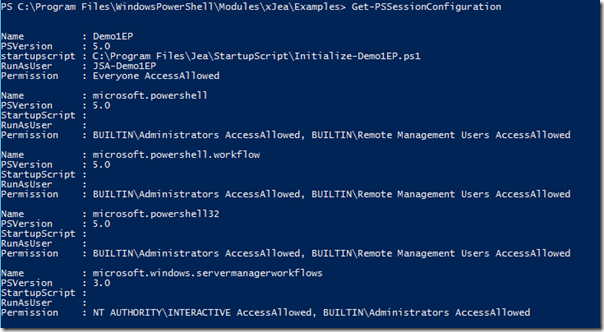
To verify the script was successful, you can view the Windows PowerShell session configurations available by running Get-PSSessionConfiguration.
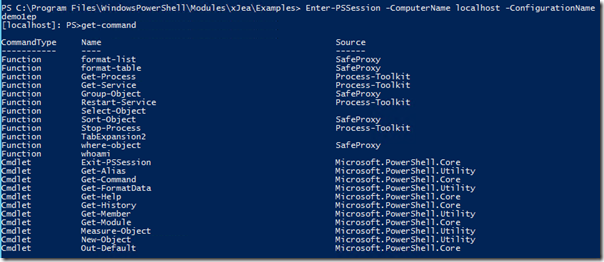
Next run Enter-PSSession –ComputerName localhost –ConfigurationName demo1ep. You should see your prompt change to [localhost]: PS] indicating you are now in the special constrained session configuration, (or JEA endpoint for short). Run Get-Command. Observe the limited set of commands available.
Validate that you cannot run other typical Windows PowerShell commands. As an example, try to run Get-Content. Observe the resulting error.

From the desktop, open Notepad. You can do this quickly by hitting Ctrl-R, typing Notepad, and then pressing Enter.
From the Windows PowerShell window, run Stop-Process –Name Notepad. You should be prompted to confirm the action. If you accept type Y and then Enter. You should see Notepad close.

Now, attempt to close any process not approved by the JEA toolkit. As an example, attempt to run Stop-Process –Name Explorer. Observe the error message which includes details on which arguments are accepted.

To exit the JEA endpoint, run Exit. You return to your previous Windows PowerShell session.
Test the Demo2 and Demo 3 Endpoints and Toolkits
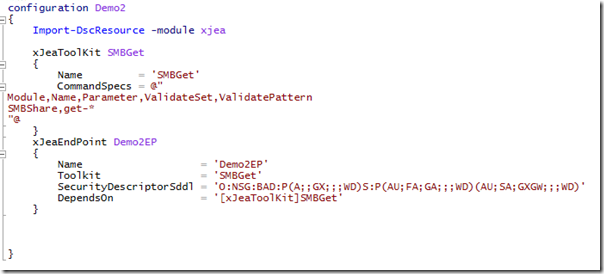
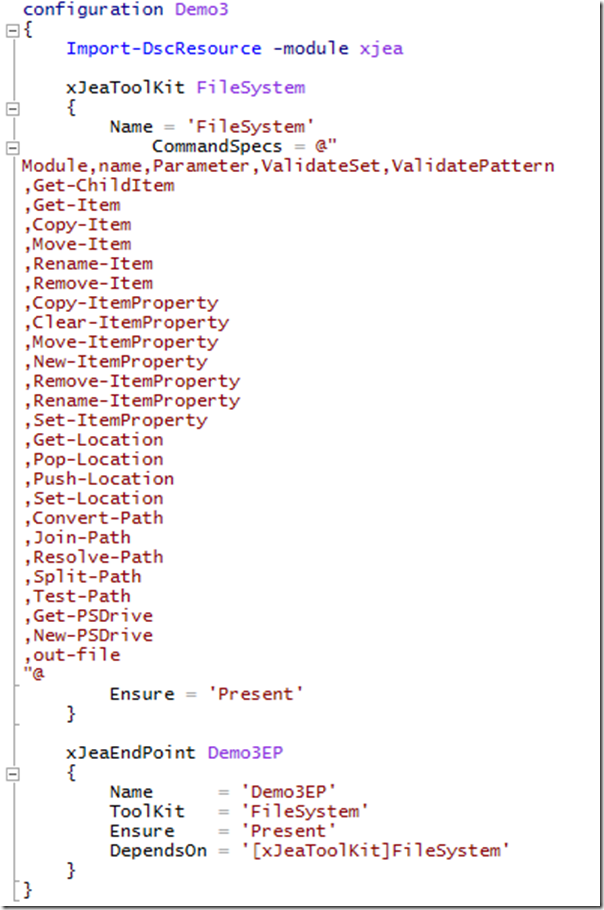
To test the Demo2 and Demo3 toolkits, you only need to run their respective scripts. Begin by reviewing them in ISE to understand which commands, parameters, and arguments, will be available. You can do this faster by running Show-JeaExamples. All four scripts will open in ISE.
One by one apply the remaining configurations to your test VM. The steps are exactly the same as the walk-through above, respective to each script name. Note the changes in the configuration name when entering the session, they are Demo2EP and Demo3EP.
See the screenshot below. Demo2 provides a toolkit for the scenario of a File Services administrator, and Demo3 provides a toolkit for navigating the file system.
View the JEA Whitepaper
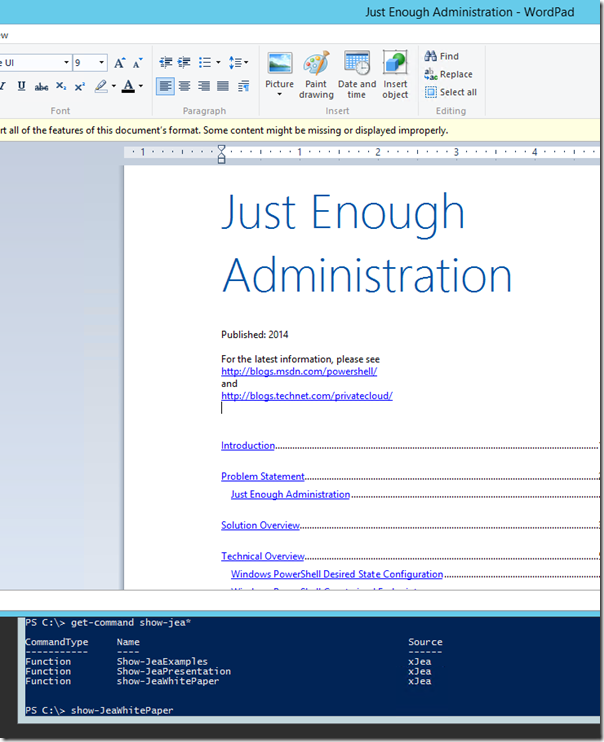
Finally, you can read the entire JEA Whitepaper from your test VM by running the command Show-JeaWhitepaper. Conveniently, the document opens in Wordpad on your test server.
Thank you
A special thank you to Jeffrey Snover for the opportunity to provide feedback on JEA during the development process and to everyone who contributed to our efforts on the documentation, especially Nir Ben Zvi, and Kim Ditto-Ehlert and her team.
There is a LOT of community opportunity around JEA in creating and publishing toolkit examples. We look forward to being part of it!
Thanks and stay tuned to Building Clouds!