Import and Configure VM Role Gallery Items in Windows Azure Pack with GRIT 1.1
About a month ago, the Gallery Resource Import Tool (GRIT) was published:
Fully written in PowerShell, the “Gallery Resource Import Tool” (GRIT) aims at simplifying discovery and installation of VMRole Gallery Items in Windows Azure Pack (WAP), in addition to help reduce manual errors when tagging virtual disks. Through this single tool, all the configuration and import steps can be achieved.
With GRIT, you can:
- Browse and download Gallery Resources available from Microsoft on the internet, or use a local copy from your disk
- Review virtual disks prerequisites for that Gallery Resource, compare with your existing virtual hard disks, and optionnaly update these disks to match the requirements for the Gallery Resource
- Import the Resource Extension and/or Resource Definition
Today I am happy to post an update to the tool!
This post summarizes the new features/enhancements in this version 1.1 and, of course, where to get it.
For more detailed “how to use” instructions, you can also refer to the very first blog post about GRIT here.
Download location

What’s new and changed in version 1.1?
Detailed VMM job outputs
The tool now returns potential job errors when interacting with VMM for Cloud Resource Extensions import and removals. This may help troubleshooting issues.
For example, trying to import a Resource Extension which requires some edits to include a payload would provide the error below:

Error summary in the GUI

Error details in the PowerShell window
Note that GRIT was actually warning you about this, before even trying  As you can see below, it detected the Resource Extension potentially needed some edits, and proactively unselected the import option (which you can override, but will result in the previous error, if the payload has not been configured correctly)

More explicit option to import and configure a local gallery item
The option to browse for a local gallery item is now at the top of the list, instead of being after the internet gallery items from Web Platform Installer (WebPI). The option already existed in v1.0, but was at the bottom of the list, and probably easier to “miss”.

New option to set the gallery item as 'public' in Windows Azure Pack (WAP)
When importing the resource definition, a new checkbox allows to set it as ‘public’ in WAP, after import. You would still have to add the gallery item to a plan, when you wish to expose it to tenants.

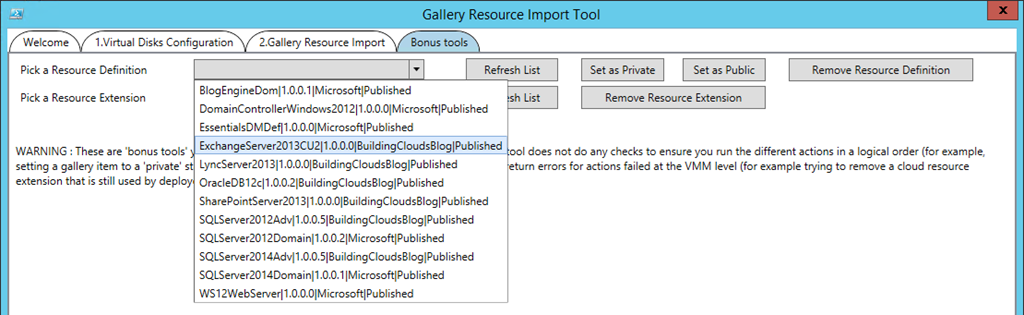
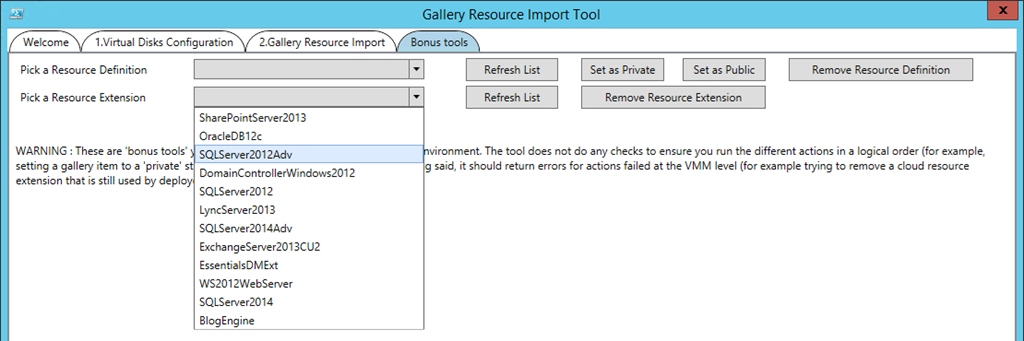
A few ‘bonus tools’ to list and remove existing gallery items from the local environment
A new tab has been added, with options to list all Resource Extensions and Resource Definitions, remove them and/or set Resource Definitions public/private

The new tab and its different options – note the disclaimer on how to use this tab

More specifically, the resource definition section allows to list galery items, set them as public/private and remove them

The resource extension definition allows to list and remove resource extensions from VMM
Fine tuned approach to configure the family name for OS disks
When the OS disk is parameterized in a VM Role Gallery Item, the family name and release can be anything as we only rely on tags. Only requirements are that:
- Family Name and Release should not be empty. GRIT v1.0 was enforcing this by suggesting to add “OS Disk” for the family name and “1.0.0.0” for the release version.
- Tags must be consistent across disks with the same family:release values. This is where GRIT v1.1 tries to help, as it adds a new option - enabled by default – to set the family name to the concatenation of tags. This only applies to OS disks, and is presented like this in the tool:

If you unselect the “Apply Resulting Tags to Family Name”, the “Family” text box will be enabled and you can configure as you wish. By using the concatenation of tags, there are less risks of having a generic family name, which may otherwise result in the following error in VMM, when deploying a virtual machine:
As an example, the previous screenshot would result in the family name being set to “Datacenter-WindowsServer2012-R2”. Again, you can override this, but the idea was to use a default configuration that would work in most cases. Here is an example with some OS disks:


A last recommendation for OS disks tags and family names
In addition to the default behavior of the tool, there are a few cases where you may want to add further tags . For example, when you use the tool to configure the SQL Server 2012 Sysprepped VM Role, this gallery item requires a “MicrosoftSQLServer2012” tag for the OS disk. Let’s assume you have two OS disks with SQL Server 2012 sysprepped, one with Windows Server 2012 and one with Windows Server 2012 R2. By default, the tool would configure the disks like this:

Note : In this case, the first disk is a match, because the tool was configuring OS disks running Windows Server 2012
While this works (WAP will deploy VMs and VMM will not give you an error about mismatched tags), it can be bit misleading, as someone new to the environment may easily miss the difference between the two disks (the operating system). So you might want to go as far as adding a additional tag to specific the OS version, and let the tool also include this one in the family name. This way, the VM Role gallery item deploys just fine AND it’s very easy to see that the disks are not equivalent. With this logic, here is how the two OS disks with SQL Server 2012 sysprepped could be tagged:

Wrap up
I hope this updated version of the tool will be useful, as you work with VM Role Gallery Items in the Windows Azure Pack. Thanks for reading, and keep the feedback coming on the tool!