Managing Windows Azure with SMA
Hello readers, Jim Britt and Victor Arzate here. This time we will show you how you can manage Windows Azure services via Service Management Automation (a.k.a. SMA).
Up until now we have shown you many samples on how to leverage SMA for automating processes for on-premises deployments (take a look at the August 2013 was Automation Month at the Building Clouds Blog! blog post for a quick reference). In this blog post we will show you how service administrators can leverage the same investments in SMA, but extended to Windows Azure.
In a nutshell, the steps that need to be done are:
- Step 1 – Install Windows Azure PowerShell
- Step 2 – Configure the connection to the Windows Azure subscription
- Step 2 – Create a connection object in SMA to Windows Azure
- Step 3 – Create your Runbook
And you need to have the following prerequisites
- An environment with WAP and SMA already integrated
- A subscription to Windows Azure. If you don’t have one, please see this link.
- An Active Directory service account that will be used for connecting to the Windows Azure subscription from your on premise WAP environment.
Okay, let’s get started!
Step 1 – Install Windows Azure PowerShell
Alright, first thing you need to do is to download and install the Windows Azure PowerShell module on a server (this can be your SMA server or another member server). You can obtain it from this link.
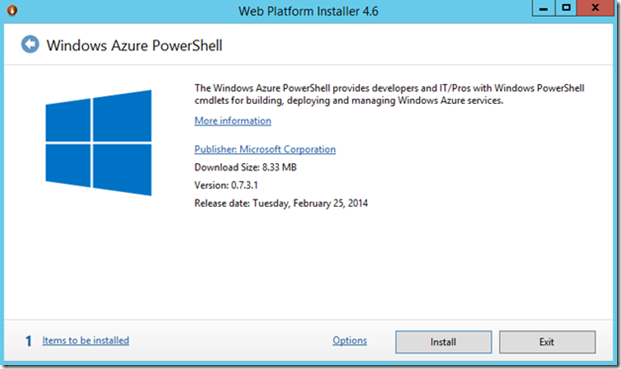
It will install and launch the Web Platform Installer and will prompt you to install Windows Azure PowerShell:
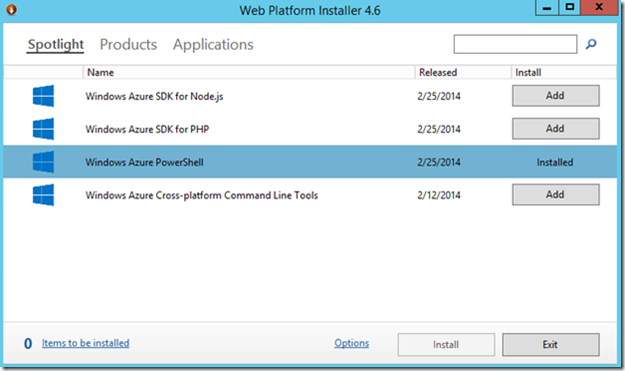
Click on Install and the Web PI will display any dependencies that are needed in your system. Click on I Accept if you accept the terms and the Web PI will start the installation of Windows Azure PowerShell and all required dependencies. Once the process is complete click on Finish. The Web PI should indicate that the Windows Azure PowerShell components are installed:
Click on Exit and restart the server. We have noticed that this is needed so that SMA Runbooks can see that the Windows Azure PowerShell module is installed.
Step 2 – Configure the connection to the Windows Azure subscription
Now we have to set up the connection to the Windows Azure subscription. You’ve different options here such as manually uploading a management certificate to Azure, authenticating using Windows Azure AD or using the certificate method.
The Windows Azure AD method was not an option as in this case the credentials are available to Windows Azure PowerShell for 12 hours. After these 12 hours the credentials expire and you’ll need to log in again.
Manually uploading a management certificate was another option, but in this case we had to obtain a certificate so that we could upload it to Windows Azure, and then we have to manually install it in the SMA server. While this option worked, we wanted to use a more slick option ![]()
We used the certificate method, because Windows Azure PowerShell includes the cmdlets that help us to download and import the certificate (hence no need for manually getting and importing the certificate)! The cmdlets are:
- Get-AzurePublishSettingsFile – this cmdlet opens a browser session, signs into your Windows Azure account, and automatically downloads a .publishsettings file that contains information and a certificate for your Windows Azure subscription.
- Import-AzurePublishSettingsFile – this cmdlet imports a .publishsettings file that has been downloaded using the Get-AzurePublishSettingsFile cmdlet. This file contains settings and an encoded certificate that provides management credentials for the Windows Azure account.
| Important: The publishsettings file contains the credentials (unencoded) that are used to administer your Windows Azure subscriptions and services. The security best practice for this file is to store it temporarily outside your source directories (for example in the Libraries\Documents folder), and then delete it after the settings have been imported. A malicious user gaining access to the publishsettings file can edit, create, and delete your Windows Azure services. |
Now, you have to consider two important facts:
- Those cmdlets need to be executed with administrative rights.
- Those cmdlets need to be executed in the context of the user account that will be used whenever a connection to Windows Azure is needed.
Therefore, log on into the server where you installed Windows Azure PowerShell with the credentials of the service account that will be used when connecting to the Windows Azure Subscription, open a Windows PowerShell session as an administrator and type the following cmdlet:
| 001 | Get-AzurePublishSettingsFile |
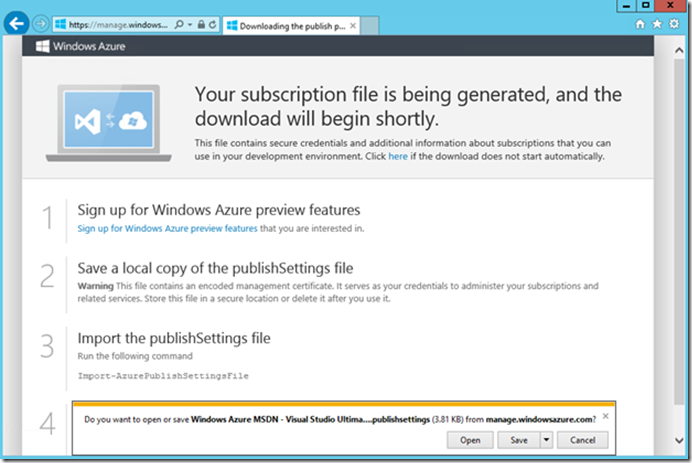
As described above, this cmdlet will launch a browser session, and after signing in into your Windows Azure subscription, it will ask you to save a .publisingsettings file in your computer:
Save the file in a secure location. If you go to Windows Azure – Settings – Management Certificates you will notice that there is a new certificate created for your subscription. Take note of the certificate thumbprint. Now return to Windows Azure PowerShell and execute the following cmdlet:
| 001 | Import-AzurePublishSettingsFile -PublishSettingsFile 'C:\Azure\YourFileName.publishsettings' |
This cmdlet will import a certificate into the Current User – Personal Store container called Windows Azure Tools. If you open the certificate you will notice that it has the same certificate thumbprint as the certificate that was created in Windows Azure. Also, this cmdlet will configure common settings for the Windows Azure subscription (including subscription ID, management certificate) in the user account profile. To check these settings, type the following cmdlet in PowerShell:
| 001 | Get-AzureSubscription |
You will notice the settings saved for your Windows Azure subscription. Please take note of the SubscriptionName value as we will use it in Step 4 when we create the SMA Runbook (in our case, it is called: Windows Azure MSDN - Visual Studio Ultimate).
Now we need to extract some data from that certificate as we will use it in the next step. Execute the following script using a PowerShell session with administrative rights (replacing the #### string with the certificate thumbprint that you obtained from Windows Azure):
| 001 002 003 004 005 006 007 | new-alias Out-Clipboard $env:SystemRoot\system32\clip.exe $Thumbprint = "###########################" $mycert = Get-Item Cert:\CurrentUser\My\$Thumbprint $certData = $mycert.GetRawCertData() $convert = [System.Convert] $certString = $convert::toBase64String($certData) $certString | Out-clipboard |
This script will get the data from your certificate and will copy it to the clipboard. We will use this data in Step 3. It would be a good idea to save the clipboard data in a notepad so that is not lost. Now delete the –publishsettings file and log into the WAP server (but this time with an account that has administrative rights on WAP/SMA).
Step 3 – Create a connection object in SMA to Windows Azure
Go to the Windows Azure Pack Admin Portal – Automation – Assets and click on Add Setting
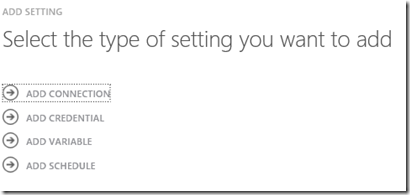
In the Select the type of setting you want to add, click on Add Connection
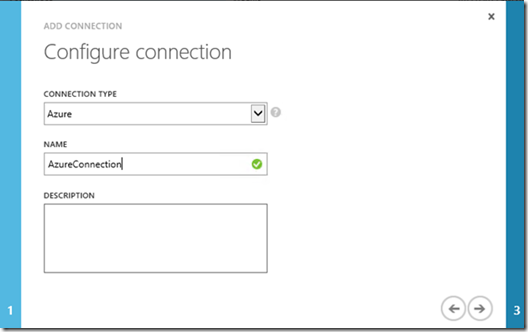
In Connection Type select Azure. In Name type AzureConnection. Click on the arrow to continue the wizard.
In the Configure connection properties, provide the following information:
- Password – Provide the password of the AD service account that we used in step 2
- Username – Provide the username of the AD service account that we used in step 2. The user should be provided as domain\username (for example: contoso\AzureSMASvc)
- Computername – Provide the name of the server where Windows Azure PowerShell was installed and where the Azure Subscription certificate was imported.
- CertificateStringBase64 – Here paste the certificate data that we generated in Step 2 of this blog as that should be in the clipboard (or in a notepad session as we suggested).
- SubscriptionID – Provide your Windows Azure Subscription ID (you can obtain this string from the same screen where you obtained the certificate thumbprint in Windows Azure).
Click on the arrow to complete the Add Connection Wizard.
Step 4 – Create your Runbook
Go to the Windows Azure Pack Admin Portal and click on the + icon to create a new object. Select Runbook – Quick Create and call it SMA-Get-AzureVMs and click on the check mark to create the Runbook.
In the Windows Azure Pack Admin Portal, go to Automation – Runbooks and click on the SMA-Get-AzureVMs runbook. Go to the Author tab, click on Draft and paste the following code:
| 001 002 003 004 005 006 007 008 009 010 011 012 013 014 015 016 017 018 019 020 021 022 023 | workflow SMA-Get-AzureVMs { # Get the Azure connection $con = Get-AutomationConnection -Name 'AzureConnection' # Convert the password to a SecureString to be used in a PSCredential object $securepassword = ConvertTo-SecureString -AsPlainText -String $con.Password -Force # Create a PS Credential Object $cred = New-Object -TypeName System.Management.Automation.PSCredential -ArgumentList $con.Username, $securepassword inlinescript { Import-Module "Azure" # Selects the Azure Subscription in PowerShell Select-AzureSubscription -SubscriptionName "Windows Azure MSDN - Visual Studio Ultimate" # Run Azure commands to get all VMs in the Azure Subscription Get-AzureVM } -PSComputerName $con.ComputerName -PSCredential $cred } |
Let us explain the code above ![]()
First, we obtain the data from the AzureConnection object we created so that we use the credentials required to execute the inlinescript section under the context of the AD service account that we used to configure the connection to Windows Azure.
| 001 002 003 | $con = Get-AutomationConnection -Name 'AzureConnection' $securepassword = ConvertTo-SecureString -AsPlainText -String $con.Password -Force $cred = New-Object -TypeName System.Management.Automation.PSCredential -ArgumentList $con.Username, $securepassword |
Then we move to the inlinescript section. Here you can see the following code:
| 001 002 003 004 005 006 007 008 009 010 011 | inlinescript { Import-Module "Azure" # Selects the Azure Subscription in PowerShell Select-AzureSubscription -SubscriptionName "Windows Azure MSDN - Visual Studio Ultimate" # Run Azure commands to get all VMs in the Azure Subscription Get-AzureVM } -PSComputerName $con.ComputerName -PSCredential $cred |
- The Import-Module “Azure” statement allows us to use the Windows Azure PowerShell cmdlets.
- The Select-AzureSubscription PowerShell cmdlet selects the desired Windows Azure subscription as the current subscription (remember that our subscription was created in the user account profile when we ran the Import-AzurePublishSettingsFile cmdlet in step 2?). In our sample, the subscription name is "Windows Azure MSDN - Visual Studio Ultimate" but you should change this string to reflect your subscription name.
- Get-AzureVM retrieves the list of Virtual Machines under the subscription specified, but basically, here you can do whatever you want (and are allowed to do) in your Azure Subscription. You can Start/Stop Virtual Machines, Create new ones, and so on. This is up to you

- The last line of code (-PSComputerName $con.ComputerName -PSCredential $cred) indicates in which computer the script will be executed and with which credentials. These are taken from the AzureConnection object we created before.
And that’s it! If you save & run the Runbook you will see in the output window the list of Virtual Machines running under your subscription!
As a bonus, take this sample Runbook that stops all Virtual Machines running under a specified Azure Subscription. Following the steps described in this section (Step 4) create a new SMA Runbook, name it SMA-Stop-AzureVMs and paste the following code:
| 001 002 003 004 005 006 007 008 009 010 011 012 013 014 015 016 017 018 019 020 021 022 023 | workflow SMA-Stop-AzureVMs { # Get the Azure connection $con = Get-AutomationConnection -Name 'AzureConnection' # Convert the password to a SecureString to be used in a PSCredential object $securepassword = ConvertTo-SecureString -AsPlainText -String $con.Password -Force # Create a PS Credential Object $cred = New-Object -TypeName System.Management.Automation.PSCredential -ArgumentList $con.Username, $securepassword inlinescript { Import-Module "Azure" # Selects the Azure Subscription in PowerShell Select-AzureSubscription -SubscriptionName "Windows Azure MSDN - Visual Studio Ultimate" # Run Azure commands to stop all running VMs in the Azure Subscription Get-AzureVM | Where-Object {$_.Status -eq "ReadyRole"} | ForEach-Object {Stop-AzureVM -ServiceName $_.ServiceName -Name $_.Name -StayProvisioned} } -PSComputerName $con.ComputerName -PSCredential $cred } |
Save & run the Runbook and it will stop all running VMs in the Azure subscription.
And if you need some ideas on operations that you could perform in Windows Azure with PowerShell, just take a look at this great blog post from Charles Joy: Automation–Automating Hybrid Clouds with Windows Azure and PowerShell (Part 3): Public Cloud Environment Provisioning PowerShell Workflow Examples.
Until next time,
Jim and Victor.
