VMRole Guide for the Service Template Admin
I recently took on a special project to create example gallery items for Windows Azure Pack. I was given a few goals to work with:
- Think about the example service templates our team has released, especially Exchange, Lync, and SharePoint, and use those as a starting point
- Improve uniformity across the different workload examples
- Share the resulting knowledge with the community
You will find the results published at https://aka.ms/bcbgicw. This post is to walk through how you could take any service template and use it as a basis of information to create a vmrole gallery item. I will explain the thought process, what you need to know about how they are built so you can get started on your own project, and finish with a walkthrough of how to create a new vmrole that is based on an existing service template.
Also, as I worked through each of the workloads I constantly went back and implemented new found best practices across the others to meet the uniformity bar. When I finished, I made a copy of one and stripped out everything specific to the workload and replace it with a generic “application”. I published this as an example kit so if anyone else would like to use it as a quick way to get started you can cheat a little rather than starting off your project with an empty authoring tool.
Virtual Machine Role Example Kit
https://blogs.technet.com/b/privatecloud/archive/2013/12/13/virtual-machine-role-example-kit.aspx
First, focus on the app
First and foremost, what you already know if you have been creating service templates is that the time you spend will be 90% focused on automating the app install to fine tune every detail and make it work the way you want. This is a healthy activity, frustrating as it may be. Great way to get to know apps that you otherwise might not think about. Ideally you would boil everything down to a the same basic elements.
- Hardware Requirements
- OS Requirements
- Pre-Installation Tasks
- Application Install
- Post-Installation Tasks
Note: You might argue performance, network, and security requirements should be in the list as well. I would say each of those should be inherent to every item in the list.
If you have this documented for your apps, you are staged to be successful. You still have the other 10%. Obviously you will spend time getting to know tools/platforms and tweaking how things run. The bulk of the work is the same though. You can deploy them via service templates, vmroles, you could incorporate PowerShell DSC, or you could launch them as manual command lines if necessary. You are future proof. That’s where to start.
Second, understand that behind the scenes a WAP vmrole is actually a service template. As a result, moving between them is pretty straight forward and knowledge of one compliments the other. When you deploy a vmrole a service template is created in to Virtual Machine Manager to facilitate. Technically even if you work with only a resource definition, it would still utilize a service template under the hood (but with no application configuration). It is not exposed in the UI and there is nothing to manage. That is how it functions though.
Overview
There is currently no tool that converts from service templates to vmroles (my job does not involve sugar coating anything). However, there is so much overlap that you can make a copy and paste conversion. This means opening the service template on one monitor and the VMRole Authoring Tool on the other, and bringing information over as you create the vmrole. The remainder of this post will be focused on how, technically, that process works if you are approaching the space as someone who previously created service templates.
Terminology
A Virtual Machine Role is simply a term to describe a template that can be added to Windows Azure Pack so tenants can select an icon and deploy a new workload using a wizard based interface. We basically use Virtual Machine Role and Virtual Machine Role Gallery Item interchangeably. Gallery Item refers to the VMRole appearing in WAP as an option for tenants.
A Virtual Machine Role consists of a Resource Definition and optionally a Resource Extension. These files are developed in JSON and combined with required metadata files in to a package file. The package file can be renamed to .zip and extracted to view the contents or perform edits, then compressed in to a new archive and renamed to become a .resextpkg file or .resdefpkg file. The manual process can be avoided by utilizing a free tool on CodePlex that provides a UI for authoring and editing virtual machine role packages.
VM Role Authoring Tool
https://vmroleauthor.codeplex.com/VM Role Authoring Tool How To Videos
https://www.youtube.com/playlist?list=PLjbVGPEELuaSuM-0eh9GO05zDFUudydJ1
The major components of a VMRole are:
- Resource Definition file (required)
- View Definition file (required)
- Resource Extension (optional)
Resource Extension Package
The resource extension gets imported in to Virtual Machine Manager. For service template authors, you can think about a ResExt as the application configuration. This is only surfaced in the service template generated at deploy time so you cannot make changes using the VMM Designer console. Most of your time spent editing the resource extension will be focused on configuring how scripts will be used to install applications or make other changes inside the VM after it comes online. Also known as Script Application and Provisioning Scripts.
Important points of clarity:
- Script Application in a VMRole is the same as a Script Application in a Service Template (also applies to IIS and SQL configurations)
- A Provisioning Script in a VMRole is akin to Application \ Application Profile scripts in a Service Template
You can view the properties of the resource extension in VMM using the following command.
| 001 | get-cloudresourceextension |
However the only way to make edits is outside of VMM, either directly using a text editor or via the Authoring Tool.
Custom Resources
In service templates there is a concept known as custom resources or what we refer to as “.CR’s”. This is the ability to encapsulate a set of folders and/or files in to your template so it is made available to the virtual machine while a script is running. Here are a couple of important things to know in that regard.
- The same concept exists in vmroles, it is called Application Payload and you will see it in the UI at the top of the configuration page for each script. The Authoring Tool is the easiest way to load these since it handles creation of the unique identifier and populating it throughout the JSON in the appropriate places.
- You don’t need to put a “.CR” on the folder name before you import it. If you do, you will end up with a folder in the library under the identifier for the gallery item with 2 “.CR” extensions. This reinforces that the ResExt generates a service template at import, complete with custom resources.
- This payload is copied in to the VM at deploy time, under the following folder.
C:\ProgramData\VirtualMachineManagerData\CacheResources\(id)\
Resource Definition Package
The resource definition package gets imported in to WAP. This concept of working with the WAP web interface is totally foreign territory for someone who is used to working on service templates but you can think about the ResDef file as a service tier in the VMM Designer, minus the application configuration. The package also contains a View Definition file that is very much focused on information that WAP will use to build the interface a tenant can see when they log in to the tenant portal and select New – Virtual Machine Role - From Gallery, and just as importantly how the parameters collected in that wizard are passed back to VMM behind the scenes to deploy the hidden service template described earlier. Finally you will find in the Resources folder the files that build your labels for each item per locale (more on this later).
The major components of a service template that you need to set in a ResDef are:
- Information going to sysprep such as domain/workgroup joins
- Data drives
- Special network requirements such as working with a load balancer
- Exposing parameters
If you think about it, this is all information fed back to VMM that could be variable and exposed to the tenant admin. The rest is really cosmetic. Making sure that everything has a localized label, description, and options like default value, text to display if the value is required, and a regex to evaluate if the value is acceptable. One thing to watch out for is making sure as you move from changes to the ResExt to changes in the ResDef, that you make sure you bind them together via the radio button in the Resource References section of the ResDef. This will update the Parameters node which should include everything you set as a parameter in the ResExt. You can think about the flow of configuring parameters starting with the ResExt, to checking the Parameters node in the ResDef, to opening View Definition and making sure every parameter is defined under a Category within Sections.
A Section represents a new page in the wizard interface and a Category represents a new block of settings on a page.
One important point. The first section by default will contain the properties that apply to the VM, including a Credentials parameter. This applies to the local administrator account that will be created inside the VM, just like you would set on the Operating System tab of the Service Template Designer UI in VMM. To set the Credential that will be used to join the domain or install applications, you need to 1) specify the parameter in Operating System node of the VMRole Authoring Tool and 2) add it to a new category outside of the default, whether it is in the same Section or not is up to you. This would be akin to using a Run As Account with VMM, and that’s why in the Example Kit I have named it that.
Networking and Storage
If you are coming from building Service Templates, you are accustomed to having to add drives and watching them BITS copy around and mapping out networks to templates or making them a parameter to choose at deploy time. Two things you need to understand as these translate over.
- Drives are always parent/child diff disks. Both OS and Data drives. This is intended to reduce deployment time and improve performance because shared bits from the parent VHD would be served up from cache in most scenarios and new VM’s simply create a new differencing disk and boot up. No file copy needs to occur unless it is not the first VM to require the disk. A new VM can boot almost immediately and start walking through Windows Setup.
- You can add multiple network adapters, but mapping them to a virtual network happens from as the tenant completes the wizard interface in WAP. This is because in a self-service IaaS environment, they are creating everything. They provision the virtual network for their subscription, or more than one, and they determine which VM’s connect to each.
Process
I just wanted to share a little bit about the process I used outside of the tool for organization and versioning. It helped me a lot to follow a routine as I went from build to build.
Develop your “working folders”
This sounds simplistic but I found it to help me tremendously. I actually created a new VHDX file and then created a series of subfolders within it. That was just to make sure my work was easily portable between environments. I store the authoring tool there and create a subfolder structure that I use each time.
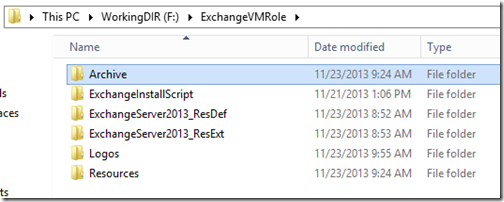
- Archive – Storing previous builds before introducing major change
- NameInstallScript – Everything I consider Application Payload
- Name_ResDef – Dedicated folder for the ResDef
- Name_ResExt – Dedicated folder for the ResExt
- Logos – The three logos I will use
- Resources – Basically anything else such as docs or notes I need to quickly reference
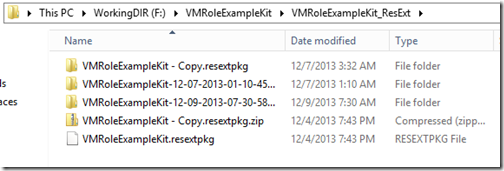
Here is an example as I employed it for the Exchange build.
This accomplished two things for me. There is no built in “versioning” for the authoring tool. This is just like service templates where you need to make a copy when forking development so as not to overwrite something with a breaking change. When I decided to make a significant change I would just create a new folder under Archive based on the version number and copy the ResDef/ResExt folders in to it.
The second advantage is easy clean-up of the ongoing work for ResDef/ResExt when using the authoring tool. It generates a unique folder per instance where everything is extracted during edit and then it manages creation of the package file during save. However it does not delete the unique folder for that session. These can build up over time so having them in an organized folder structure keeps it simple to know what can be deleted and when.
Importing and housekeeping
I found it best to version my changes in WAP/VMM and import them as I went forward rather than trying to overwrite an existing version even with a small change. Don’t be afraid that your build count is showing off trial and error. You can always go back to 0 at release (notice I released builds versioned 1.0.0.0 ![]() ).
).
For the ResDef’s I found it best to create a folder on the WAP server and copy them there. Then do an import in to WAP of the locally stored file. This prevented ever having collision “in use” problems where I forgot to close the tool before doing an import. Imports are very easy because it is all UI driven in the WAP admin portal. I typically kept the previous few builds in WAP but just changed them from public to private. I tried to only add/remove them from plans during time when I knew my peers were not also using our development lab since a series of jobs kick off in VMM to update ACL’s when new items are added or removed from plans and subscriptions already exist.
For the ResExt’s you make all changes in VMM using PowerShell. Happy to share the snippets I used. My routine was to keep alive ResExt’s in VMM based on what ResDef’s I still had in WAP.
Import
| 001 | Import-CloudResourceExtension -ResourceExtensionPath F:\ExchangeVMRole\ExchangeServer2013_ResExt\ExchangeServer2013CU2.resextpkg -Description "Exchange Server 2013 CU2" -SharePath (Get-SCLibraryShare | ? Name -eq "vmRoleLibrary") |
Housekeeping
To remove all versions with “Exchange” as the first word in the name.
| 001 | Get-CloudResourceExtension | ? Name -like "Exchange*" | Remove-CloudResourceExtension |
or with a little more manual effort you can pick out specific versions and remove them.
| 001 002 003 | Get-CloudResourceExtension | select name, version, id | ft -AutoSize # Copy the ID Remove-CloudResourceExtension -ID PasteID |
Sharing
Finally, if you ever decide to share your work with the community, I found it was pretty easy just to strip out anything that was officially licensed Application Payload (such as the Silverlight or UCMA download) and replace it with .txt files that explained what to put there and where I found it online. That way you aren’t breaking any EULA’s and it prevents the archive file from purging empty folders. It also reduces the file size of the package to something very small and portable.
Copy/Paste from ST to GI
Here is a complete walk-through using screenshots as I bring over configuration from a Service Template to a VMRole. To facilitate this project I am beginning with the VMRole Example Kit linked at the top of this page. This will speed things up because many of the common fields are already populated and scripts are already in place. As a workload, I will walk through converting the Active Directory Service Template published by my peer, Shawn Gibbs. Ironically, that is based on his Service Template Example Kit.
Yes, there is already a Domain Controller VMRole in the WebPI feed. This is just an example.
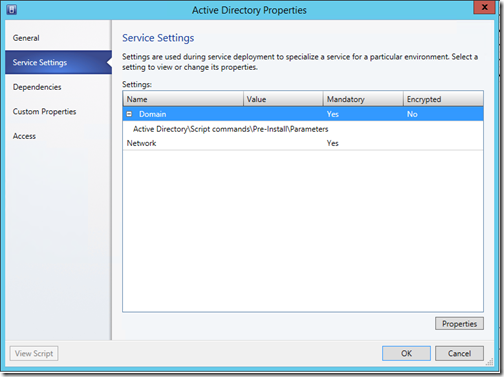
I would start by opening the properties of the service template and taking note of the Service Settings. Some or all of these will become VMRole parameters. Service Settings is a good place to see them all.
While this is good insight, I can tell you right now we will change those pretty significantly. We will not need “Network” and we will collect more information than just Domain name. Shawn was being nice and hoping to minimize how much typing we had to do when kicking off the ST. ![]()
To start with I am literally going to make a copy of the Example Kit and handle some folder renames.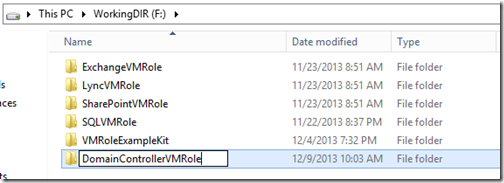
Open the Service Template in Designer and a copy of the Example Kit in the Authoring Tool. Dual monitors help out a lot…
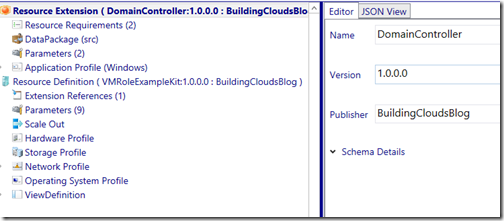
Now just like I described in the post for the Example Kit, I would start off going top to bottom through the console and getting all the cosmetics done. The 4 places to cover are the ResExt root, the ResDef root, the root of the Application Profile subtree, and the labels and descriptions under Resources – en-US.
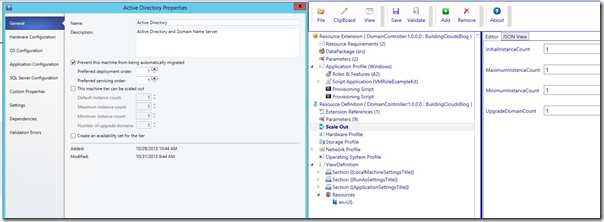
Working through the Designer UI for the service template and opening the properties of a computer tier, the first item we see is in regards to scaling. In the VMRole, we do not have the option to enable or disable scale, but we can set min to 1 and max to 1.
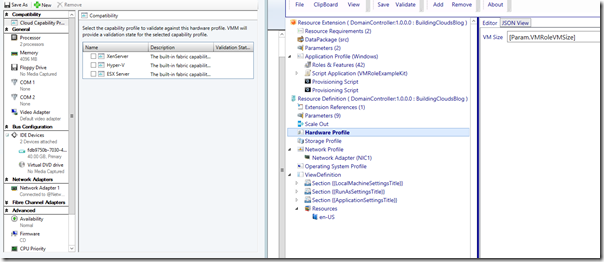
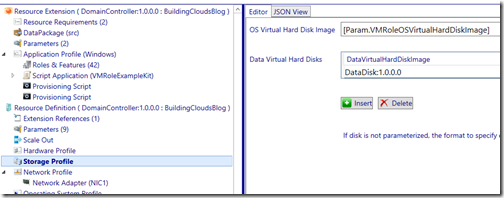
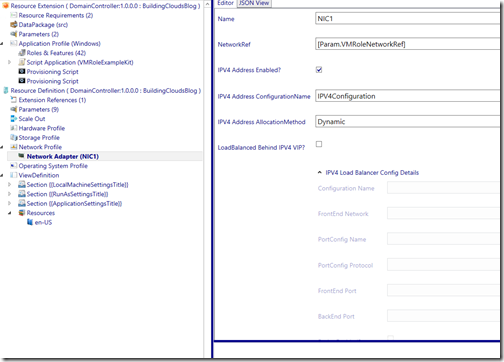
Looking at the Hardware Profile for the service template, the memory and processor are chosen as compute resources by the tenant admin so we don’t have to set those in the Authoring Tool. However, we do configure data disks by mapping family name and version, and we do set properties per network adapter. There is actually no change required across the hardware settings in the case of the vmrole I am creating here.
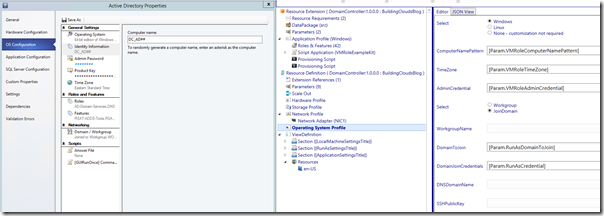
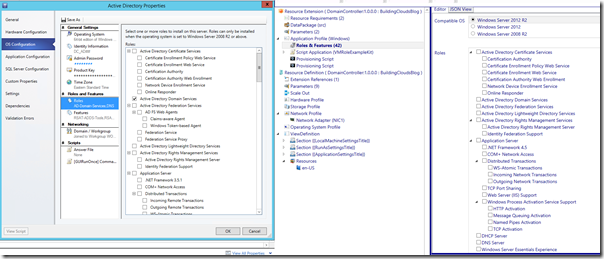
Looking at the Operating System tab of the service template, you will find this information is split between the ResDef and the ResExt.
ResDef – In this case you would switch from Domain to Workgroup and replace the parameter with a name like “Workgroup”. Of course, for any other template you probably do want it to join the domain.
ResExt – Compare the lists and make sure you have the roles and features selected based on the service template you are starting from.
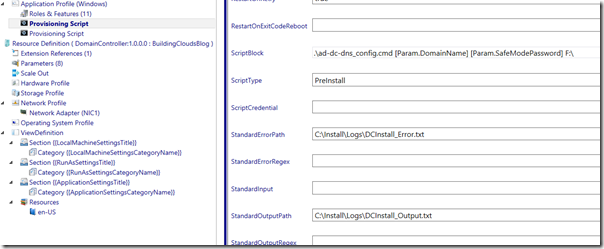
The application settings require the most change from the example. If you are using a data disk you could leave the first provisioning script in place and include it in your payload. In the case of the domain controller ST, the same snippet is included in a single PS script so I am consolidating.
I will have two total provisioning scripts. I am setting the AD script to run first, then I am adding a script to also install and configure an enterprise CA since that is required by the Lync VMRole we published.
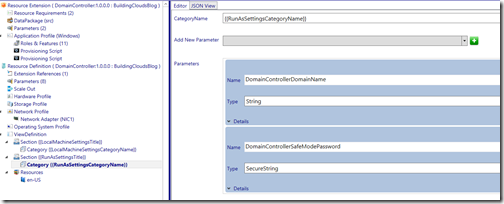
You can see that I am adding text for 2 parameters. This is just based on the installation script and will allow me to pass the domain name and safe mode password all the way back to the cmdlets inside the PowerShell script where we actually configure the domain. Also at the top of this page I set Always Reboot to True and suppress reboots in the script. This is important as any reboots that are not known and managed by the VMM agent will result in an error.
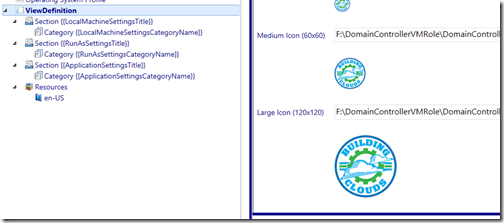
That is almost it! The only thing left is to clean up the View Definition in the ResDef. This isn’t anything you ever had to think about for a service template, which was convenient but at the expense of not having a nice GUI wizard for the tenant to fill out and provide parameter values in a friendly sort of way. To start with, set your icon files.
Next, if you read over how I setup the default view definition for the Example Kit, you know that we need to make a couple of changes here. The easiest path forward will be to simply remove the Application Settings section entirely and map the new parameters in to the Run As section.
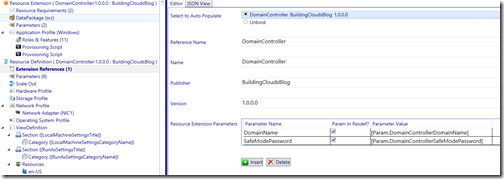
Let’s start by making sure the parameters are up to date. Click on Extension Reference and then click Unbind, then on the top radio button next to the name of your ST. This should populate the table with any changes you have made and ensure your params are the same across your ResExt and ResDef.
Use the drop-down and select each new param and click +. Set the types as well. Remember this page would normally be used to uniquely capture the domain join settings but in this case they are parameters to actually create the domain.
You can explore the options for each parameter by clicking on the Details arrow. Ensure that each parameter has a Label, Description, and optionally a message if the value is required and that each is checked to be localized.
Localized? The basic concept at work here is that for text presented in WAP, it is a variable that is set to a string in the ResDef. That way if someone opens it who requires a different language, you could have text in each language mapped to every label throughout WAP.
Localized values appear under Resources and then your language such as en-US. Parameters have at minimum a name and description. Replace the boilerplate text with your own.
By the way, should you decide you don’t like your parameter names (such as [param.badname]), don’t change them half-hazardly and simply rebind. You will literally remove your old parameter values and replace them, and the labels and descriptions will have to be typed in again.
Before you are done, consider for each parameter if you would like to have a default value or if it would make sense to have a regular expression that performs a check of the input to make sure it meets requirements. As an example, I could make sure the domain name matches <domain><dot><extension>.
Summary
Moving from service templates to vmroles is not a technically daunting task but it does take some time and a decent understanding of both tools. I look forward to reading your thoughts and learning additional best practices from you in the Building Clouds Forum.
Stay tuned to Building Clouds!


