VMRole Gallery Item – SharePoint Server 2013
This post is part of a series for the Building Clouds Blog Gallery Items for Collaboration Workloads. For more information see the following Table of Contents post - https://aka.ms/bcbgicw.
Overview
The SharePoint Server 2013 gallery resource enables a service provider or enterprise administrator to publish a gallery item for tenants to deploy SharePoint Server 2013 on Windows Server 2012.

Download the SharePoint Server 2013 CU2 Windows Azure Pack Virtual Machine Role Gallery Item

Notes
This item does not include Active Directory and the FarmServer installation method does not include SQL Server. You might consider the Domain Controller and SQL Server VMRoles published to the Service Models WebPI Feed, to also publish in your environment. For more information see the page below in reference to the Web Platform Installer. Note that the SingleServer installation method includes a local instance of SQL Express.
Downloading and Installing Windows Azure Pack Gallery Resource
https://social.technet.microsoft.com/wiki/contents/articles/20194.downloading-and-installing-windows-azure-pack-gallery-resource.aspx
This item has required post-installation tasks. For more details review the pages at the links below. This Gallery Item allows you to choose Single Server or Farm Server. Details for both are linked below.
Install SharePoint 2013 on a single server with a built-in database (see Run the SharePoint Products Configuration Wizard)
https://technet.microsoft.com/EN-US/library/cc263202.aspxInstall SharePoint 2013 across multiple servers for a three-tier farm (see Create and configure the farm)https://technet.microsoft.com/EN-US/library/ee805948.aspx
This VMRole Gallery Item is loosely based on work we completed regarding a Service Template for the same workload. For more information see the following post.
Application Management Example Deploying a Service to Your Private Cloud (Part 1)
https://blogs.technet.com/b/privatecloud/archive/2013/04/03/application-management-example-deploying-a-service-to-your-private-cloud-part-1.aspx
Guidance
In order to publish the gallery resources as a gallery item, you must:
- Import the resource extension package into System Center Virtual Machine Manager.
- Ensure the virtual hard disk for the operating system is properly prepared and has all the necessary properties set.
- Ensure the data disk is also properly prepared and has all the necessary properties set.
- Import the resource definition package as a gallery item.
- Make the gallery item public and add it to a plan.
System Center Virtual Machine Manager
In order to use a gallery resource, you must take the following actions in System Center Virtual Machine Manager.
Import Resource Extension Package
Using PowerShell, you must import the resource extension package into the virtual machine manager library.
Sample Windows PowerShell
| 001 002 003 | $libsharepath = <you must set the library sharepath from your environment> $resextpkg = “<pathtofile>\SharePointServer2013.resextpkg” Import-CloudResourceExtension –ResourceExtensionPath $resextpkg –SharePath $libsharepath –Description “SharePoint Server 2013” |
The import can only be done using PowerShell.
To verify the import, run the get-CloudResourceExtension PowerShell command and locate the newly imported extension.
| 001 | Get-CloudResourceExtension |
Prepare the virtual hard disk – Operating System template
A virtual hard disk containing a sysprepped version of one of the available editions of Windows Server 2012 must be added to a SCVMM library share.
Note that one of the Features that needs to be enabled for this image is .NET 3.5 For more information on adding .NET 3.5 to an offline VHD using the Roles and Features wizard in Windows Server 2012 R2, see the following Technet article.
Install or Uninstall Roles, Role Services, or Features
https://technet.microsoft.com/en-us/library/hh831809.aspx
Set Virtual Hard Disk Properties
You must provide a virtual hard disk from which the virtual machine role will be created. You may have a virtual hard disk used in other virtual machine creations that will work for this gallery resource.
Operating System
The virtual hard disk must be sysprepped and contain a valid Windows Server 2012 operating system.
Since this resource extension will only work with Windows Server 2012, use one of the following operating system values on your Windows Server 2012 virtual hard disks.
- 64-bit edition of Windows Server 2012 Datacenter
- 64-bit edition of Windows Server 2012 Standard
Sample PowerShell
| 001 002 003 | $myVHD = <you must set to the virtual hard disk in your environment> $WS2012Datacenter = Get-SCOperatingSystem | where { $_.name –eq “64-bit edition of Windows Server 2012 Datacenter” } Set-scvirtualharddisk –virtualharddisk $myVHD –OperatingSystem $WS2012Datacenter |
The Operating System value can be set using PowerShell or the Virtual Machine Manager Administrator Console.
FamilyName and Release
The FamilyName and Release properties of the virtual hard disk must be set in order for the Windows Azure Pack portal to display the virtual hard disk as an available disk for this gallery resource. The FamilyName and Release properties are shown in the portal drop-down list, so set them to values that will make sense to your user.
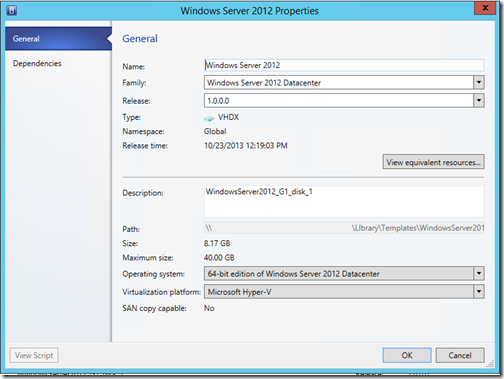
FamilyName property values should indicate the contents of the virtual hard disk, including the Windows Server release and edition. For this gallery resource, you should consider the following FamilyName values.
- Windows Server 2012 Datacenter
- Windows Server 2012 Standard
Release property values must conform to the Windows Azure versioning scheme of n.n.n.n
- 1.0.0.0
- 1.0.0.1
- etc
Sample PowerShell
| 001 002 003 | $myVHD = <you must get the virtual hard disk in your environment> Set-SCVirtualHardDisk –VirtualHardDisk $myVHD –FamilyName “Windows Server 2012 Standard” ” –Release “1.0.0.0” |
FamilyName and Release values can be set using PowerShell or the Virtual Machine Manager Administrator Console.
Tags
This gallery resource depends on a virtual hard disk with the following tags.
- WindowsServer2012
- R1
Sample PowerShell
| 001 002 | $myVHD = <you must set to the virtual hard disk in your environment> Set-SCVirtualHardDisk –virtualharddisk $myVHD –Tag “WindowsServer2012”,”R1” |
The tag property can only be set using PowerShell.
Prepare the virtual hard disk – Data Disk
A virtual hard disk containing the SharePoint Server 2013 installation files must be added to a SCVMM library share.
Set Virtual Hard Disk Properties
You must provide a virtual hard disk that will be attached to the virtual machine created by the virtual machine role.
Contents
Download the SharePoint Server 2013 installation media from the volume licensing website or MSDN. Copy the contents of the ISO in to a new folder in the data disk VHDX file. The subfolder name is required because the installations scripts call the specific path to setup.exe.
<driveletter>:\SharePoint\
There are a number of prerequisite installation files required for SharePoint Server 2013. To ensure the installation will be able to complete in an environment that is not Internet connected, I recommend downloading them and staging in the prerequisiteinstallerfiles folder. The subfolder name is required because the installations scripts call the specific path to installers.
<driveletter>:\SharePoint\PrerequisiteInstallerFiles
Rather than link to each of the files and ask you to do a lot of leg work, I would recommend you take a look at the download below. This will save you a LOT of time.
AutoSPInstaller - PowerShell script to pre-download prerequisites
https://autospinstaller.codeplex.com/releases/view/44442UPDATED 5/30/2014 based on feedback: If the VM does not have Internet access you may want to make sure you have the latest version of all prereqs. WCF is an example.
FamilyName and Release
The FamilyName and Release properties of the virtual hard disk must be set in order for the virtual hard disk to be discovered and connected to the gallery resource.

FamilyName property value must match the following value.
- SharePointDataDisk
Release property values must match the following value.
- 1.0.0.0
Sample PowerShell
| 001 002 003 | $myVHD = <you must get the virtual hard disk in your environment> Set-SCVirtualHardDisk –VirtualHardDisk $myVHD –FamilyName “SharePointDataDisk” ” –Release “1.0.0.0” |
FamilyName and Release values can be set using PowerShell or the Virtual Machine Manager Administrator Console.
Tags
No tags are required for the data disk.
Windows Azure Pack Service Administrator Portal
Once the resource extension and virtual hard disk are all correctly set in SCVMM, you can import the resource definition package using the Service Administrator Portal in the Windows Azure Pack.
Import Resource Definition Package
- Open the Service Admin Portal.
- Navigate to the VM Clouds workspace.
- Click the Gallery tab.
- Import.
- Select and import the SharePointServer2013.resdefpkg file in the unzipped location.
- Note that the gallery item now is listed on the Gallery tab.
Now that the packages for the Virtual Machine Role have been installed, you can publish the gallery item to make it available to tenants.
Publish gallery item and add to a plan
To make the Virtual Machine Role available to the tenant, you need to add it to a plan. In this procedure, you publish the Virtual Machine Role that you installed.
To publish the gallery item
- On the Gallery tab, select the version of the gallery item that you just imported.
- Click the arrow next to the gallery item name.
- Explore the details of the gallery item.
- Navigate back and click Make Public.
- Select the Plans workspace in the Service Admin Portal.
- Select the plan to which you want to add this gallery item.
- Select the Virtual Machine Clouds service.
- Scroll to the Gallery section.
- Click Add Gallery Items.
- Select the gallery items that you imported, and then click Save.
The Virtual Machine Role is now available to the tenant as part of the selected plan.
Deployment settings
When deploying this virtual machine role, the user must provide values for the following settings
- Name – Sets the name of the object that will appear in the WAP interface to represent the service.
- Local Administrator Credential – Type the password for the Administrator account that will be used inside the virtual machine for the local operating system.
- Domain Name – The FQDN of the existing Active Directory environment that the VM will join.
- Run As Credentials – The domain\account and password that will be used to join the domain and install SharePoint. This also means the account will be the Site Administrator in SharePoint.
Install Choice – Select from the drop-down menu and choose whether to load a stand-alone SharePoint instance with a local instance of SQL Express, or a farm server that will utilize a separate instance of SQL and can be scaled by deploying additional instances and separating the Web and App tiers.
Summary
When complete, log in as a test admin and construct the prerequisites in the environment including a network, domain controller including a DNS server, and add the DNS client settings to the network. Then deploy the SharePoint gallery item. Console connect to the resulting VM and perform post-installation tasks.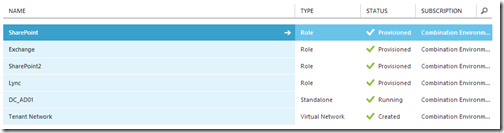
This gallery item may be combined with the other Building Clouds Blog Gallery Items and the Sample VMRole Packages to construct a collaboration environment.
Stay tuned to the Building Clouds Blog!