Automation–Automating Hybrid Clouds with Windows Azure and PowerShell (Part 4): Public Cloud Environment Deprovisioning PowerShell Examples
Hello once again!
Here we are at the end of this blog series: Part 4 of the Automating Hybrid Clouds with Windows Azure and PowerShell blog series - Public Cloud Environment Deprovisioning PowerShell Examples. I do think you will be surprised to see how easy it is to remove everything you added.
Before we move on to this content, here are the requisite references to the previous three parts of this blog series:
- Part 1: Intro & TOC
- Part 2: Public Cloud Environment Provisioning PowerShell Examples
- Part 3: Public Cloud Environment Provisioning PowerShell Workflow Examples
Okay, now for the good part, let’s see what it takes to remove everything you worked so hard to put up there in the first place.
Public Cloud Environment Deprovisioning PowerShell Examples
The following is a list of the high level concept commands that will be covered in this post:
High Level Concept Commands
- Remove Windows Azure VM
- Remove Windows Azure VM Image
- Remove Windows Azure VM Specific Disk (associated to Project)
- Remove Windows Azure Storage Account (and Storage Account Resources)
- Remove Windows Azure Storage Blob(s)
- Remove Windows Azure Storage Container(s)
- Remove Windows Azure Cloud Service
- Remove Windows Azure Affinity Group
- Remove Windows Azure Subscription
Pre-Requisites
We obviously need a few things before we get started:
- Windows Server
- Windows Azure PowerShell Module
Direct Download Link: https://go.microsoft.com/?linkid=9811175&clcid=0x409 - Something to Deprovision (like the Windows Azure Environment Resources set up in tests of the previous portions of this blog post)
- An Established Windows Azure Subscription Connection ( Please Reference Part 2 for details ).
Note This portion of the script will be included in the overall script at the end of the post, just not covered in full separately here at the top.
Pre-Requisite Setup
Once again, we have to ensure a connection to the Windows Azure Subscription has been established before we proceed.
It is entirely possible this is already Selected/Set on the system where have been executing the Windows Azure PowerShell commands.
If this is the case, simply execute the following command:
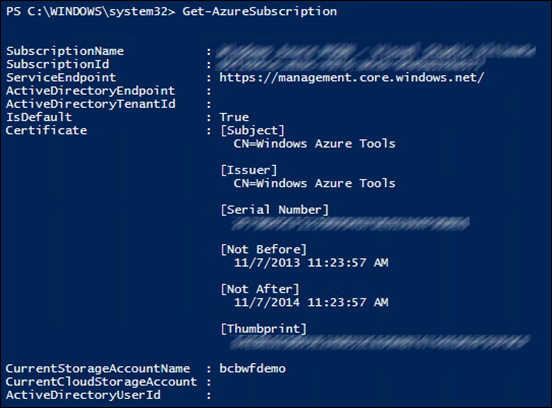
| 001 | Get-AzureSubscription |
Result Option 1: Data Returned for BOTH Subscription and CurrentStorageAccountName
If the Get-AzureSubscription command results in something like this, you are good to go:
Note The CurrentStorageAccountName field is important for these examples. If this is blank, you will have to complete more steps before proceeding (see below).
Result Option 2: No Data Returned
If the Get-AzureSubscription command results in a NULL value, you will have to complete the necessary steps for an Established Windows Azure Subscription Connection.
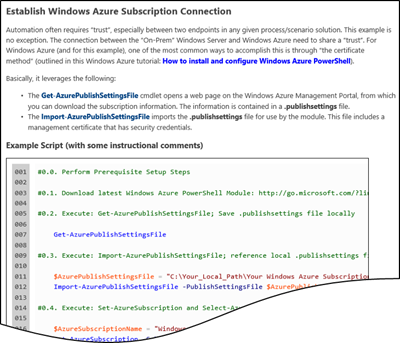
This region is covered 100% in Part 2 of this blog series.
For reference, here is the link:
Automating Hybrid Clouds with Windows Azure and PowerShell (Part 2): Public Cloud Environment Provisioning PowerShell Examples
Result Option 3: Data Returned for Subscription BUT not CurrentStorageAccountName
If the Get-AzureSubscription command results in NULL CurrentStorageAccountName field data, execute the following commands:
| 001 002 003 004 005 006 007 | $AzureSubscriptionName = "Windows Azure MSDN - Visual Studio Ultimate" $ProjectName = "BCBWFDemo" $ProjectNameLower = $ProjectName.ToLower() $AzureStorageAccountName = $ProjectNameLower Set-AzureSubscription -SubscriptionName $AzureSubscriptionName -CurrentStorageAccountName $AzureStorageAccountName Get-AzureSubscription |
Note The variables on lines 001 and 002 should be changed to fit your environment/deployment.
Begin Deprovision…
With the Connection to a Windows Azure Subscription Established, Deprovisioning of Windows Azure resources associated with that Subscription and Storage Account can be completed.
Because many of the commands in the Deprovision process are very simple, I have grouped them into sections that can easily be executed together. They can be executed individually if you like, this is just for the example.
Note Within the examples, I have repeated the required variable declarations to successfully execute each of the commands (per section).
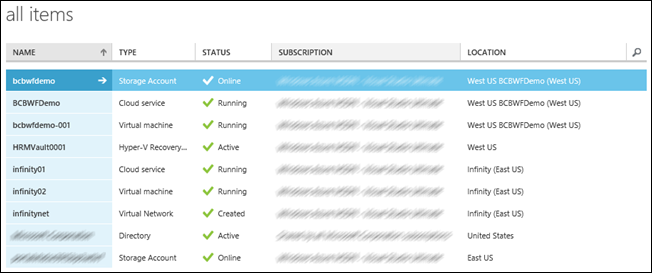
Final thing before we get to the commands - here is a screenshot of my…
Windows Azure Environment (all items) BEFORE Deprovision Commands
Note I will also show individual breakdown screenshots for each of the Deprovision sections below.
Oh, and because many of the resources have dependencies, be sure to execute them in the recommended order here.
Remove Windows Azure VM and Windows Azure VM Image
Virtual Machines BEFORE
Images BEFORE
Example PowerShell Script to Remove the Windows Azure VM and Image
| 001 002 003 004 005 006 007 008 009 | $ProjectName = "BCBWFDemo" $ProjectNameLower = $ProjectName.ToLower() $VMName = "{0}-001" -f $ProjectNameLower $ServiceName = $ProjectName $ImageName = $ProjectName #Remove Windows Azure VM and Image Remove-AzureVM -Name $VMName -ServiceName $ServiceName Remove-AzureVMImage -ImageName $ImageName |
Note As can be seen, all other variables are derived from the $ProjectName variable. This is consistent with the example Provisioning PowerShell (and Workflow) Examples. Feel free to leverage/update the variables as desired to fit your environment/deployment.
Execution Results
Virtual Machines AFTER
Images AFTER
Remove Windows Azure VM Specific Disk (associated to Project)
Disks BEFORE
Note The image above does not show that the “BCBWFDemo…” Disk is attached to a Virtual Machine. This is usually not the case directly after a Virtual Machine is removed. I just happened wait long enough before taking the screenshot and executing the next command. The following commands do take this “wait time” into account with a simple example of a “check for status” loop based on Disk Data.
Example PowerShell Script to Remove the associated Windows Azure VM Disk
| 001 002 003 004 005 006 007 008 009 010 011 012 013 014 015 | $ProjectName = "BCBWFDemo" #Remove Windows Azure VM Specific Disk do { "Disk Attachments being Removed..." (Get-AzureDisk | where {$_.DiskName -match $ProjectName}).AttachedTo Start-Sleep -Seconds 30 } until ((Get-AzureDisk | where {$_.DiskName -match $ProjectName}).AttachedTo.Length -eq 0) Start-Sleep -Seconds 15 if ((Get-AzureDisk | where {$_.DiskName -match $ProjectName}).AttachedTo.Length -eq 0) { $AzureDiskToRemove = Get-AzureDisk | where {$_.DiskName -match $ProjectName} $AzureDiskToRemove.AttachedTo $AzureDiskToRemove | Remove-AzureDisk } |
Note Obviously this is a simple example of what you can do to remove the associated Windows Azure VM Disk for the Project VM. There are many ways to program the wait time. This is one of them. You may also just want to wait until the disk is fully detached from other resources by watching it in the portal).
Execution Results
Disks AFTER
Remove Windows Azure Storage Account Resources
Storage BEFORE
Containers BEFORE
Blobs BEFORE
Note Removal of the Windows Azure Storage Account will perform a cascading removal of the Windows Azure Storage Containers and Windows Azure Storage Blob(s). I will break those examples out separately, but if you want to remove everything all at once, simply leverage the following command.
Example PowerShell Script to Remove the Windows Azure Storage Account Resources
| 001 002 003 004 005 006 | $ProjectName = "BCBWFDemo" $ProjectNameLower = $ProjectName.ToLower() $AzureStorageAccountName = $ProjectNameLower #Remove Windows Azure Storage Account Resources Remove-AzureStorageAccount -StorageAccountName $AzureStorageAccountName |
Note Depending on your starting point for this example, you may already have defined the $AzureStorageAccountName variable.
Execution Results
Storage AFTER
Note With the removal of the Windows Azure Storage Account went the associated Windows Azure Storage Containers and Windows Azure Storage Blobs. The following are the individual example commands for each of those if specified removal is desired.
Remove Windows Azure Storage Blob(s)
| 001 002 003 004 005 006 007 008 009 010 | $ProjectName = "BCBWFDemo" $ProjectNameLower = $ProjectName.ToLower() $ProjectCopiedBlobName = "{0}_copy.vhd" -f $ProjectName $ProjectContainerName = $ProjectNameLower $ProjectBlobName = "{0}.vhd" -f $ProjectName $GenericContainerName = "vhds" #Remove Windows Azure Storage Blobs Remove-AzureStorageBlob -Blob $ProjectCopiedBlobName -Container $ProjectContainerName Remove-AzureStorageBlob -Blob $ProjectBlobName -Container $GenericContainerName |
Remove Windows Azure Storage Container(s)
| 001 002 003 004 005 006 007 008 | $ProjectName = "BCBWFDemo" $ProjectNameLower = $ProjectName.ToLower() $ProjectContainerName = $ProjectNameLower $GenericContainerName = "vhds" #Remove Windows Azure Storage Containers Remove-AzureStorageContainer -Name $ProjectContainerName -Force Remove-AzureStorageContainer -Name $GenericContainerName -Force |
Remove Windows Azure Cloud Service and Windows Azure Affinity Group
Cloud Services BEFORE
Affinity Groups BEFORE
Example PowerShell Script to Remove the Windows Azure Cloud Service and Affinity Group
| 001 002 003 004 005 006 007 | $ProjectName = "BCBWFDemo" $ServiceName = $ProjectName $AffinityGroupName = $ProjectName #Remove Windows Azure Cloud Service and Affinity Group Remove-AzureService -ServiceName $ServiceName -Force Remove-AzureAffinityGroup -Name $AffinityGroupName |
Execution Results
Cloud Services AFTER
Affinity Groups AFTER
…End Deprovision
And just like that, all the project specific Windows Azure Environment resources have been removed.
Windows Azure Environment (all items) BEFORE Deprovision Commands
Putting it all together
Okay, once again, here is the portion of the blog post where I put all the above examples together in one copy/paste-able script. You will see, for the sake of simplicity (and line count), I did not add “If Checking” into these examples – feel free to add whatever wrapper logic you want, as desired. Okay, here it is (a destructive 92 lines of PowerShell):
| 001 002 003 004 005 006 007 008 009 010 011 012 013 014 015 016 017 018 019 020 021 022 023 024 025 026 027 028 029 030 031 032 033 034 035 036 037 038 039 040 041 042 043 044 045 046 047 048 049 050 051 052 053 054 055 056 057 058 059 060 061 062 063 064 065 066 067 068 069 070 071 072 073 074 075 076 077 078 079 080 081 082 083 084 085 086 087 088 089 090 091 092 | #region 0.DefineVariables $AzurePublishSettingsFile = "C:\Your_Local_Path\Your Windows Azure Subscription Name-MM-DD-YYYY-credentials.publishsettings" $AzureSubscriptionName = "Windows Azure MSDN - Visual Studio Ultimate" $ProjectName = "BCBWFDemo" $ProjectNameLower = $ProjectName.ToLower() $AzureStorageAccountName = $ProjectNameLower $VMName = "{0}-001" -f $ProjectNameLower $ServiceName = $ProjectName $AffinityGroupName = $ProjectName $ImageName = $ProjectName $ProjectCopiedBlobName = "{0}_copy.vhd" -f $ProjectName $ProjectContainerName = $ProjectNameLower $ProjectBlobName = "{0}.vhd" -f $ProjectName $GenericContainerName = "vhds" #endregion 0.DefineVariables #region 1.PrerequisiteSetup #1.0. Perform Prerequisite Setup Steps #1.1. Download latest Windows Azure PowerShell Module: https://go.microsoft.com/?linkid=9811175&clcid=0x409 #1.2. Execute: Get-AzurePublishSettingsFile; Save .publishsettings file locally Get-AzurePublishSettingsFile #1.3. Execute: Import-AzurePublishSettingsFile; reference local .publishsettings file Import-AzurePublishSettingsFile -PublishSettingsFile $AzurePublishSettingsFile #1.4. Execute: Set-AzureSubscription with -CurrentStorageAccountName Set-AzureSubscription -SubscriptionName $AzureSubscriptionName -CurrentStorageAccountName $AzureStorageAccountName Get-AzureSubscription #endregion 1.PrerequisiteSetup #region 2.RemoveVMandImage #Remove Windows Azure VM and Image Remove-AzureVM -Name $VMName -ServiceName $ServiceName Remove-AzureVMImage -ImageName $ImageName #endregion 2.RemoveVMandImage #region 3.RemoveVMDisk #Remove Windows Azure VM Specific Disk do { "Disk Attachments being Removed..." (Get-AzureDisk | where {$_.DiskName -match $ProjectName}).AttachedTo Start-Sleep -Seconds 30 } until ((Get-AzureDisk | where {$_.DiskName -match $ProjectName}).AttachedTo.Length -eq 0) Start-Sleep -Seconds 15 if ((Get-AzureDisk | where {$_.DiskName -match $ProjectName}).AttachedTo.Length -eq 0) { $AzureDiskToRemove = Get-AzureDisk | where {$_.DiskName -match $ProjectName} $AzureDiskToRemove.AttachedTo $AzureDiskToRemove | Remove-AzureDisk } #endregion 3.RemoveVMDisk #region 4.RemoveStorageResources #Remove Windows Azure Storage Account Resources Remove-AzureStorageAccount -StorageAccountName $AzureStorageAccountName <# #The lower level Storage Resources (Blobs and Containers) are Removed by the Remove-AzureStorageAccount Command above #For Reference, here are examples of the commands to remove these lower level Storage Resources: #Remove Windows Azure Storage Blobs Remove-AzureStorageBlob -Blob $ProjectCopiedBlobName -Container $ProjectContainerName Remove-AzureStorageBlob -Blob $ProjectBlobName -Container $GenericContainerName #Remove Windows Azure Storage Containers Remove-AzureStorageContainer -Name $ProjectContainerName -Force Remove-AzureStorageContainer -Name $GenericContainerName -Force #> #endregion 4.RemoveStorageResources #region 5.RemoveCloudServiceandAffinityGroup #Remove Windows Azure Cloud Service and Affinity Group Remove-AzureService -ServiceName $ServiceName -Force Remove-AzureAffinityGroup -Name $AffinityGroupName #endregion 5.RemoveCloudServiceandAffinityGroup |
Note Since it worked out so nicely last time, I broke the “all together” script into collapsible regions.
Important “Automation” of these Deprovision tasks is very destructive and should be done with care. In fact, I would recommend only executing these script examples one region at at time (if not more granular) to ensure no accidental removal of resources occurs.
Remove Windows Azure Subscription
In the spirit of “Removal”, here is a little script I use when I want to clear out the Selected/Set Windows Azure Subscription from the machine performing all the Windows Azure PowerShell commands:
| 001 002 003 004 005 006 007 008 009 010 | #Remove Windows Azure Subscription (if selected/set) $AzureSubscriptionName = Get-AzureSubscription if ($AzureSubscriptionName) { Remove-AzureSubscription -SubscriptionName $AzureSubscriptionName.SubscriptionName -Force } #Verify Windows Azure Subscription Removal Get-AzureSubscription |
Note I intentionally did not included this example script in the above “all together” section. I am not actually sure how often it will be used, but I wanted to provide it just in case.
Execution Results
What’s next?
Well, that is it for this Blog Series on Hybrid Cloud Automation with Windows Azure and PowerShell.
All that is left to do, is start exploring and developing use cases to leverage the example scripts within Parts 2, 3 and 4!
Automating Hybrid Clouds with Windows Azure and PowerShell - Blog Series - Table of Contents
I broke this “Automating Windows Azure” topic up into four posts – primarily to make it easier to reference externally (based on varied interest levels).
- Automation–Automating Hybrid Clouds with Windows Azure and PowerShell (Part 1): Introduction and Table of Contents
- Automation–Automating Hybrid Clouds with Windows Azure and PowerShell (Part 2): Public Cloud Environment Provisioning PowerShell Examples
- Automation–Automating Hybrid Clouds with Windows Azure and PowerShell (Part 3): Public Cloud Environment Provisioning PowerShell Workflow Examples
- Automation–Automating Hybrid Clouds with Windows Azure and PowerShell (Part 4): Public Cloud Environment Deprovisioning PowerShell Examples
As promised, the following is the link to the TechNet Contribution and Download for the examples (from all parts of the blog series).
TechNet Contribution and Download
The download (Hybrid Cloud Automation Toolkit - Windows Azure and PowerShell.zip) includes the following (4) files:
- Provision-WindowsAzureEnvironmentResources.ps1
- Provision-WindowsAzureEnvironmentResources-Workflow.ps1
- Deprovision-WindowsAzureEnvironmentResources.ps1
- Provision-Deprovision-Extras.ps1
Thanks for checking out this blog series! For more information, tips/tricks, and example solutions for Automation within System Center, Windows Azure Pack, Windows Azure, etc., be sure to check out the other blog posts from Building Clouds in the Automation Track!
enJOY!


