Automation–PowerShell Workflow Script Spotlight–Creation and Parameterization of Virtual Machine Manager Run As Accounts for “OnBehalfOf” Service Template Deployment
Hello Readers/Viewers!
I know it is a bit back-to-back with these examples, but I wanted to continue to share my learnings with you, as I continue down the “Tenant Provisioning POC” path with my team. Today it is all about dynamically creating Virtual Machine Manager Run As accounts for use as parameters during Service Template deployment.
Note This post will be best understood if you check out my most recent previous post:
Use Case Scenario
Here is the high level breakdown of the scenario in this blog post (all steps are performed with PowerShell against Virtual Machine Manager):
- Dynamically Create a VMM Run As Account
- Grant a VMM Tenant Administrator User Role Permissions to that VMM Run As Account
- Build Out a Settings Hash Table to include that Granted VMM Run As Account
- Leveraging that Settings Hash Table, Set the VMM Service Template Global Setting Parameters “OnBehalfOf” that User Role
Note While other parameters can (and do) exist in this example, only the extended portions to the previously blogged script will be highlighted for the Run As Account parameter below.
Again, before we dive in, let’s take a quick look at some of these concepts…
VMM Run As Accounts
Run As Accounts are pretty common, whether they are created and leveraged within VMM or not.
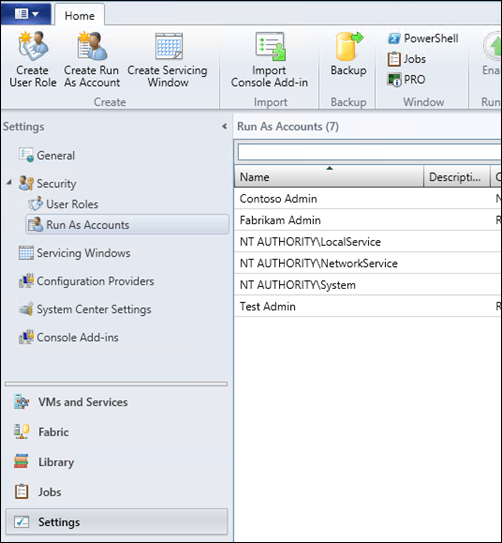
Within VMM, they can be found and configured within Settings – Security – Run As Accounts:
You can create them manually, or leverage PowerShell (as seen in the example below).
For more information about VMM Run As Accounts, please refer to the following: Configuring Run As Accounts in VMM
What? A Service Template can take a Run As Account as a Parameter?
Yes.
Here are two common examples:
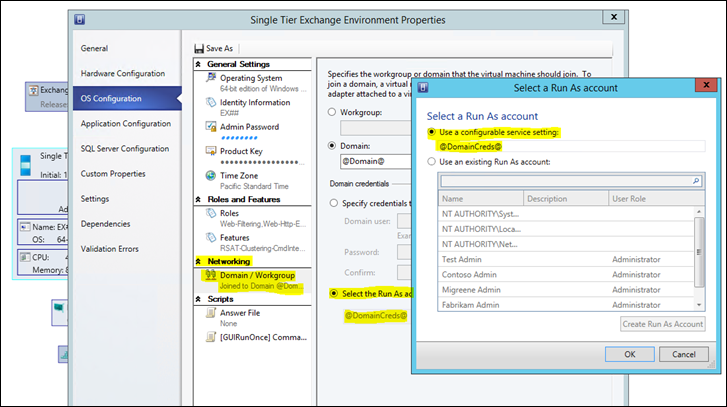
The following image illustrates the usage of a Run As Account as a Parameter in the OS Configuration – Networking Configuration:
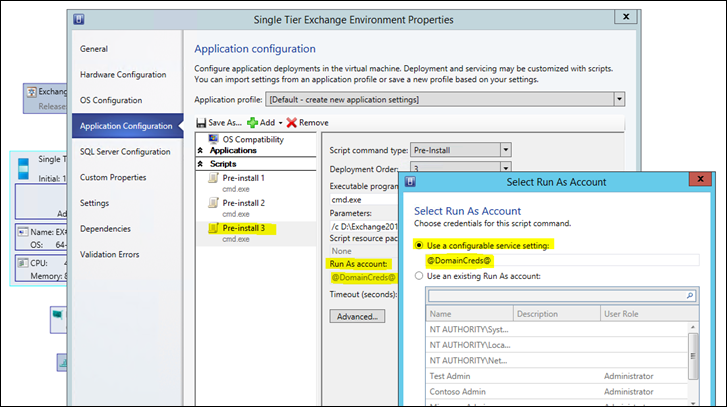
The following image illustrates the usage of a Run As Account as a Parameter in the Application Configuration – Scripts Configuration:
But…Why would I want to leverage VMM Run As Accounts in VMM Service Templates?
While the following blog post, SC VMM 2012 Service Settings, outlines service setting usage in great detail, it boils down to two main reasons:
- Reusability
- Deployment time configurability
This particular service setting is further explained by the simple definition of VMM Run As Accounts: A Run As account is a container for a set of stored credentials.
So, for our example here, it is best to look at VMM Run As Accounts for Service Templates as a reusable container for stored credentials which allow for dynamic deploy time configurability.
Okay, now that we have those two things down, let’s get right to the scripts!
Create a VMM Run As Account
The following PowerShell workflow script (Create-SCRunAsAccount) will create a VMM Run As Account with the following settings:
- Run As Account Name: <Run As Account Name generated by Domain defined with parameter>
- User Name: <defined in script: "$Domain\Administrator">
- Password: <defined in script as an example: "My5ecr3t">
Example PowerShell workflow script for Create-SCRunAsAccount
| 001 002 003 004 005 006 007 008 009 010 011 012 013 014 015 016 017 018 019 020 021 022 023 | workflow Create-SCRunAsAccount { param ( [string]$VmmServerName, [string]$Domain ) $VmmServerConn = Get-SCVMMServer -ComputerName $VmmServerName $RunAsAccountName = "$Domain Admin" $runAsAccount = Get-SCRunAsAccount -Name $RunAsAccountName if(!$runAsAccount) { $Password = "My5ecr3t" $securePassword = ConvertTo-SecureString $Password -AsPlainText -Force $Username = "$Domain\Administrator" $credential = New-Object -TypeName System.Management.Automation.PSCredential -argumentlist $Username,$securePassword $runAsAccount = New-SCRunAsAccount -Credential $credential -Name $RunAsAccountName -NoValidation } Return $runAsAccount } |
Note Hardcoding of a plain text password is not best practice. Its usage here is strictly for example purposes. If this PowerShell is leveraged within SC Orchestrator or SMA, it could be easily obscured.
Calling the Create-SCRunAsAccount PowerShell workflow
You can call the Create-SCRunAsAccount workflow like this:
| 001 002 003 | $VmmServerName = "MY_VMM_SERVER" $Domain = "Contoso" Create-SCRunAsAccount -VmmServerName $VmmServerName -Domain $Domain |
Results of calling the Create-SCRunAsAccount PowerShell workflow
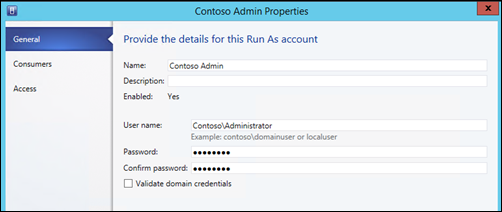
A VMM Run As Account is created with a name matching the pattern “<Domain Name> Administrator” with the configured Username and Password.
In the example below (as Domain Name = Contoso):
- Name = “Contoso Administrator”
- User name = “Contoso\Administrator”
Like all examples, there are lots of options here, choose the one that makes sense for your deployment.
Grant a VMM User Role Permissions to a VMM Run As Account
Granting permissions should be leveraged sometime after the VMM Run As Account has been created, and after a the intended VMM User Role (Tenant Administrator in this example) has been established.
It most likely will be part of the script that calls the Create-SCRunAsAccount PowerShell workflow (above).
The following PowerShell snippet extends the above “Calling the Create-SCRunAsAccount PowerShell workflow” example as well as leverages the previously blogged Create-TenantAdminUserRole PowerShell workflow example:
| 001 002 003 004 005 006 007 008 009 010 | $VmmServerName = "MY_VMM_SERVER" $User = "tenant01@contoso.com" $CloudName = "My Tenant Cloud" $Domain = "Contoso" $UserRole = Create-TenantAdminUserRole -VmmServerName $VMMServer -User $User -CloudName $CloudName $RunAsAccount = Create-SCRunAsAccount -Domain $Organization $RunAsGrant = Grant-SCResource -Resource (Get-SCRunAsAccount -Name $RunAsAccount.Name) -UserRoleName $UserRole.Name |
Build Out a Settings Hash Table to include the Granted VMM Run As Account
The following extends the previously blogged Build-ServiceSettings PowerShell workflow example, leveraging the examples illustrated above. For ease of use, the entire extended version of the Build-ServiceSettings PowerShell workflow example has been included here, with the updates highlighted.
| 001 002 003 004 005 006 007 008 009 010 011 012 013 014 015 016 017 018 019 020 021 022 023 024 025 026 027 028 029 030 031 032 033 034 035 036 037 038 039 040 041 042 043 044 045 046 047 048 049 050 051 052 053 054 | workflow Build-ServiceSettings { param ( [string]$OwnerUserRoleName, [string]$VmmServerName, [string]$ServiceTemplate ) $User = $OwnerUserRoleName.Split("_")[0] $SCVMMServer = Get-SCVMMServer -ComputerName $VmmServerName #Domain Build Out $Domain = $User.Split("@")[1] #Network Build Out $Network = (Get-SCVMNetwork | Where {$_.UserRole.Name -eq $OwnerUserRoleName}).ID.Guid #Organization Build Out $lowerOrg = $Domain.Split(".")[0] $Organization = $lowerOrg.Substring(0,1).ToUpper() + $lowerOrg.Substring(1) #Run As Account Build Out and Grant $RunAsAccount = Create-SCRunAsAccount -Domain $Organization $RunAsGrant = Grant-SCResource -Resource (Get-SCRunAsAccount -Name $RunAsAccount.Name) -UserRoleName $OwnerUserRoleName $DomainCreds = $RunAsAccount.ID.Guid #Active Directory and SharePoint Service Template Parameters if($ServiceTemplate -eq "Active Directory" -or $ServiceTemplate -eq "SharePoint"){ $globalSettings = @{ Domain = $Domain Network = $Network } } #Exchange Service Template Parameters if($ServiceTemplate -eq "Exchange Server 2013 Single Server"){ $globalSettings = @{ Domain = $Domain Organization = $Organization Network = $Network DomainCreds = $DomainCreds } } #Lync Service Template Parameters if($ServiceTemplate -eq "Lync Service Template"){ $globalSettings = @{ Network = $Network } } Return $globalSettings } |
Note The highlighted portions above reflect the major updates to the previously blogged Build-ServiceSettings. For more information about this specific PowerShell workflow example, please refer to the previous blog post .
Set the VMM Service Template Global Setting Parameters “OnBehalfOf” the VMM User Role
More specifically for this example: Set the VMM Service Template Global Setting Parameters (leveraging the new Build-ServiceSettings PowerShell workflow) “OnBehalfOf” the User Role (Tenant Administrator) .
Because we extended the functionality a layer down (in the Build-ServiceSettings PowerShell workflow example), no changes are necessary to the Deploy-VMMService PowerShell workflow. This is due to the fact that Deploy-VMMService leverages a foreach statement to traverse the hash table created in Build-ServiceSettings – Setting Global Setting Parameters is then completely dynamic at this level. For ease of use, the Deploy-VMMService PowerShell workflow example has been included here.
| 001 002 003 004 005 006 007 008 009 010 011 012 013 014 015 016 017 018 019 020 021 022 023 024 025 026 027 028 029 030 031 032 033 034 035 036 037 038 039 040 041 042 043 044 045 | workflow Deploy-VMMService { param ( [string]$VmmServerName, [string]$OwnerUserRoleName, [string]$CloudName, [string]$ServiceTemplateName, [string]$ServiceTemplateRelease ) $globalSettingsHash = Build-ServiceSettings -UserRole $OwnerUserRoleName -VmmServerName $VmmServerName -ServiceTemplate $ServiceTemplateName inlinescript { $UserRole = $Using:OwnerUserRoleName $User = $UserRole.Split("_")[0] $ServiceConfigName = "$Using:ServiceTemplateName ($User)" $globalSettings = $Using:globalSettingsHash Get-SCVMMServer -ComputerName $Using:VmmServerName -ForOnBehalfOf | Out-Null $OwnerUserRoleObj = Get-SCUserRole | Where {$_.Name -eq $UserRole} $OriginalServiceTemplateName = $Using:ServiceTemplateName $OriginalServiceTemplateRelease = $Using:ServiceTemplateRelease $ServiceTemplateToCopy = Get-SCServiceTemplate -Name $OriginalServiceTemplateName | where {$_.Release -eq $OriginalServiceTemplateRelease} $ServiceTemplate = New-SCServiceTemplate -Name $OriginalServiceTemplateName -Release $UserRole -ServiceTemplate $ServiceTemplateToCopy Grant-SCResource -Resource $ServiceTemplate -UserRoleID $OwnerUserRoleObj.ID foreach ($key in $($globalSettings.Keys)){ $globalSetting = Get-SCServiceSetting -ServiceTemplate $ServiceTemplate -Name $key Set-SCServiceSetting -ServiceSetting $globalSetting -Value $globalSettings[$key] ` -OnBehalfOfUser $User -OnBehalfOfUserRole $OwnerUserRoleObj } $Cloud = Get-SCCloud -Name $Using:CloudName $InitialServiceConfig = New-SCServiceConfiguration -ServiceTemplate $ServiceTemplate -Name $ServiceConfigName -Cloud $Cloud ` -OnBehalfOfUser $User -OnBehalfOfUserRole $OwnerUserRoleObj New-SCService -ServiceConfiguration $InitialServiceConfig -RunAsynchronously ` -OnBehalfOfUser $User -OnBehalfOfUserRole $OwnerUserRoleObj } } |
Note The Deploy-VMMService script above is the same exact script previously blogged. For more information about this specific PowerShell workflow example, please refer to the previous blog post .
Calling the Deploy-VMMService PowerShell workflow
The same exact script example from the previous blog post can be used to call Deploy-VMMService. Again, for ease of use, here is an example (this time for the Exchange Service Template):
| 001 002 003 004 005 006 007 008 009 | $User = "tenant01@contoso.com" $CloudName = "My Tenant Cloud" $LogicalNetworkName = "Contoso Logical Network" $ServiceTemplateName = "Exchange Server 2013 Single Server" $ServiceTemplateRelease = "1.0.0.0" $UserRole = Create-TenantAdminUserRole -VmmServerName $VMMServer -User $User -CloudName $CloudName Create-VMNetwork -VmmServerName $VMMServer -OwnerUserRoleName $UserRole.Name -CloudName $CloudName -LogicalNetworkName $LogicalNetworkName Deploy-VMMService -VmmServerName $VMMServer -OwnerUserRoleName $UserRole.Name -CloudName $CloudName -ServiceTemplateName $ServiceTemplateName -ServiceTemplateRelease $ServiceTemplateRelease |
Note The $ServiceTemplateName and $ServiceTemplateRelease values would vary based on your Service Template details.
All results and further detailed explanation is the same as the previous blog post, see that post for more information.
That’s it - thanks for checking it out!
And for more information, tips/tricks, and example solutions for PowerShell + System Center 2012 R2, be sure to watch for future blog posts in the Automation Track!
enJOY!


