SQL Server Self-Service Kit – Installation Instructions for the SMA Edition
This post covers installation information for the SQL Server Self-Service Kit (SQLSSK) v2.0, a.ka. SMA Edition. The main blog post about that release is here and this is where I would recommend starting reading, before getting into the details from this post, which cover:
- Updated Installation Instructions for this release
- Instructions to enable deployments of new clusters for SQL Server components – This adds two optional deployment types in the SQLSSK
Updated installation instructions
Note : This section goes through the full installation instructions for the SQL Server Self-Service Kit v2.0. If you have already installed and configured the SQKSSK v1.0 (prerequisites, scripts, VMM), you will likely only need to go through step 5 for SMA, after downloading the SMA Runbooks, and you might also be interested in the section about new cluster scenarios (The VMM service template, VMM Custom resource and Deployment scripts are unchanged from v1.0).
1. Check prerequisites
- SQL Server 2012 installation files. They should be available on a network share. The path you will configure later in the SMA variables should be the root folder containing SETUP.EXE. This has been specifically tested with SQL Server 2012 SP1, but the method used to install SQL Server 2012 should work at other patch levels.
- Windows Server 2012 sysprepped image in the VMM library – which you will be able to map to the virtual hard drive in the VMM service template. This image should have the .NET Framework 3.5 already installed. If not, you could also edit the VMM Service Template to add the .NET Framework as part of the installation process.
- If you want to leverage the “SQL Server-enabled environment” deployment scenario, you should make sure you download and configure the Service Template Example Kit (STEK) from my colleague Shawn Gibbs.
2. Download the ZIP File

The package contains two files and four folders

3. Deployment scripts
- Copy the “SQLProvisioning” folder to a share on the network, that can be accessed via the machines acting as the “shared” SQL Server Fabric (standalone servers and/or cluster nodes)
- Update the INI files to suit your account needs (in boldare the only mandatory updates)
- FIRST.INI and REST.INI are used to deploy SQL Server on cluster nodes. In these files, you should look at these properties to ensure they match your needs : AGTSVCACCOUNT, SQLSVCACCOUNT, FTSVCACCOUNT as the accounts used to configure clustered instances ; SQLSYSADMINACCOUNTS as the group which will be assigned SYSADMIN rights on any deployed instance ; INSTALLSHAREDDIR and INSTALLSHAREDWOWDIR if you usually install SQL Server in a different directory. The PID parameter can be set to specify a non-evaluation version. You should not need to touch the instance or disk data as they are passed automatically when running setup, based on the user request
- STANDALONE.INI : you should update these properties as needed : AGTSVCACCOUNT, SQLSVCACCOUNT, FTSVCACCOUNT as the accounts used to configure standalone instances ; SQLSYSADMINACCOUNTS as the group which will be assigned SYSADMIN rights on any deployed instance ; INSTALLSHAREDDIR and INSTALLSHAREDWOWDIR if you usually install SQL Server in a different directory. The PID parameter can be set to specify a non-evaluation version. You should not need to touch the instance data as they are passed automatically when running setup, based on the user request
Note : The SQL Server INI files provided in this sample solution are still very generic. You will probably want to optimize performance and implement best practices like separating data files and logs, etc. This hasn’t been done in these files, because the actual best option depends on how you will ultimately lay out the virtual hardware for best performance, and also because the first goal was to showcase the automation of deployment.
Note : Full reference on the SQL Server unattended files can be found here : https://msdn.microsoft.com/en-us/library/ms144259.aspx
4. Virtual Machine Manager (VMM) configuration
- Copy the “SQL” folder and subfolder (only one subfolder in this version) in your Virtual Machine Manager (VMM) Library, and refresh the library or make sure the library has already refreshed before importing the VMM Service Templates in the next steps
- Update the files: In “INSTALL.CMD”, you will need to update the path where the SQL Server installation files are located. The “CONFIGURATIONFILE.INI” could be a copy of the “STANDALONE.INI” file from the scripts folder.
- Import the VMM Service Template file “SQL Server Farm.new.xml” and map the appropriate resources in the wizard, including the RunAs account (need to be a local administrator on the deployed VMs to install SQL Server), your Windows Server 2012 image, and the custom resource “SQLStandalone.cr” you added to the library in step 3 as part of the “SQL” folder)
- You will also need to update the VMM Service Template with your network information, the domain name, and the account used to join the domain. Note : If you can change the naming pattern for the VMs, make sure you also update the SMA variable named “SQLSSK-Placement-DedicatedNoHAInstance-VMPrefix” as well.
5. Service Management Automation (SMA) configuration
- You will need to enable the SMA Runbook Servers to act as CredSSP client, per this article : https://blogs.technet.com/b/heyscriptingguy/archive/2012/11/14/enable-powershell-quot-second-hop-quot-functionality-with-credssp.aspx
- Import the Runbooks using the Jim Britt’s excellent SMART for Runbook Import and Export tool.
- Update the SMA assets through the SMA administration interface – The description mentions the purpose of the variable, and if updating them is optional or not


Instructions to enable deployments of new clusters for SQL Server components
When deploying a new cluster, the SMA Runbooks leverage a VMM service template to deploy the base Windows cluster, and then they use SQL unattended installs to deploy a clustered SQL Server instance. This is achieved like this to be consistent with the way the solution also deploys a named instance on an existing shared cluster (*).
While the scripts include calling a VMM cluster template deployment, the template for the base Windows Server cluster itself is not provided as part of the SQLSSK package, and the process to create your own is well documented in this post by Kurt Scherer. To simplify creating this service template, the cluster deployment scripts to be included in your service template have been tested and are provided in the SQLSSK download package. And the scripts in the Runbooks are tuned for the same structure and parameters as in Kurt’s post.
Here are the steps to create you own template and configure the cluster deployments :
1. Create a Service Template following Kurt’s guidance. More specifically:
- Your 1-Tier service template should include the Shared VHD feature
- The application scripts installing and forming the cluster should be added as “Application Configuration” entries.

“Cluster-InstallFeatures.ps1” should be used on all machines on the tier (node 1 and node 2). “Cluster-FormCluster.ps1” should be used only on the first node. “Cluster-AddNode.ps1” should be used only on the second node. These last two scripts are the ones from the blog post, saved in PS1 format and ready to use. The scripts run cluster validation, because this will be a requirement before installing SQL Server, as Kurt pointed out in his blog post.
When calling the Powershell scripts from VMM, you might have to set the Execution Policy first, or force a bypass, depending on your security requirements:

- After cluster installation, you might want to include a restart, as I have seen a few cases where the cluster name wasn’t always responding to PowerShell queries until after a first restart (the cluster name is being used to initiate the SQL Server cluster deployment).
- You can skip the SQL Server part in the post, since the SQLSSK Runbooks will deploy SQL Server after the service template has finished deploying and configuring the cluster nodes
2. Name your Service Template “SQLSSK Base Cluster”, or update the SMA variable “SQLSSK-Deploy-BaseClusterST” to reflect the name you chose
3. Change the value of the SMA variable “SQLSSK-General-AllowClusterDeployments’' to True (by default, this type of deployments are disabled, and the requesting user receives an email notification)
What if I want new clusters for SQL Server components, but only require default named instances?
(*) If you will only be deploying instances with the default MSSQLSERVER name, you could also directly use Kurt’s full SQL Server cluster template available in his second post, and soon also available through the WebPI feeds. You would just have to update the scripts in the Runbooks, to match this tweaked scenario.
Here would be the steps to do so:
- Import and configure Kurt’s template per the instructions in his post
- Update the “SQLSSK-Main-DB” and “SQLSSK-Main-Instance” Runbooks to remove the call to the “SQLSSK-Deploy-NewInstanceOnCluster” subroutine, since SQL Server deployment will have already been done as part of the template. Here is an example with the “SQLSSK-Main-Instance” Runbook:

3. Update the definition and the call to the “SQLSSK-Deploy-NewBaseCluster” subroutine (just before the SQL Server deployment subroutine in the previous screenshot), with the parameters expected by Kurt’s template, as you can see in the list below.
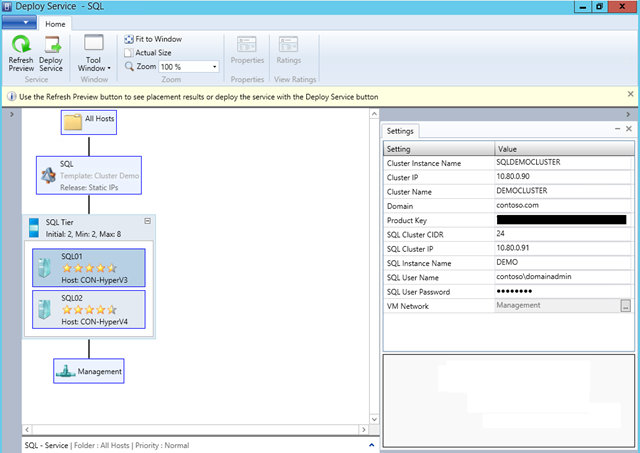
The “SQLSSK-Deploy-NewBaseCluster” subroutine already has the code to pass parameters to the Service Template, so it should be easy to duplicate and update these lines to match the new list of parameters. You would get most of these parameters from SMA variables or computed from the user request. Note that the “Cluster IP”, “SQL Cluster IP” and “SQL Cluster CIDR” parameters are only applicable if you choose to use the Fixed IP template from Kurt, which might imply more changes to the scripts (like getting the value from a location). So you may want to take it one step at a time at start with DHCP if you can.
Note : Only gotcha might be passing an encrypted value for “SQL User Password” to the service template creation, and this is how you would do it, assuming the password is stored as an encrypted string in a SMA variable named “SQLSSK-Deploy-SQLUserPasswordforNewClusters”: