Application Management – Clustering SQL Guest Instances in R2 – Part 2
In a previous post, I described how one might use Service Templates to leverage new features in System Center Virtual Machine Manager 2012 R2 to build a guest cluster with a Failover Cluster Instance installation of SQL Server.
In this post, I’ll be providing a downloadable sample that you can tailor to your environment and discussing resource preparation, template import, configuration, and deployment. With the information already provided in my previous post, you should have a clear understanding of deploying a SQL Server Failover Cluster Instance install in your environment using Service Templates. If you would like to use this template to deploy new SQL Server clusters as part of Bruno Saille’s SQL Server Self-Service Kit, some instructions are posted here.
The sample download is available here:
The process of deploying this template involves a few steps:
- Media Preparation
- Prepare the Operating System media
- Prepare the SQL Server media
- Account Preparation
- Create Run As accounts
- Sample Preparation
- Download the sample
- Extract the sample
- Copy the extracted files to the VMM Library Server
- Import the template
- Deployment
- Deploy the template
- Investigate the results
- Troubleshooting
- Service Settings
- IP Placement Issues
- Failover Issues
Media Preparation
The downloadable sample does not contain the media necessary for deployment. Before deploying, you’ll need two disk images to be present in you library.
Operating System Preparation
This template expects the Operating System of the VM to be Windows Server 2012 R2 Datacenter.
Note: The expected image is a full installation. If you instead choose to use a Server Core installation, check the SQL Server documentation for components that are not supported on Server Core. Additionally, you will need to edit the template to remove the Failover Clustering Management Tools (leaving only Failover Clustering and Failover Cluster Module for Windows Powershell). Additionally, you may need to pre-install the .NET 3.5 features on the disk image.
If you already have a disk image in your library that meets this requirement, you can use it. If not, you will need to create one. The basic process of creating such an image is reasonably straight-forward.
- On a Hyper-V host, create a new virtual machine.
- Start the virtual machine, and install the operating system.
- After the installation has completed, open an elevated shell.
- In the shell, run $env:windir\System32\Sysprep\sysprep.exe /mode:VM /oobe /generalize /shutdown
- Once the virtual machine has shutdown, you can copy the VHDX disk image into your VMM library and use it to deploy Service Templates.
SQL Server Preparation
The installation scripts included with the sample reference D:\Setup.exe. The expectation is to include a VHDX file containing the SQL Server installation media. First, create an empty VHDX image of approximately 10GB. This can easily be done on a machine containing the Hyper-V Module for Windows PowerShell:
| 001 002 003 004 005 006 007 008 009 | $driveLetter = "V"; New-VHD -Path SQL.vhdx -SizeBytes 10GB -Dynamic; Mount-VHD SQL.vhdx; $disk = Get-Disk | ?{ $_.FriendlyName -eq "Microsoft Virtual Disk" }; Initialize-Disk -Number $disk.Number -PartitionStyle MBR; New-Partition $disk.Number -UseMaximumSize -DriveLetter $driveLetter; Format-Volume -DriveLetter $driveLetter -FileSystem NTFS -Confirm:$false; copy -Recurse C:\Setup\* V:; Dismount-VHD SQL.vhdx; |
This is assuming the C:\Setup path contains SQL Server installation media (with Setup.exe), your V: drive is unused, and you don’t have any other disk images mounted. You may need to tailor this to your environment and may choose entirely different means to produce the necessary disk image (diskpart, diskmgmt.msc, etc). As long as the Setup.exe is at the base directory of the disk image, it should function as needed. After this, you can copy the SQL.vhdx disk image to your VMM library share.
Account Preparation
The scripts included in the sample will need to run as an account with particular credentials. Two accounts will be needed: a domain account and a local administrator account.
Local Administrator
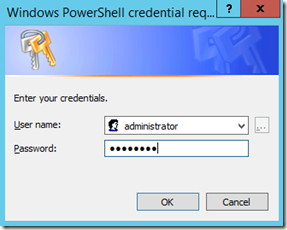
The local administrator account is necessary for preparation of the Operating System and serves as a means of setting the local administrator password. You may choose to create this account from within the VMM UI, or from PowerShell. In PowerShell, you can create an account by running:
| 001 | New-SCRunAsAccount -Credential $(Get-Credential) –Name "Local Admin"; |
After issuing this command, you’ll be prompted to enter credentials.
The username should just be ‘administrator’ and the password will be the password for the local administrator account on the VMs, which has not been set at deployment time. You can also create the credential object from the shell:
| 001 002 003 004 | $user = 'administrator'; $pass = ConvertTo-SecureString 'password!!123' -AsPlainText -Force; $cred = New-Object System.Management.Automation.PSCredential($user,$pass); New-SCRunAsAccount -Credential $cred -Name "Local Admin"; |
Keep in mind that running this from the shell will keep password in plain text in the shell history.
Domain Admin
For simplicity, this sample uses a Domain Administrator account (a domain account that is a member of the Domain Admins Security Group in AD). If you wish to use another domain account with lesser privileges, you’ll need to add a script that gives local administrator permissions to the VMs (this is not included in the sample). You can follow the instructions above or create the Run As account from within the VMM UI.
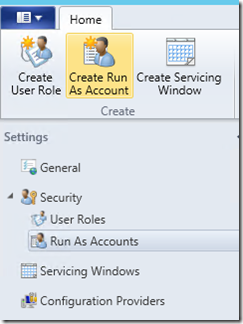
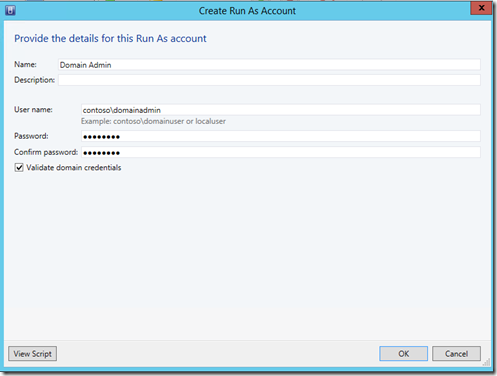
In the Settings Pane, click the Create Run As Account button on the Home ribbon to open a dialog box to guide you through account creation.
Simply enter the required information into the dialog box to create the account. If this domain account belongs to a domain that is in an isolated VM Network to which your VMM server does not belong, you’ll want to uncheck the Validate domain credentials checkbox.
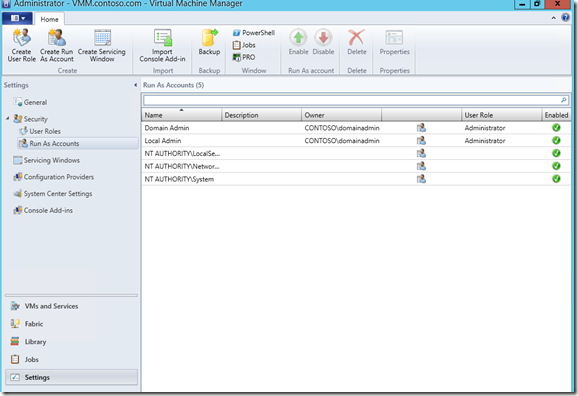
Once the accounts have been created, you can use them to deploy the sample.
Sample Preparation
The sample download is available here.
Extract the Sample
Once downloaded, extract the files to a location reachable by your VMM server. The sample contains the following:
Filename |
Description |
| README.docx | Instructions for using the sample content |
| Cluster\Cluster Demo.<TYPE>.xml | Sample template for deploying a Failover Cluster Instance of SQL Server |
| Cluster\Cluster Demo.<TYPE>\1.vhdx | Empty disk image used by cluster |
| Cluster\Cluster Demo.<TYPE>\2.vhdx | Empty disk image used by cluster |
| Cluster\Cluster Demo.<TYPE>\GuestClusterDemo.cr | Custom resource folder |
The <TYPE> in the table above is either DHCP or Static IPs. You should choose a deployment method appropriate for your environment. Note that deploying a the static IP version of the template will require the appropriate static IP pools to be present for your VM Network. The provided sample is built with IPv4 and would require some changes to support IPv6.
Move the Content to the VMM Library Share
The disk images and custom resource folder should be copied to the VMM library share. Once the library has been refreshed, the resources will be available for deployment. The default refresh interval is hourly, but a refresh can be run manually by executing Get-LibraryShare | Refresh-LibraryShare on the VMM server.
The GuestClusterDemo.cr folder contains the following files:
Filename |
Description |
| *.cmd | Start the PowerShell counterparts |
| Cluster\first.ps1 | Allocation of disks and creation of cluster |
| Cluster\rest.ps1 | Addition of subsequent cluster nodes |
| SQL\first.ps1 | Install SQL Server as a Failover Cluster Instance and add firewall openings |
| SQL\rest.ps1 | Add node to SQL Server Failover Cluster Instance and add firewall openings |
| SQL\first\SQL.ini | Base configuration for first SQL Server Failover Cluster Instance node |
| SQL\rest\SQL.ini | Base configuration for additional SQL Server Failover Cluster Instance nodes |
For more information about the context of these scripts, you can refer to my previous post.
Template Import
Once the resources are in place on the VMM Library Share, you’re ready to import the template. The simplest import mechanism is to use the VMM UI. This will show the mapping of resources in an simplistic format.
VMM will map any components that can be automatically discovered and ask you to specify the others. The following table depicts the necessary components:
Name |
Resource Type |
Description |
| Hyper-V | Capability Profile | Default Hyper-V Capability Profile |
| GuestClusterDemo.cr | Custom Resource | GuestClusterDemo.cr folder copied into Library |
| SQL.vhdx | Disk Image | SQL Server Installation Media (Not included) |
| Server2012R2.vhdx | Disk Image | Operating System disk, sysprep’d (Not included) |
| 2.vhdx | Disk Image | Blank disk, cluster volume for SQL Server installation |
| 1.vhdx | Disk Image | Blank disk, cluster witness |
| Domain Admin | Run As Account | Domain account with privilege to create cluster to AD |
| Local Admin | Run As Account | Local admin account (username ‘administrator’) |
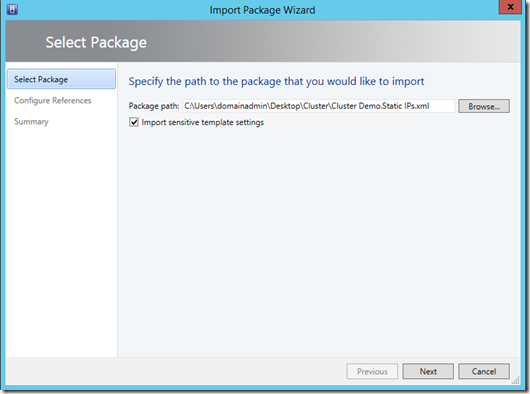
To import the template, click the Import Template button on the Home ribbon in the Library pane of VMM. This will open a wizard to guide you through the process. Click the Browse… button to locate the template file that fits your environment (either DHCP or Static IP). Ensure the Import sensitive template settings box is checked and click Next to continue.
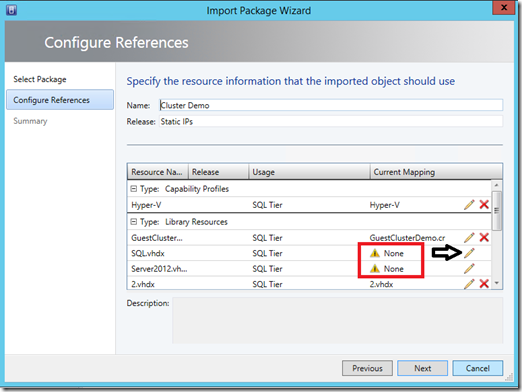
On the next page scroll through the reference mappings and populate any missing data by clicking on the pencil next to any component that lists None as its mapping:
After populating all reference mappings, click Next, and then Import on the next page.
Note: In this post, I’m importing the Static IP template. There are a few additional fields in the Static IP template and I will specify where the DHCP template differs.
After import, right-click the template and select Properties. On the Service Settings page, you’ll see a list of service settings. You can double-click any setting to see its properties, as listed in the table below:
Name |
Default Value |
Description |
| Cluster Name | DEMOCLUSTER | DNS Name of Windows Failover Cluster Instance |
| *Cluster IP | IP address of Cluster Name | |
| Domain | Domain VMs will join | |
| VM Network | VM Network to attach VM’s NIC to | |
| Product Key | Windows Server Product Key | |
| Cluster Instance Name | SQLDEMOCLUSTER | DNS Name of SQL Server Failover Cluster Instance |
| SQL Instance Name | DEMO | SQL Server Instance ID |
| *SQL Cluster IP | IP address of Cluster Instance Name | |
| *SQL Cluster CIDR | Subnet mask for SQL Cluster IP | |
| SQL User Name | Domain account for SQL Server User | |
| SQL User Password | Password for SQL User Name |
* = Setting only exists in Static IP template
All settings are mandatory, and the SQL User Password setting is encrypted.
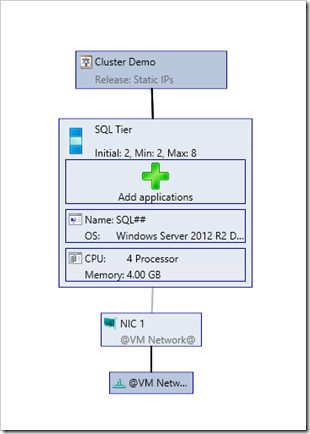
Feel free to open the Service Template Designer (right-click the template and choose Open Designer) to see its configuration:
Now, you’re ready to deploy!
Deployment
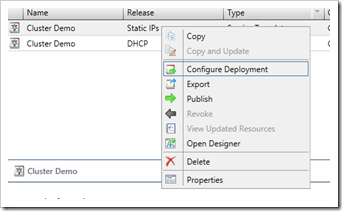
You can deploy the template by either clicking the Configure Deployment button in the Service Template Designer or right-clicking the template and selecting Configure Deployment from the menu:
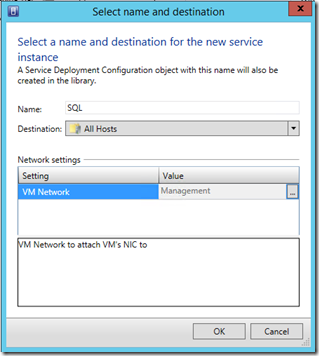
This will bring up a window to supply some information:
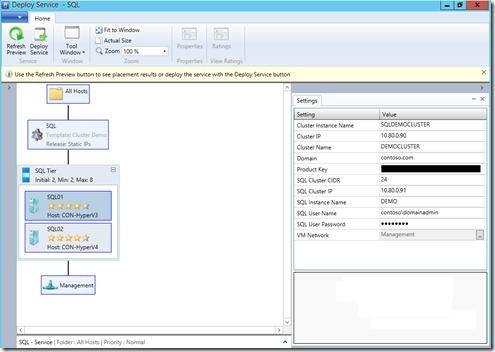
Provide a name for the Service Instance and click the ellipses button to select a VM Network, and then VMM will prepare an instance for deployment. In the Deploy Service window, add any necessary values for service settings, and click Refresh Preview to let VMM run its placement algorithms.
When you’re ready, click the Deploy Service button. The deployment may take a significant amount of time, depending on your environment.
Results
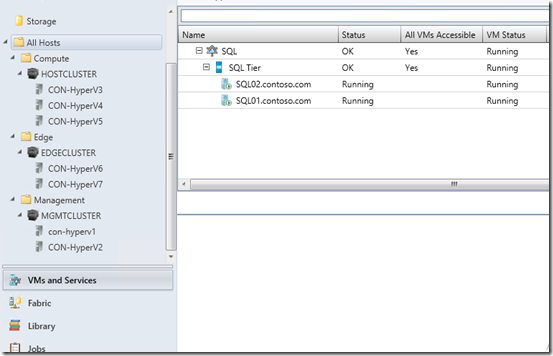
After the template has been deployed, you can switch to the VMs and Services pane in VMM, select the appropriate host group, and select Services from the Home ribbon to view the deployed service:
You can open a console to the first VM and view its logs in C:\ScriptLogs. You’ll see two sets of files: one for cluster setup and one for SQL Server setup. The stdout will be captured in *-out.txt and the stderr will be in *-err.txt. The error output should be empty on a successful deployment.
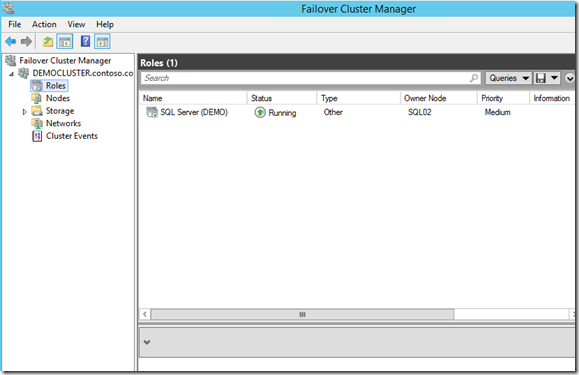
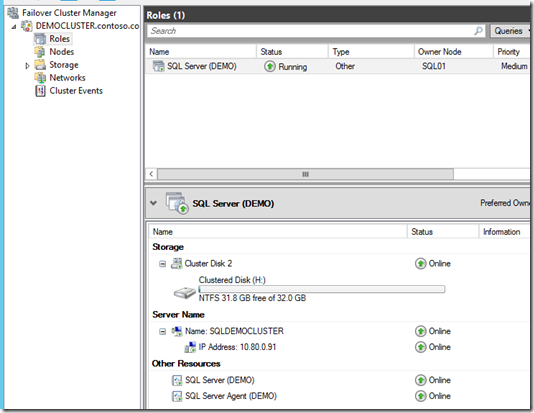
By opening the Failover Cluster Manager, you should see your cluster with a role for the SQL Server Failover Cluster Instance:
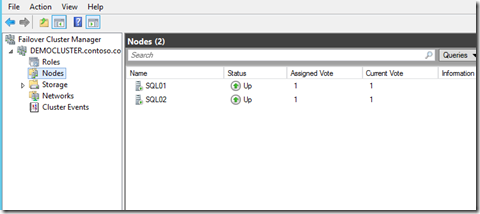
Both of the deployed VMs should appear in the Nodes view:
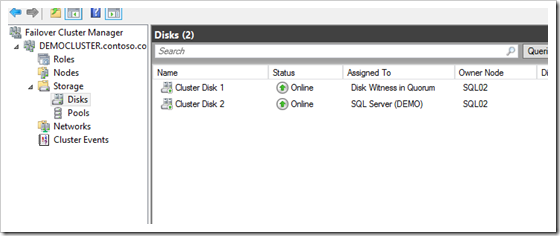
You should also see two disks in under Storage –> Disks: one cluster witness and one for the SQL Server instance:
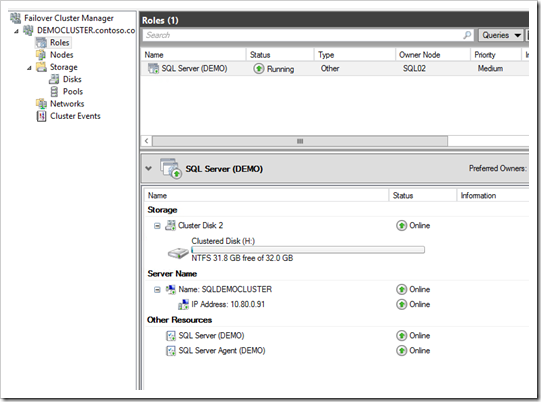
Going back to the Roles view, you can view the Resources tab at the bottom (after selecting the SQL Server role) and see its assigned resources:
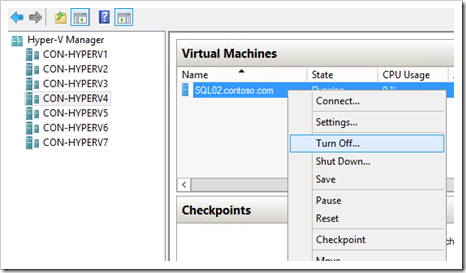
If you feel the need to test failover, you might unceremoniously turn off the active SQL Server node from Hyper-V:
Looking at the Failover Cluster Manager on the VM that wasn’t turned off, you should see the Failover Cluster Instance has moved to the other node:
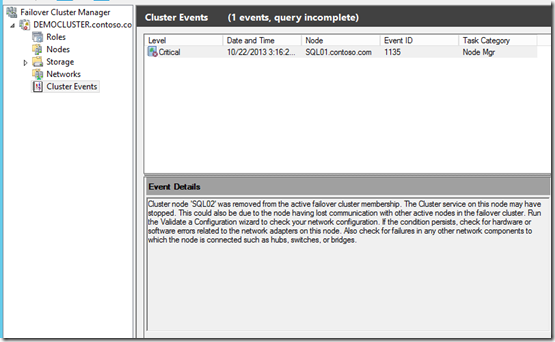
The cluster log will also show a critical error:
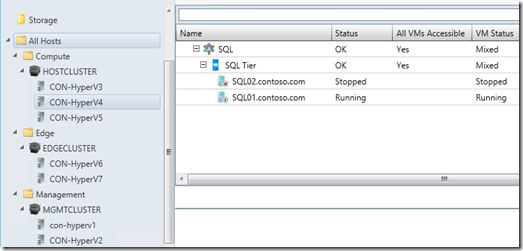
And the status of the service is visible within VMM:
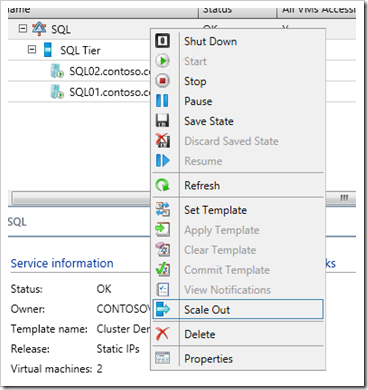
I deployed my VMs to a 3-node cluster, so I might want to scale-out the service to include another VM:
Note that this sample does not include any scripts for scaling-in the service. If you wished to add such scripts, you could add two scripts: one that removes a node from the cluster and one that deletes the cluster. The former would attach to Deletion: VMs Before Last and the latter to Deletion: Last VM.
That’s all for this sample. Enjoy!
Troubleshooting Tips
There are a few issues you might hit during deployment, especially as you start to customize this sample. I’ve outlined a few below to assist you.
Settings
You’ll want to be certain of the feasibility of the default values. For instance, if a machine already exists in your environment with the name SQLDEMOCLUSTER, the deployment will fail. VMM does not provide control logic to validate service settings, so you’ll need to do this yourself.
IP Issues in Placement
If you are trying to deploy the Static IP template, you will need to have the proper static IP pools configured in your network. If the network to which you’re deploying does not contain sufficient IP addresses, you may see placement errors:

Ensure that the VM network has sufficient IP addresses (if you’re using IPv6 and IPv4, you’ll need a static IP pool for each). If you’re deploying to an isolated VM network, ensure that you have the static IP pools for both the logical network and the VM network (in a dual-stack scenario, this will mean four total static IP pools).
Failover Issues
It’s important to mention that SQL Server does not support the AddNode action in parallel. This means that if you want to have a four-node cluster, you will need to serialize your deployment. That is, first deploy the two-node cluster, and then scale-out the VMs one at a time. If all four VMs are deployed in a single tier, VMM will deploy the first VM, and then deploy the other three in parallel, which will deploy successfully, but may cause the Failover Cluster Instance to inexplicably be unable to failover to some nodes.
If you wish to extend this template to configure a SQL Server Availability Group on top of the SQL Server Failover Cluster Instance, you should be aware that a SQL Server Failover Cluster Instance will not allow automatic failover of the corresponding SQL Server Availability Group. This can be a great way to provide disaster recovery, but you should be aware that moving the Availability Group to a secondary replica in the event of failure will require manual intervention.
General Troubleshooting
If deployment fails, there are a few steps you can follow to find the root cause. Troubleshooting of placement issues or file copy issues is beyond the scope of this particular post, but I’ll try to lead you through the steps to investigate issues on the assumption that the VMM server was able to create the VM.
Failure Before the Scripts Begin
If the failure occurs before the application scripts begin, you should investigate the VMM logs. Since VMM uses an answer file to complete Sysprep configuration, that should be your first starting point. Generally, you can find the answer file at $env:windir\Panther\unattend.xml and you can view logs at $env:windir\Panther\UnattendGC\*.log. This could give you insight into the post-configuration steps that failed.
Script Failures
I’ve tried to construct the scripts in a way that is easy to troubleshoot. The C:\ScriptLogs directory should contain necessary information on why any particular step might have failed. The next step would be to run the script manually. When a VM is deployed, the payload for the script is copied to $env:SystemDrive\ProgramData\VirtualMachineManagerData\TempResources\<GUID> , so you can try running the scripts from there to troubleshoot.
DNS Resolution Errors
In some environments, there may be an AD or DNS propagation delay. If this is the case, you might want to adjust the scripts to wait for DNS resolution before proceeding with joining subsequent nodes to the cluster.

