Exchange Server 2013 CU2 Service Templates - Prerequisites
This blog post is part 2 of 3 in a series.

This series of posts details how to deploy Exchange 2013 CU2 using Service Templates in Virtual Machine Manager. If you are just landing on this subject I recommend starting with Part 1. This page will focus on what you need to do in advance to prepare your environment.
| Blog Series: Table of Contents |
Part 1 – Philosophy/Overview – Define scope and assumptions. Part 2 - Prerequisites – Document any unique pre-work and link to all downloads that should be ready before getting started. Part 3 - Setup the Service Templates in VMM and Best Practices – Document the process to setup and configure the service templates in VMM. Exchange Server 2013 Service Templates for System Center Virtual Machine Manager |
Prerequisites
There are pre-requisite downloads to build out everything you need, and then you need to pre-stage that content inside a VHDX file in the VMM library so that it can be used by the template. Unfortunately this is not a 1-click import. We are going to walk through every step together in detail but as a result, this is a long article. Don’t be afraid!
Working Assumptions
Before we get started, I want to be clear about the groundwork. I am working under the assumption that you have Hyper-V, XenServer, or VMware, and you have System Center Virtual Machine Manager 2012 R2 installed with a Library available and a VM template based on Windows Server 2012 RTM. If not, I would direct you to the TechNet resources for VMM as a starting point. Adding those steps would force me to more or less re-create their documentation!
Virtual Machine Manager
https://technet.microsoft.com/en-us/library/gg610610.aspx
I am creating your go-to source here, so you can always come back to 1 place if you need to rebuild.
First - Download Files
You need to download 2 prerequisite executables from the Microsoft Download Center.
Unified Communications Managed API 4.0 Runtime
https://www.microsoft.com/en-us/download/details.aspx?id=34992
Office 2010 Filter Packs (64 bit)
https://www.microsoft.com/en-us/download/details.aspx?id=17062
You also need Exchange 2013. You can download the RTM build from MSDN, but I recommend going directly to the Cumulative Update 2 installation. It can be used either as an upgrade or as a full install, so you might as well build on the latest code. I am linking you to the Exchange CAT team’s blog that references the download so that if they ever need to make a correction, you are going to the guys in the know.
Now Available: Updated Release of Exchange 2013 RTM CU2
https://blogs.technet.com/b/exchange/archive/2013/07/29/now-available-updated-release-of-exchange-2013-rtm-cu2.aspx
Finally, there is a security update available for CU2. The Exchange setup.exe understands how to patch the installation prior to install. All you have to do is copy the update to a folder. Again, let’s start with the latest code.
Security Update For Exchange Server 2013 CU2 (KB2874216)
https://www.microsoft.com/en-us/download/details.aspx?id=39904
Second - Create a formatted, fixed size VHDX file
We need to create a blank virtual hard disk to home the installation files, the Exchange DB, and logs. If you want to review storage practices (and if you are building more than a test lab, you should) I recommend the TechNet article below as well as the PDF linked at the beginning of the article, which goes in to great detail. Even in a Single Server Architecture, storage will be key to performance.
Exchange 2013 Virtualization – Exchange storage requirements https://technet.microsoft.com/en-us/library/jj619301(v=exchg.150).aspx#BKMK_ExchangeStor
I recommend a Fixed Size VHDX. You can do this via Disk Manager in Windows or via PowerShell if you have the Hyper-V cmdlets available. To keep things moving, I will provide the workflow from the UI.
Process to create a new blank VHDX file:
- Run - DiskMgmt.MSC
- Action Menu - Create VHD
- Populate the form according to your environment but make sure you choose Fixed Size, NOT Dynamically Expanding. I would recommend 40 GB at minimum but you may require much more if this environment will host production Exchange DB and Logs. I also recommend VHDX as the format.
- Right click on the new disk and choose Initialize Disk. MBR is fine.
- Right click on the shaded portion of the new disk item and select New Simple Volume…
- Walk through the wizard selecting the full size of the disk, assign a drive letter, and perform a Quick Format.
Third - Add the files you downloaded to the new virtual hard drive
I have tested this solution in many different permutations. Unless you plan to use UCMA or the Office filters for other applications (in which case a VMM custom resource would be in order) and since we are already planning to have a data drive for the servers, my recommendation is to just stage the installations in the VHD for the data drive and call them from there. In 2012 you can mount the VHD file and modify it easily. Simply double click on it and it should launch a new window. To detach it you can open Explorer, right click on the drive icon and select ‘Eject’.
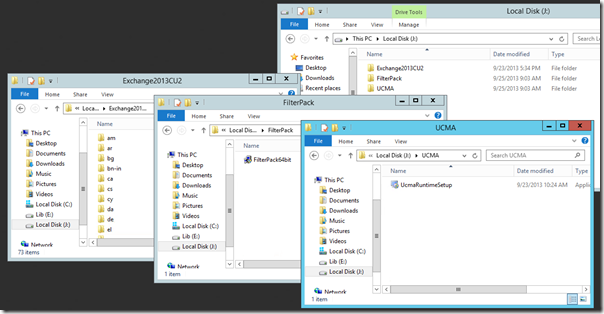
For the folder and files, please create this structure and stage each set of content so that the parameters in the template do not require modification:
<driveletter>:\Exchange2013CU2\
<driveletter>:\UCMA\
<driveletter>:\FilterPack\Then create a new subfolder under Exchange 2013CU2 named “Updates”.
Copy the content you downloaded in to each respective folder. You should have something like this:

The last step is to copy the new VHDX file to the VMM library in the folder of your choosing.
You only have to do that once! Now that you have a prepared VHDX file you can use it for any Exchange servers you create using the service template.
FINALLY - Refresh your VMM library
This is just a good idea to move things along after you have added the item above. Note that you need to run this from the VMM shortcut to PowerShell so the VMM cmdlets will be available.
| 001 | Get-SCLibraryShare | Refresh-SCLibraryShare |
Next
You now are prepared to import the service templates for Exchange! Please proceed to Part 3 – Setup and Best Practices. I know it is a lengthy post but details count. If you feel lost, I have recorded a full length walk-through. I would recommend you skip to the place where you would like a visual aid. I have included bookmarks to help.
[View:https://www.youtube.com/watch?v=juutEgj_Hlk&feature=youtu.be]